


SUUNTOブログ

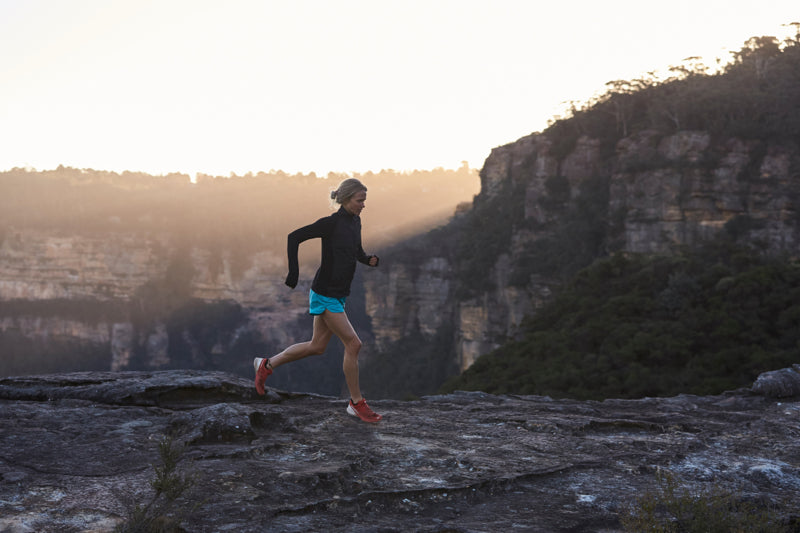
6 tips for XC skiing with your Suunto
If you’re enjoying a white winter and out skiing a lot, there’s some simple things you can do with your Suunto watch and Suunto app to find nice tracks to explore and train more effectively. Read on for our six tips!
Find the cross-country ski tracks
Ok, first step: where to ski? You might know where your local tracks are but how about exploring somewhere further? Based on millions of workouts, Suunto Heatmaps in Suunto app show where the Suunto community loves to train across the planet. Simply select the cross-country skiing heatmap and see where the glow is. On Suunto app go to the map view on Suunto app and select ‘cross-country skiing’ in the heatmap options.
Wear your watch on top of your sleeve
While wrist heart rate is super handy during the warmer seasons you may want to take a different approach during the colder months: wear a Suunto Smart Heart Rate Belt for precise heart rate readings and wear your watch on top of your sleeve for more comfort in the cold. A heart rate belt is useful also when tracking swimming, swinging a kettlebell or if you want to use a Suunto Bike Mount and still get your HR data.
Get automatic lap times
Have you tried any of the SuuntoPlus features yet? They offer some great additional benefits for Suunto 9 and Suunto 5 users. SuuntoPlus Loop is a must for cross-country skiers: it automatically takes lap times for you!
Simply select the Loop feature in the options before starting your exercise. Your watch will record the starting point and when you pass this point later during your exercise, you have done a loop. You can also start a loop manually by pressing the lower right button at any stage, making this spot the start point of the loop. Learn more about SuuntoPlus Loop for Suunto 9 here and for Suunto 5 here.
Turn on the backlight
Mid-winter skiing sessions – at least up here in Finland – often mean skiing at night. To make it easier to check your exercise data, it’s useful to turn the backlight of your watch on. To do this, select ‘cross-country skiing’, go down to ‘options’ and turn the backlight toggle on before starting the exercise.
Where’s the next feedzone?
A route is not always needed for a cross-country ski tour but creating one could still be useful: you can add waypoints along the route and – as you go – see the distance to the next one. This comes in handy on long ski tours or during long-distance races: you can, for example, mark feedzones and know exactly when they are approaching.
Click to learn how to create routes and waypoints using Suunto app.
See the data you want
Your Suunto watch has over 80 sport modes out of the box, but you still can customize it and create more. Custom sport modes are created in Suunto app. Select the display option based on the amount of data you want to have on a single screen and then populate the data fields with anything from the obvious, like heart rate and distance, to more detailed ones, like sunset time or the remaining distance to the next waypoint. Click to learn how to create custom sport modes using Suunto app
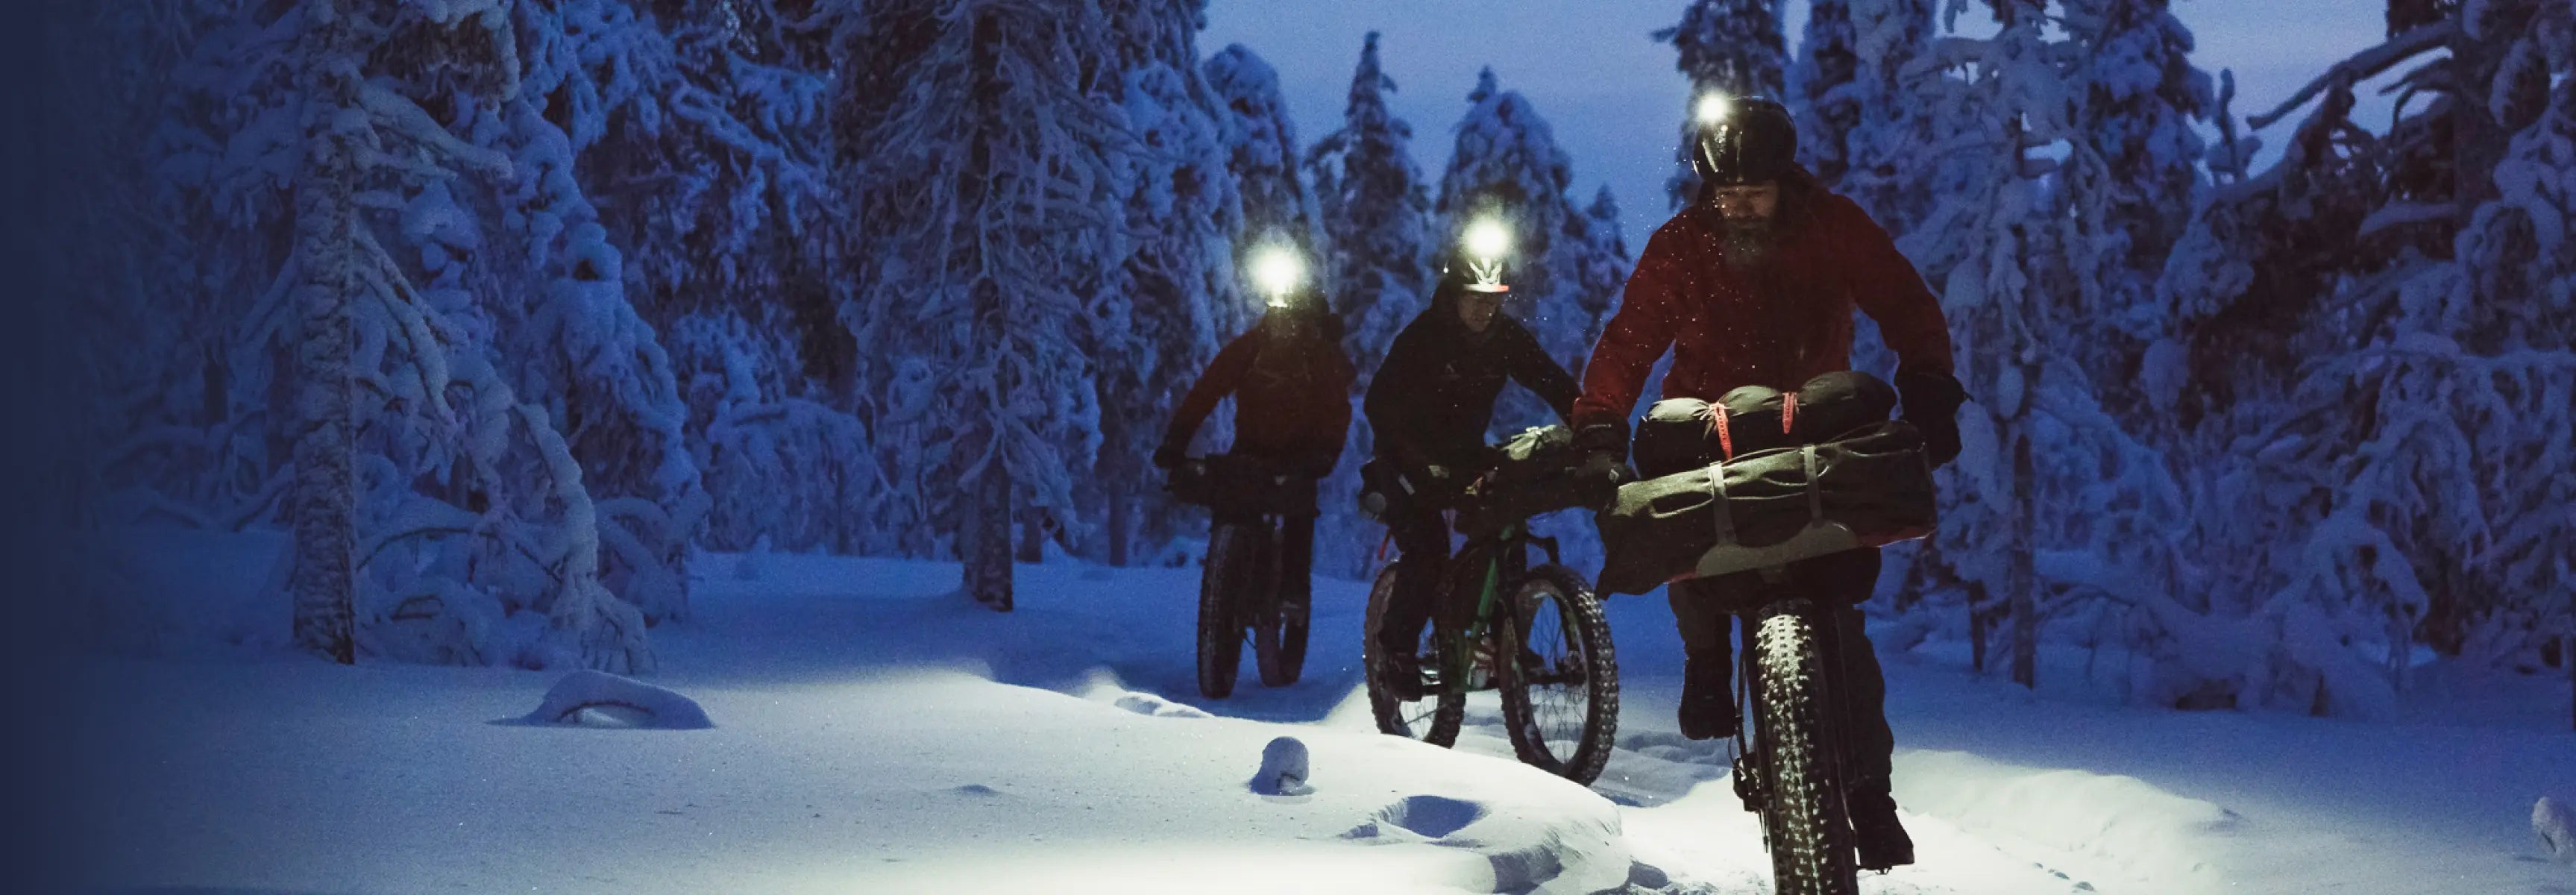
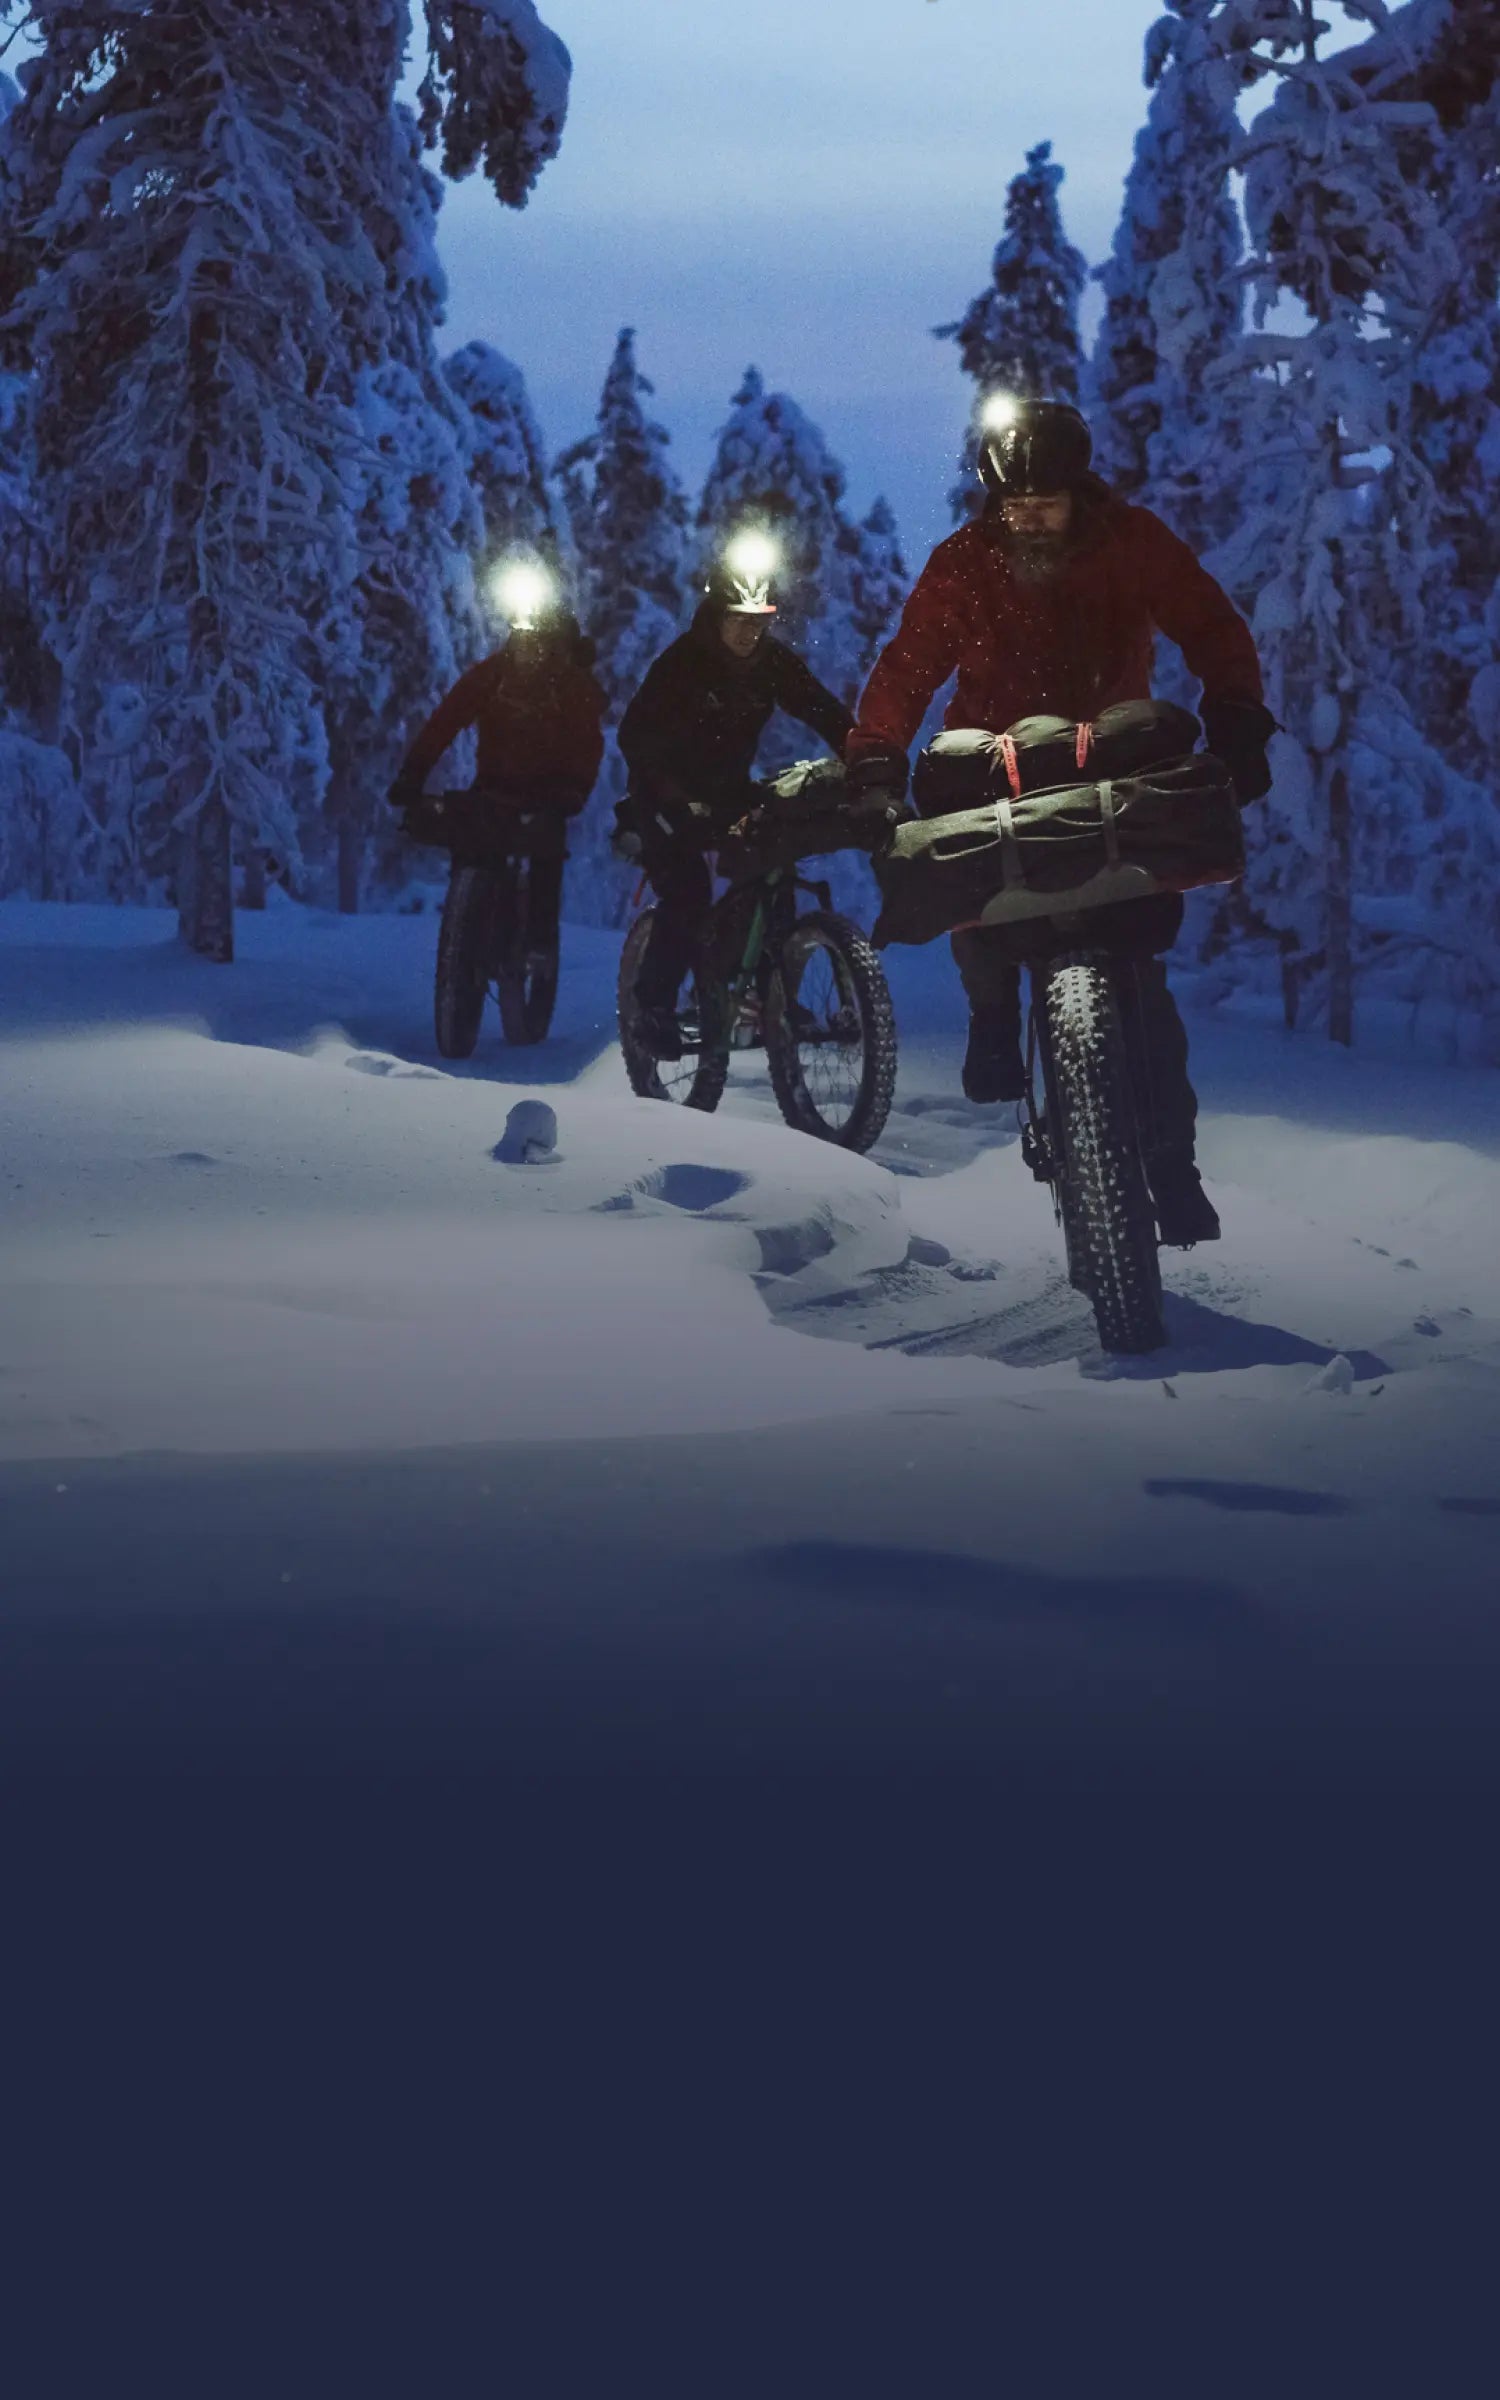
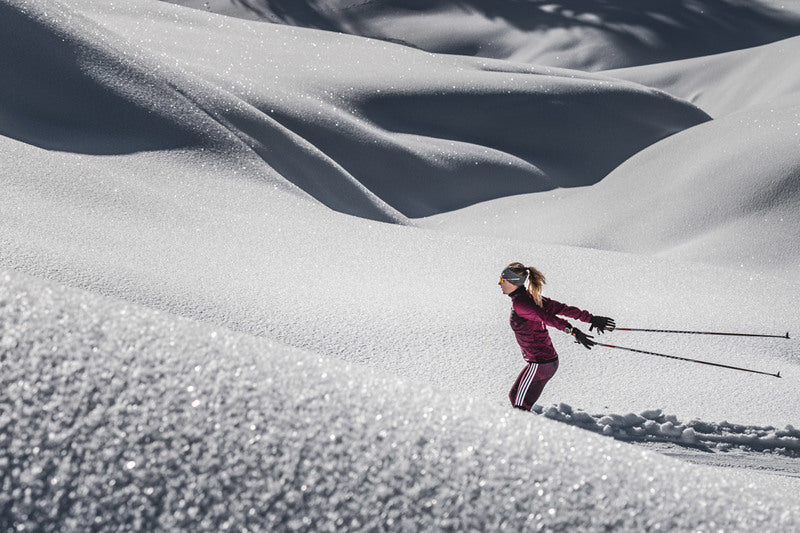
Action images by @terrgraphy, skiing by @cajaschoepf

Sustain your Ability
Suunto athlete Lucy Bartholomew has published a book of her favourite recipes. Called Sustain your Ability, available in print and as an ebook, the plant based cookbook is loaded with delicious meals and treats designed to keep active people fuelled and thriving.
“These are all recipes I’ve used to pursue my athletic pursuits from the age of 15 when I started, says Lucy, now 24. “I made the book for people who are trying to sustain an active lifestyle. I was going to call it ‘sustain’ which means to nourish, to thrive, to continue to live, and ‘sustainability’ is the ability to do that for yourself. So it’s for people who want to live a consistently sustainable life. This isn’t a book with some sort of dietary fad – like ‘follow this diet for one month and you'll reach peak fitness’ – it’s for those who are passionately dedicated to being active in the outdoors.”
Now available for download, the book was three years in the making. A self described foodie, Lucy initially posted her favourite recipes on her blog and shared them via social media. Then the COVID-19 pandemic hit and the Melbourne based runner suddenly found herself in lockdown, and prohibited from travelling more than five kilometers from her home.
“I was thinking I’ve got to have a goal during this time otherwise I will lose motivation,” Lucy says. “COVID gave me time at home with a kitchen, it gave me time because I wasn’t training as much which also gave me a lot of energy. It was a nice distraction. It kept my dad and I very full.”
While all the recipes are plant based or vegan, Lucy says they are easily adaptable for people who eat dairy products or meat. “The recipes have been inspired by my travels,” she says. “After Western States in 2018 I went to Mexico where I learned about the culture and the way they make things. Then I went to Nepal and that’s where the dal recipes came from. The meals these places produce are made with ingredients that aren’t super rare or expensive, they normally consist of rice and beans.
“They are all meals I enjoy before, during and after runs,” Lucy continues. “It really shows how after nine years in the sport and the fact I still love it is because I’m able to be sustainable in the way I approach it, just like the way I eat.”
Read more articles
9 bits of positivity from a crazy year
10 must-read Suunto articles from 2020
7 tips for running in the rain


Skimo legend Greg Hill shows his trainer some love
Suunto ambassador and record breaking ski mountaineer Greg Hill has achieved some incredible things; skiing two million vertical feet (609, 600 m) in a single year, climbing and skiing over 190 mountains, his inspiring Electric Adventures challenge in which he has so far climbed 100 summits without using any fossil fuel. On top of this, add to the list being an awesome dad, and a voice for climate change action.
Yet, behind every elite athlete, is at least one trainer who helps to keep the fire burning and things progressing in the right direction. This is true for Greg who has had the same highly sophisticated trainer for the last 21 years. When the COVID-19 pandemic hit, Greg had the time to sit down and reflect on this relationship.
Thanks to my trainer
By Greg Hill
As Covid hit, we all sat back and reflected on our lives. What I reflected on most was my relationships and their importance. Of course, there were family and loved ones which are the most important. Yet, there were also others whose importance in my life became obvious. Relationships with co-workers, neighbours and, now that I think about it, a long-lasting relationship with my personal trainer.
I should introduce myself. I am Greg Hill, a super passionate backcountry skier. This passion has driven me to find first descents, push endurance records and explore places like no one else. My passion lies in pushing into the unknown; be it the physical or the mental landscape.
I first met my trainer in a parking lot in Whistler in 1999. It was a moment fated by the stars. I knew I needed a trainer, but I never understood how important the relationship was going to be. This began right at the start of my obsession with vertical travel in the mountains. I knew little, but dreamed big. How could I push and evolve my skills without a proper trainer? Most likely I wouldn’t have accomplished any of my goals without this connection.
I had no idea how much this relationship was needed, but we hit it off right away. The moment I was told how fast I was moving upwards, I wanted to excel and push that number higher. With my days being diligently tracked I pushed higher and further for hours. Multiple summits, long, long days, bigger days than I had ever done before. Always the incessant qualifying of my efforts, always the numbers telling me how hard I was working. It was addictive being accountable.
Our relationship developed into one of trust and commitment. I was pushed and driven to higher numbers and heights, always keeping track of my times, urging my vertical speeds faster and faster, always wanting me to go higher and further; 30 vertical feet a minute, come on you can do better, 50 feet a minute, that’s it … hold on… push and push… you've got this!
One of my first goals was to max out how much I could do in a day’s effort. We diligently worked on getting my one hour vertical as fast and high as possible. My trainer coached me to a point where I could glide and slide my way uphill very fast for an hour at a time. He watched me hit personal best after personal best. Always keeping track and letting me know how well I had done. Or poorly depending on the day.
Eventually with this coaching we saw the numbers get higher and higher, 10k, 20k, 30k, 40k in a day. Finally, my biggest vertical day ever, 50 000 feet (15, 240 m) in 23.5 hours. My coach kept those numbers and I was proud. Yet we knew we had more to do … lots more.
For many years we worked at doing 3000 m days as fast as possible, pushing and working my fluidity until it felt normal to go out for four to five hours and log 3000 + meters of uphill travel.
As a team, we worked up to one million feet in a winter, then eighty days over 3000 m in a season. Finally, we decided it was time for my biggest year ever. With my coach at my side at all times, I felt like we could challenge the world.
As scared as I was of the audacity of the task, I knew that together we could make it happen. My drive and the constant progress reports would keep me motivated. The year was going to be all about getting out every day and moving up and down mountains. For 365 days I went to bed with my trainer beside me. Immediately on waking I was told how much vertical I had climbed up to that point. It took exactly 270 days out of 365 to push my numbers over the two million feet (609 km) mark but it was the endless support and drive of my trainer that kept me getting up in the morning.
Greg celebrates back in 2014 after completing his March Madness, skiing 100.000 meters of vertical in a month. His trainer played a key role also in this challenge!
In the last 10 years the information has changed and there is so much more that I get from my trainer: GPS lines that show the adventures with distances, apps that have all my efforts on them. I am even told how much time to relax between training sessions, though I find this one hard to follow!!
These days my trainer captures all my efforts to stay off my “dad bod” and keep pushing my personal limits. High intensity training is key to pushing back against the effects of age. Now I am pushed hard for two minutes, then slow my heart rate down, then back up for two minutes, pushing hard into the 90 % of effort range. My heart rate is watched, recorded and displayed. I know if I am pushing hard enough to lose these love handles.
By now it may be obvious the trainer I met in the parking lot in Whistler was my first altimeter watch. It has been an incredible time, using it for endless hours of quantified fun. I can honestly say that without the constant updates, and the evolution of these watches, I most likely would not have been as obsessed and pushed to excel in my life.
All images: © Bruno Long
Read more articles
14 tips for backcountry skiing this winter
10 must-read Suunto articles from 2020
7 tips for running in the rain


14 tips for backcountry skiing this winter
With many ski resorts closed this winter due to the pandemic, the backcountry is our one and only saviour. It means hard work, more exploration, memorable adventures, and an opportunity to burn off all those Christmas calories. Crucially, it also means more risk.
We caught up with mountain guide, alpinist, photographer and passionate outdoor educator Mark Smiley about where our heads should be at this ski season. The upshot is if we’re going to be spending a lot more time in the backcountry, then we need to be refreshing our skills now so come pow time we can bring our A game, and not wing it.
To help Suunto users skill up for winter, Mark’s offering a $50USD discount on his new Comprehensive Guide to Avalanche Safety course. The offer expires at midnight on December 20.
Read on for Mark’s 14 tips to ensure you have an awesome and safe backcountry ski season.
Get your gear now
It’s been a difficult year. Aside from the human and social cost, Mark points out the pandemic has also disrupted supply chains and product distribution. This could mean there’s isn’t the normal level of gear in stock, so it might run out quickly as snow starts to fall.
“Make sure you have the gear, or go out and buy it now before people make a big run on it,” Marks says.
Know how to use that gear
Next up, make sure you know how to use that gear. “I mean really know,” Mark says. “Consider doing a refresher course to ensure you’re skilled up for the winter.” Be a student of the sport by signing up for one of Mark’s online courses designed to make you a safer, faster, smarter skier.
Remember avalanches play for keeps
Heading out into the backcountry is a serious business. “It can be life and death out there,” Mark says. “Don’t approach it in a cavalier way.” Take it seriously and ensure your head is screwed on. Your loved one’s will thank you for it.
Improve your avalanche skills at a beacon park
Mark strongly advises you and your ski partner to go to a beacon park to improve your search and rescue skills. That way when it’s time to head out into the hills, you’ll truly know what to do in an avalanche emergency and feel more confident. If you don’t have a beacon park nearby, get out in the snow with your friends and play around with your transponder kit.
Realign your expectations
With resorts closed, you’re not going to be gliding down manicured slopes all day. Backcountry skiing is hard work, maybe 75% perspiration, 25% inspiration.
“At the resort you're going to ski down hill like a 1000 times,” Mark says. “Much more than you will backcountry skiing, which is great for keeping the winter weight off!”
Keep that in mind and plan your adventures accordingly.
Pick objectives that match your skill level
Know your skill and experience level, and carefully, maturely, sanely choose tours that match it. Don’t put you or your partner in situations you’re not trained for. If you choose well, you’ll have an awesome time, and will come home with cool video to share.
“And if you’re just starting out, you need to pick non avalanche terrain,” Mark cautions. “There are off piste spots in the backcountry where there will never be an avalanche and you can safely ski in that terrain. Look for gladed slopes with a 25° gradient or less. It can still be a lot of fun to ski those!”
Do your homework
If an area takes your interest, study it thoroughly before heading there to shred. Study the topographical map, read trip and weather reports, contact the local avalanche center and get the what’s what. Find out where the sweet spots are, as well as where the best avoids, and the stay clears are.
“There’s no silver bullet instruction that will allow you to go out and have no risk,” Marks says. “You need to do your homework and never stop learning and educating yourself and keeping in mind that risk is inherent to the activity.”
Find the right partner
Backcountry skiing means heading out with one ski partner at the very least. Choosing the right ski partner for you is important. You want someone who has a similar level of experience, skill and fitness.
“It’s not important how fast or slow you are, but more about matching your abilities with your partners abilities that makes for great partnerships,” Marks says. “Then you can have cool experiences and learn together.”
Look for new lines up
With potentially a lot more people out in the backcountry this ski season, it means the usual skin tracks up will probably become much more well trodden.
“Most slopes will have a standard skin track that has been used in the past most of the time,” Mark says. “If there’s increased traffic, then that skin track might be exposing you to avalanche hazard from above. Be ready and able to take a different track up to avoid that.”
Read our article 7 tips to find a safe track up the mountain.
Watch out for fatigue
Remember the backcountry demands much more of you than skiing at a resort. So factor your fitness and endurance level into how you plan your trips.
“Fatigue is a huge factor because it can blur good decision making,” Mark says. “It can turn it from choosing what’s the best in terms of risk assessment into what’s the easiest. You need to make sure you have the fitness reserves to be willing to put the skins back and correct a potential error. You don’t want to be out with someone who’s much faster than you, forcing you to be in intensity zone four most of the day.”
Read about intensity zones here.
Slide your skis
“The movement of ski touring isn’t an inherent skill,” Marks says. “It’s like learning how to surf or swing a golf club – it takes time. There’s a right and wrong way to do it. And if you do it right, it’s way more enjoyable.”
For example, the action of trudging up the mountain can result in epic blisters if done poorly. When you skin your way up, Mark advises to try to slide your skis along the surface of the snow, rather than lifting them off. Sliding them is more efficient, reducing fatigue.
Grams matter
“Lighter packs equal enjoyable tours,” Mark says. “Carry only what you need and leave the rest at home.”
And even if your jacket is made of alien technology, when you’re out ski touring it won’t breathe fast enough.
“You’re going to get really hot, so take that jacket off, and make it more enjoyable for yourself,” he says. “You don’t want to make yourself all sweaty.” Pack it, and only use it to maintain your body warmth when you take breaks.
Share your observations
Be a backcountry angel, and share any avalanche observations with the local avalanche center. This helps to give the forecast as much relevant data as possible, which contributes to keeping people safe.
“A recent avalanche is the biggest, most important piece of data for forecasting,” Mark says. “You don’t need to know all the technical jargon; If you see an avalanche, try to take a 10 second video of it, note the location, and submit that observation to your local avalanche center when you get home.”
Debrief your trips
There’s always something to learn, always a way to get better. Mark points out two important principles to keep in mind: just because you got home safely doesn’t mean you did things right, and “past performance is no guarantee of future results”. Debriefing after trips is a way to keep yourself honest about the risk you are exposing yourself to, and the quality of your decision making.
“Get into the habit of asking yourselves, ‘did we make good decisions today’?” Mark suggests. “Or did you just get lucky? And if you just got lucky, a subsequent question to ask is, ‘when were we most exposed?’. And ask yourself, if you had Groundhog Day how would you lessen that exposure next time?”
All images: © Mark Smiley
Read more articles
8 avalanche safety checks to tick off before the ski season
Know the ropes – staying safe with crevasse rescue online
7 tips to find a safe track up the mountain

Five Adventure Starter Packs up for grabs!
If you love adventure like we do we want you to show it by sharing an awesome image from one of your recent trips on Instagram. Share your adventure pride, and you have a chance to get kitted out for your next trip: we have five Adventure Starter Packs to give away, each worth over 1350 euros!
Each starter pack includes a Suunto 9 GPS watch, an Arcteryx Alpha AR 20 backpack, an Insta360 action camera, a Jetboil portable stove and Oakley Clifden sunglasses. You’ll be ready to hit the trail!
How to enter:
1. Post an adventure image with text explaining what your best outdoor adventure has been or what your dream outdoor adventure would be. 2. Tag #adventurestartshere and #suunto, #arcteryx, #insta360, #jetboil, #oakley in your copy text. 3. Follow @suunto We’ll choose the 5 most inspiring posts among those tagged with #adventurestartshere plus #suunto #arcteryx #insta360 #jetboil and #oakley, and send the adventure gear their way soon after. Contest ends on November 23 at 8 am GMT. The most inspiring posts will win. Good luck! Terms and conditions apply. Read them here.


登山やトレイルで天気を確認する方法|Suuntoウォッチで気圧・日没・ストームアラームを活用
登山やトレイルランニングでは、天気の変化が行動計画に大きく影響します。
出発時は晴れていても、山では急に雲が広がったり、風が強くなったり、雨に変わったりすることがあります。特に標高の高い場所、稜線、長時間のハイクでは、天気や気圧の変化を早めに把握することが大切です。
SuuntoのGPSウォッチには、アウトドアで天気の変化を確認するための機能があります。気圧傾向、ストームアラーム、日の出・日の入り、気温、高度、天気予報などを活用することで、山での判断をサポートできます。この記事では、登山やトレイルで天気を確認するために役立つSuuntoウォッチの機能と、実際の使い方を紹介します。
登山やトレイルで天気確認が重要な理由
山の天気は、平地よりも変わりやすいことがあります。
登り始めは晴れていても、標高が上がるにつれて気温が下がったり、風が強くなったり、ガスが出たりすることがあります。雨や雷、強風、日没の早さは、登山やトレイルランニングの安全に直結します。
山の天気は変わりやすい
登山やトレイルランでは、天気予報だけでなく、行動中の変化にも注意が必要です。
気圧が下がってきた。
風が強くなってきた。
雲が厚くなってきた。
気温が思ったより低い。
こうした変化に早めに気づくことで、休憩場所を変えたり、行動時間を短くしたり、引き返す判断をしやすくなります。
日没・気温・風も行動判断に影響する
山では、日没時間も大切な情報です。
特に秋冬や標高の高いエリアでは、日が落ちると一気に気温が下がることがあります。ヘッドライトを持っていても、暗くなってからの行動はリスクが高くなります。
天気、気圧、気温、高度、日の入り時間をあわせて確認しておくことで、無理のない行動計画を立てやすくなります。
Suuntoウォッチで確認できる天気・環境情報
Suuntoウォッチでは、モデルやソフトウェアの対応状況に応じて、アウトドアで役立つ天気・環境情報を確認できます。
対応するSuuntoウォッチでは、ウィジェットから現在の高度、気圧、気圧傾向、気温などを確認できます。山での行動中に気圧や高度の変化を手元で見られるため、天候変化やペース配分の判断に役立ちます。
気圧傾向
気圧傾向は、天気の変化を知るための参考になります。
一般的に、気圧が大きく下がると天候が崩れるサインになることがあります。登山中に気圧の変化を確認できると、雨や風の変化に早めに気づきやすくなります。
ストームアラーム
ストームアラームは、急な気圧低下を知らせる機能です。
Suunto RaceやSuunto Verticalでは、ストームアラームを有効にしている場合、3時間で気圧が4hPa以上低下するとアラームとストームシンボルで通知される仕様です。
日の出・日の入り
の出・日の入りの時刻を確認できると、登山やハイキングの行動時間を管理しやすくなります。
Suunto Verticalでは、日の出・日の入りアラームとストームアラームを設定でき、日の出・日の入り時刻とアラームにはGPS取得が必要とされています。
気温
気温の確認は、ウェアや防寒対策の判断に役立ちます。
ただし、腕に着けているウォッチで気温を測る場合、体温の影響を受けることがあります。正確に外気温を確認したい場合は、ウォッチを腕から外してしばらく置くなど、測定環境に注意しましょう。
高度・高度計
高度は、現在地の標高や登下降の目安として役立ちます。
登山では、地図上の標高やルートの高度差と照らし合わせることで、現在どのあたりまで登ってきたか、残りの登りがどれくらいあるかを把握しやすくなります。
天気予報
対応モデルでは、ウォッチ上で現在の天気や予報情報を確認できます。
対応するSuuntoウォッチでは、天気ウィジェットから現在の気温、風速・風向、天気の状態などを確認できます。さらに詳細な天気情報も手元で確認できるため、登山やトレイルランニング中の状況判断に役立ちます。
気圧傾向とストームアラームで天気の変化に備える
登山やトレイルランでは、天気予報だけでなく、行動中の気圧変化も確認しておくと安心です。
気圧が安定しているのか、下がり続けているのか、急に変化しているのかを見ることで、天候変化のサインに気づきやすくなります。
気圧が下がると天気が崩れるサインになることがある
気圧が下がると、雨や風など天気の変化につながることがあります。
もちろん、気圧だけで天気を完全に判断できるわけではありません。地形、季節、風向き、前線、標高など、さまざまな要因が関係します。
それでも、登山中に「気圧が下がり続けている」とわかれば、空の変化や風の強さにもより注意を向けやすくなります。
ストームアラームとは
ストームアラームは、急な気圧低下を検知したときに通知する機能です。
Suunto Race 2、Suunto Vertical 2をはじめ、対応するSuuntoウォッチでは、ストームアラームを有効にしておくことで、急な気圧低下を検知した際にアラームとストームシンボルで通知します。3時間で4hPa以上の気圧低下があった場合に通知されるため、登山やトレイルランニング中に天候変化のサインへ早めに気づきやすくなります。
急な天候悪化の可能性に早めに気づけるため、登山、ハイキング、キャンプ、トレイルランニングなどのアウトドアで役立ちます。
アラームが鳴ったときに考えたいこと
ストームアラームが鳴った場合は、まず周囲の状況を確認しましょう。
空が暗くなっていないか。
風が強くなっていないか。
遠くで雷鳴が聞こえないか。
稜線や開けた場所にいないか。
安全に下山・撤退できるルートがあるか。
アラームは「必ず嵐が来る」という断定ではありませんが、行動を見直すきっかけになります。特に雷や強風のリスクがある場合は、早めに安全な場所へ移動する判断が大切です。
日の出・日の入りを確認して行動時間を管理する
登山では、日没までに安全な場所へ戻ることが基本です。
特に初めて歩くルート、標高差の大きいルート、天気が不安定な日、秋冬の登山では、日の入り時間を早めに確認しておくことが重要です。
日没前に下山・撤退判断をしやすくする
Suuntoウォッチで日の入り時間を確認できると、行動中に「あとどれくらい明るい時間が残っているか」を把握しやすくなります。
予定よりもペースが遅い。
休憩に時間がかかっている。
天気が崩れてきた。
ルート上にまだ大きな登りが残っている。
こうした状況では、日没時間を見ながら早めに判断することが大切です。
朝駆け登山や写真撮影にも役立つ
日の出・日の入り情報は、安全管理だけでなく、楽しみ方にも役立ちます。
朝日を見に行く登山、夕景を狙う写真撮影、キャンプ場での行動計画などでは、日の出・日の入り時間を手元で確認できると便利です。
特に写真撮影では、光の向きや時間帯が仕上がりに大きく影響します。日の出前後や日没前後の時間を把握しておくことで、撮影ポイントへの到着時間や撤収タイミングを考えやすくなります。
登山やアウトドアでの写真撮影にSuuntoウォッチを活用する方法は、こちらの記事でも紹介しています。
▶︎関連記事:Suuntoウォッチがアウトドア写真撮影に役立つ理由
ストームアラームと日の出・日の入りアラームの設定方法
ストームアラームや日の出・日の入りアラームは、対応するSuuntoウォッチの設定メニューからオン/オフできます。
ウォッチフェイス画面で中央ボタンを長押しして設定メニューを開き、システム通知 > アラート から ストーム や 日の出・日の入り に関するアラートを設定できます。
ストームアラームをオンにすると、気圧の急な低下を検知した際にウォッチ上で通知されます。日の出・日の入りアラームを設定しておくと、行動開始や下山、撮影、キャンプでの準備時間を考えやすくなります。
*モデルによってメニュー名や表示位置が異なる場合があります。使用しているウォッチの設定画面、またはユーザーガイドもあわせて確認してください。
気温と高度を確認して装備やペースを調整する
山では、標高が上がるにつれて気温が下がりやすくなります。
天気予報では暖かく見えても、稜線や風の強い場所では体感温度が大きく下がることがあります。ウォッチで気温や高度を確認することで、ウェアの調整やペース配分を考えやすくなります。
ウォッチで気温を測るときの注意点
ウォッチを腕に着けたまま気温を見ると、体温の影響を受ける場合があります。
外気温をより正確に知りたい場合は、ウォッチを腕から外してしばらく外気に触れさせると、参考にしやすくなります。気温表示は、行動中の体感や天気予報とあわせて判断するのがおすすめです。
高度変化から負荷を把握する
登山やトレイルランでは、距離だけでなく高度差も負荷に大きく影響します。
同じ5kmでも、平坦な道と標高差の大きいルートでは疲労感が異なります。高度を確認しながら進むことで、今どのくらい登っているのか、残りの登りをどう進むかを考えやすくなります。
ルート上の登り下りを詳しく把握したい方は、クライムガイダンスの記事も参考にしてください。
▶︎関連記事:登山・トレイルランのルートナビゲーション|Suuntoクライムガイダンスの便利な使い方
天気予報とウォッチの情報を組み合わせて使う
Suuntoウォッチの天気・環境情報は、アウトドアでの判断をサポートするものです。
ただし、登山やトレイルランでは、出発前の天気予報、雨雲レーダー、登山天気サービス、現地の情報とあわせて確認することが大切です。
出発前は天気予報・雨雲レーダーを確認する
出発前には、目的地周辺の天気予報を確認しましょう。
見るポイントは、天気だけではありません。
降水確率
風速
気温
雷の可能性
雨雲の動き
日の出・日の入り
標高による気温差
山では、ふもとの天気と山頂付近の天気が違うことがあります。長時間の行動や標高の高いエリアでは、余裕を持った計画が必要です。
行動中はウォッチで変化を見る
行動中は、ウォッチで気圧傾向、気温、高度、日の入り時間などを確認します。
たとえば、出発前の予報では晴れでも、行動中に気圧が下がり続けている場合は、空の変化や風に注意する。予定より遅れている場合は、日の入り時間を見ながらルート短縮や撤退を考える。
このように、出発前の予報と行動中の変化を組み合わせることで、より安全に判断しやすくなります。
Suuntoウォッチが役立つアウトドアシーン
Suuntoウォッチの天気・環境情報は、登山だけでなく、さまざまなアウトドアで役立ちます。
登山・ハイキング
登山やハイキングでは、気圧、気温、高度、日の入り時間の確認が行動判断に役立ちます。
天気が崩れそうなとき、予定より時間がかかっているとき、稜線に出る前など、ウォッチで情報を確認することで、次の判断をしやすくなります。
登山用GPSウォッチの選び方を知りたい方は、以下の記事も参考にしてください。
▶︎関連記事:登山におすすめのGPSスマートウォッチとは?地図・バッテリー・選び方を解説
トレイルランニング
トレイルランニングでは、天候の変化がペースや安全に影響します。
長い登り、稜線、山間部のルートでは、雨や風、気温低下に備えることが大切です。気圧傾向や日の入り時間を確認できると、レースやロングランの行動計画にも役立ちます。
キャンプ・縦走
キャンプや縦走では、夜間の気温や天気の変化も重要です。
テントを張る場所、行動を終える時間、翌朝の出発時間を考えるときに、天気や日の出・日の入り情報が役立ちます。ストームアラームや気圧傾向を確認できると、天候悪化への備えもしやすくなります。
釣り・写真撮影
釣りや写真撮影では、日の出・日の入り、気圧、天気の変化が大切な要素になります。
朝夕の光を狙う撮影や、長時間屋外にいるアクティビティでは、手元で環境情報を確認できると便利です。
天気確認に役立つSuuntoウォッチを選ぶポイント
登山やアウトドアで使うウォッチを選ぶときは、天気情報だけでなく、ナビゲーション、バッテリー、使いたいアクティビティに合っているかも確認しましょう。
Suuntoには、オフラインマップやルートナビゲーションに対応したGPSスポーツウォッチだけでなく、気圧計・高度計・コンパスを備えたアウトドアウォッチもあります。登山やトレイルランニングでルート確認まで行いたいのか、気圧や高度、方角をシンプルに確認したいのかによって、選ぶモデルが変わります。
気圧計・高度計・コンパス
山で使うなら、気圧計、高度計、コンパスは確認しておきたい機能です。
気圧は天候変化のサインを知るために、高度は現在地や登下降の把握に、コンパスは方向確認に役立ちます。
Suunto Coreは、気圧計、高度計、コンパスを備えたアウトドアウォッチです。GPSやオフラインマップは搭載していませんが、天気や気圧、高度、方角をシンプルに確認したい方におすすめです。
▶︎Suunto Coreを見る
オフラインマップ・ルートナビゲーション
登山やトレイルでは、天気だけでなく現在地やルート確認も重要です。
Suunto Vertical / Vertical 2など、オフラインマップやルートナビゲーションに対応したモデルなら、スマートフォンを頻繁に取り出さなくても手元でルートを確認しやすくなります。
Suunto Vertical / Vertical 2が登山に向いている理由は、こちらの記事で詳しく紹介しています。
▶︎関連記事:Suunto Vertical / Vertical 2が登山用GPSスマートウォッチに向いている理由
バッテリー持ち
長時間の登山や縦走では、バッテリー持ちも重要です。
GPS記録、地図確認、ナビゲーション、天気情報の確認を行う場合、バッテリーに余裕があると安心です。日帰り登山だけでなく、長時間のハイクや山小屋泊を想定するなら、バッテリー性能もチェックしましょう。
Suuntoウォッチで天気を確認する前に準備しておきたいこと
アウトドアでウォッチを使う前に、基本的な準備をしておくと安心です。
ウォッチとSuuntoアプリを最新にする
出発前に、ウォッチとSuuntoアプリを最新バージョンに更新しておきましょう。
天気ウィジェットやナビゲーション機能、マップ機能は、ソフトウェアアップデートによって改善されることがあります。山に入る前に同期や設定を済ませておくと、現地で慌てにくくなります。
GPS取得と位置情報を確認する
日の出・日の入り時刻や位置に応じた情報を使う場合は、GPS取得が必要になることがあります。
登山口や開けた場所でGPSを取得し、ルートやマップ、アクティビティ記録の準備ができているか確認しましょう。
予備の安全対策も忘れない
ウォッチは便利なサポートツールですが、天気判断をウォッチだけに頼るのは避けましょう。
登山地図、スマートフォン、モバイルバッテリー、レインウェア、防寒具、ヘッドライト、水分、非常食など、基本装備もあわせて準備することが大切です。
Suuntoのアウトドアウォッチで、天気とルートを手元で確認しよう
登山やトレイルランでは、天気の変化、現在地、ルート、標高差、日没時間をまとめて確認できると、行動中の判断がしやすくなります。
Suuntoのスポーツウォッチは、アウトドアでのルートナビゲーションやアクティビティ記録に対応したモデルを展開しています。天気や気圧、標高、ルート確認を活用したい方は、自分のスタイルに合うモデルをチェックしてみてください。
▶︎Suuntoのアウトドア向けスポーツウォッチを見る
まとめ|天気の変化を早めに知ることが、安全なアウトドアにつながる
登山やトレイルランニングでは、天気の変化を早めに把握することが大切です。
Suuntoウォッチを使えば、気圧傾向、ストームアラーム、日の出・日の入り、気温、高度、天気予報などを手元で確認できます。出発前の天気予報と、行動中のウォッチ情報を組み合わせることで、山での判断をサポートできます。
天気が変わりやすい山では、「まだ大丈夫」ではなく、「早めに気づいて、早めに判断する」ことが安心につながります。
登山、トレイルラン、キャンプ、縦走をより安全に楽しむために、Suuntoウォッチの天気・環境情報を活用してみてください。
▶︎Suuntoの登山・ハイキング向けGPSスポーツウォッチを見る


