


SUUNTOブログ

How to use the terrain maps in your Suunto Vertical
Suunto Vertical comes with detailed outdoor offline maps that are globally free of charge. The new maps build on Suunto’s already advanced route navigation in the Suunto app. Discovering and creating routes is easy with the Suunto app's heatmaps, 3D maps and road surface-type layers and syncing them into a watch is effortless.
Now, users have offline maps to consult no matter where they are, offering them greater safety and confidence!
In this article, you will learn how to get started with the maps.
Getting the maps on your watch
You can download the maps on your Suunto Vertical watch using the Suunto app. You don’t need to pay any extra for the maps: simply select the right area for your adventure and download it.
The watch has plenty of storage capacity, too: You can download 32GB of maps. As a reference the entire France is 7,47 GB and the entire Canada 15,17GB. Naturally large maps take longer to download so being a bit more specific helps you get the maps on the watch faster.
Add wireless network to watch
To install offline maps on the watch, connect your watch to a wireless network using the Suunto app:
Pair your Suunto Vertical with Suunto app
In the Suunto app go to the watch settings (select the watch icon on the top left and then the settings symbol on the top right)
Select ‘Wireless networks’ and add a network
You can add multiple wireless networks (like home and work)
Select the offline map area
Go to the map view in the Suunto app and tap ‘+’, the same “plus” you use to create a new route. That will allow you to download new offline maps.
Search for the correct map or select it in the country menu. You can still review the selected area on the map before downloading.
Connect the watch to the charger
Once you have established the connection with a wireless network and selected your preferred map area, you can download the maps on the watch. To start the download, connect the watch to a charger.
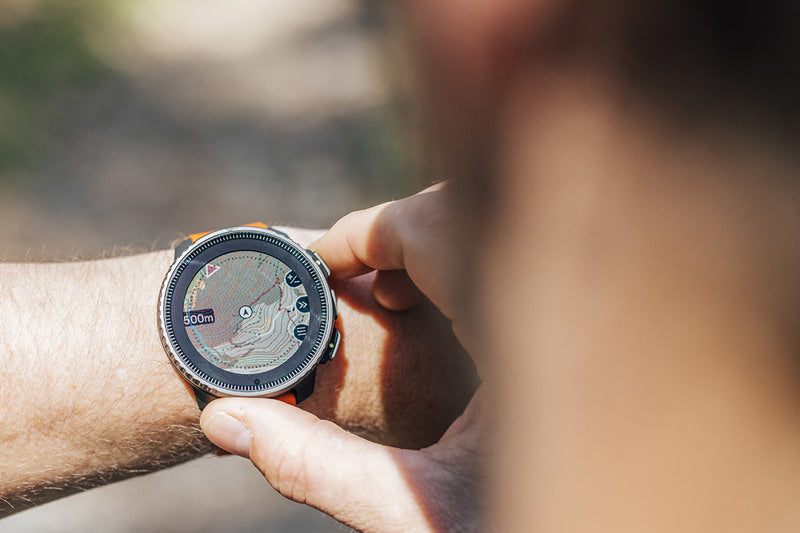
Using the offline maps on Suunto Vertical
Top buttonShort press: Zoom inLong press: Zoom out
Middle buttonShort press: Next screenLong press: Zoom/pan options
Lower buttonShort press: Navigation options
You can use the terrain maps during an activity with a preplanned route or simply see the breadcrumb trail, the path you have already traveled, on the map.
Happy adventures!
READ MORE
Six ways to plan a route for your next adventure
How to use avalanche terrain maps
Lead image by Maximillian Gierl


Get feedback from the Suunto coach
The role of a coach is to provide guidance, support, and expertise to help athletes achieve their goals. A coach can be crucial for monitoring progress and providing feedback and adjustments as needed to ensure the athlete is training safely and effectively.
A great coach is also a friend and a companion in your journey. A coach motivates you and requires accountability. Overall, a coach helps athletes improve their performance, avoid injury, and reach their full potential. This is also our goal when providing you with Suunto Coach.
Suunto app’s Training zone has an AI-based coach that is an integral part of the service. It looks at hundreds of different parameters after each workout, learns how you train, and builds a normal training pattern that evolves from every workout you do. Based on this, it can give you the key highlights of your training, recovery, and progress. It provides insights and suggestions for the current week, so you can adjust your effort level as you go forward.
The Suunto coach recognizes areas you are missing in your training this week that you normally are focusing on: Are you lacking volume in your swim workout? Do you push yourself too much with high-intensity runs?
The Suunto coach is not trying to push your training in a direction that you are not used to. For example, if you usually do just high-intensity training, the Suunto coach is not going to ask you to focus more on lower-intensity sessions.
Suunto coach doesn’t really know what is your goal or if you want to follow some specific training methodology. But what it does, is alert, highlight, and comment when you are exceeding healthy limits or just lacking some training aspects you are used to. Suunto coach is there to keep you on your selected path. Its recommendations and highlights are easy to digest without you needing to dig deep into the data.
Now, go to the Suunto app and meet your new coach – the coach already knows you based on your training history!
Lead image by @rsalanova
READ MORE
Manage your training with Suunto app's Training zone


Manage your training with Suunto app’s Training zone
Get a detailed overview of your training in Suunto app’s new Training Zone!
A progressive training load with adequate recovery and ways to follow progress will lead to a successful adventure or race.
Suunto is your daily companion to enhance your performance. The new training toolset in Suunto app’s Training zone is vast. Read on and learn what’s available. We are sure you will find your new favorite dataset to analyze your training and follow your progress.
To ensure you have the latest Suunto app version update your iOS app in App Store and Android app in Google Play.
Four new ways to look at your training
Am I training smartly? Is my training load progressive? Do I have the right intensity mix? What type of impact do my workouts have?
Training load
The training load theme in Suunto app’s Training zone gives you a good overview of this week’s training load compared to a six-week average. You will also see the daily training load split and the split by activity type. All of this will help you understand your overall physiological load and how much more you can – and should – still do this week.
The value of following your physical load weekly with comparisons to your long-term baseline is that you can look at this as a goal for the week. To gain some fitness, you might want to slightly increase the load for the week. To ensure recovery, keep the load level lower than your average.
Training intensity
Are you really doing both easy base training and higher intensity? Or is your training piling up in a single intensity zone, like tempo work in zone 3? The new Training intensity theme in Suunto app will help you understand your training better as you will see both the weekly intensity distribution and the six-week averages.
The workout intensity totals can be viewed as heart rate, pace, running power, and cycling power zones.
You can set your sport-specific training zones in your Suunto watch based on heart rate, pace and power. Suunto is following a five-zone model where your anaerobic threshold is at zone 4 /5 limit. You can find your correct training zones with a lab or a field test. SuuntoPlus Sports apps like the Anaerobic threshold test and the Functional threshold power test will guide you through a field test session.
Learn more about intensity zones.
Training volume
The sports you have done during the week are shown with duration, distance, load, and ascent. Sports are also grouped to give an overview of each type of sport i.e. running includes running, treadmill, and trail running.
Volume is compared with your six-week average.
As you follow your training volume, you can now easily ensure that you meet the numbers for your key sports any given week: It might be that as a trail runner, you want to get 3000 meters of ascent each week, or as a cyclist, ride 200 kilometers weekly. Your six-week average will help you match your personal benchmark.
Training impact
Suunto app’s Training impact is a new tool that helps you understand your training model and the physiological systems you are targeting. This will help you understand if you are doing what you were planning to do – and if you are missing something in your training.
Training impacts are defined as cardio and muscular impacts. Each workout gets assigned an impact such as “Aerobic” or “Speed & Agility”. Cardio impacts are based on workouts intensity, load, and duration. Muscle impacts are based on activity type.
The training model is identified based on your workout intensity distribution such as Polarized (most activities on low and high intensities, less in the middle), Sweet spot (training mainly between aerobic and anaerobic thresholds), and Base training (most workouts are in zones 1&2).
In addition to the current week, you will see the six-week average for your training impact.
As with other training insights, the impacts are illustrated with long-term reference. If your normal training week has two aerobic sessions, one VO2 max session and two strength sessions, and on Friday you are still missing those aerobic sessions, you know what to focus on during the weekend. This will help you check all the boxes.
Training impact is currently available on Suunto app for Android. Coming soon to iOS as well!
Lead image by Roger Salanova
READ MORE
Get feedback from the Suunto coach
Test your fitness with Suunto
Plan your interval workouts with Suunto app
Unlock your interval training and watch your running improve


トレイルランナー向けインターバルトレーニング3選|登り・閾値・下りを鍛えるメニュー
トレイルランニングでは、ロードランニングとは違う力が求められます。
登りで心拍数が上がる。下りで脚に負担がかかる。テクニカルな路面でリズムが崩れる。レース後半になると、登り返しで思うように脚が動かない。こうした場面に強くなるには、ただ距離を走るだけでなく、目的に合わせたトレーニングを取り入れることが大切です。
インターバルトレーニングは、トレイルランナーにとって効果的な練習方法のひとつです。短い時間で負荷を高めながら、登りの走力、心肺機能、ペース維持力、下りの技術を鍛えることができます。
この記事では、トレイルランナーにおすすめの3つのインターバルトレーニングメニューを紹介します。
▶︎関連記事:トレランにおすすめのGPSスマートウォッチとは?必要な機能と選び方
目次
トレイルランナーにインターバルトレーニングが必要な理由
始める前に確認したいこと
メニュー1:VO2max向上インターバル
メニュー2:閾値インターバル
メニュー3:下りインターバル
Suuntoウォッチでインターバルトレーニングを管理する
どのくらいの頻度で行うべき?
Suuntoウォッチでトレイルランの練習をもっと計画的に
まとめ|登り・閾値・下りを鍛えて、トレイルランをもっと強く
トレイルランナーにインターバルトレーニングが必要な理由
トレイルランでは、一定ペースで走り続ける場面ばかりではありません。
登りでは心拍数が上がり、下りでは脚への衝撃が増え、路面状況によってペースも変わります。だからこそ、トレイルランナーには「強く走る時間」と「回復しながら動き続ける時間」を繰り返す練習が役立ちます。
登りで心拍数が上がりやすい
登りでは、スピードが遅くても心拍数が大きく上がることがあります。
インターバルトレーニングで高い心拍ゾーンに入る練習をしておくと、登りでの負荷に慣れやすくなります。特に短い登りやレース中の急な登り返しでは、心肺機能の余裕がパフォーマンスに影響します。
レース後半の登り返しに強くなる
トレイルレースでは、下った後に再び登る場面があります。
脚が疲れた状態で登りに入ると、ペースが落ちやすくなります。登りとリカバリーを組み合わせたインターバルを行うことで、疲労した状態でも動き続ける力を鍛えやすくなります。
下りはスピードだけでなく技術も必要
トレイルの下りでは、心肺機能よりも技術や集中力が重要になることがあります。路面を読む、接地を安定させる、ブレーキをかけすぎない、リズムを保つ。こうした下りの動きは、実際の地形で繰り返し練習することで身につきやすくなります。
始める前に確認したいこと
インターバルトレーニングは負荷が高い練習です。
疲労が残っている日や、筋肉痛が強い日は無理に行わないようにしましょう。良いインターバル練習を行うには、前のトレーニングからしっかり回復していることが大切です。疲れているときは、予定していたメニューを延期する判断も必要です。
20分続けて走れるようになってから始める
インターバルトレーニングは、まず20分程度を無理なく走れるようになってから始めるのがおすすめです。走り始めたばかりの場合は、ジョギングやハイキングを組み合わせて、基礎体力を作ることを優先しましょう。
心拍ゾーンを確認しておく
インターバルトレーニングでは、感覚だけでなく心拍数も参考になります。
Suuntoウォッチでは、心拍数や心拍ゾーンを確認しながら走ることができます。VO2max向けの高強度メニューなのか、閾値付近で粘るメニューなのかによって、目安にする強度が変わります。
心拍ゾーンの基本はこちらの記事でも解説できます。
▶︎関連記事:心拍ゾーンとは?ランニングトレーニングでの使い方
ウォッチにワークアウトメニューを入れておく
時間や本数が決まっているインターバルは、ウォッチで管理すると走りに集中しやすくなります。
Suuntoアプリでワークアウトメニューを作成してウォッチに同期しておけば、ウォームアップ、インターバル、リカバリー、クールダウンを手元で確認しながら進められます。
▶︎関連記事:インターバルトレーニングのやり方|ランニング向けワークアウトをSuuntoアプリで作成する方法
メニュー1:VO2max向上インターバル
VO2max向上インターバルは、心肺機能を高めたいトレイルランナーにおすすめのメニューです。登りで強い負荷をかけることで、レース中の急な登りやペースアップに対応しやすくなります。
目的
このメニューの目的は、VO2maxの向上です。
高い強度で走る時間を作ることで、心肺機能に刺激を入れます。登りで行うとスピードを出しすぎなくても心拍数を上げやすく、トレイルランニングに近い負荷を作りやすくなります。
強度の目安
最大心拍数の約90%を目安にします。
かなりきつい強度ですが、全力疾走ではありません。後半の本数でもフォームを崩さず、同じくらいの負荷で走れるペースを意識しましょう。
メニュー例
ウォームアップ:20分
最初の15分はゆっくり走ります。その後、1分だけ少し強めに走り、1分ゆっくり走って回復します。これを2回ほど行い、最後に2分ゆっくり走ってからインターバルに入ります。
インターバル:4分 × 4〜6本
4分間、登りを高強度で走ります。リカバリーは2分です。止まらずに、ゆっくりジョグまたは歩きで動き続けます。
初めて行う場合は4本から始めましょう。慣れていてコンディションが良い場合は5〜6本まで増やせます。
クールダウン:10〜15分
インターバル後は、10〜15分ほどゆっくり走るかジョグをして身体を落ち着かせます。
実施場所
できれば、走り続けられる緩やかな登りで行います。
長い登りがある場合は、登りで4分走り、2分ゆっくり下る、または歩いて戻る形で行えます。長い登りがない場合は、登りを含む周回コースを使うと実施しやすくなります。
ポイント
1本目から飛ばしすぎないことが大切です。
すべての本数で同じ距離、または少しずつ長い距離を走れるくらいのペースが理想です。最初だけ速く、後半に大きく落ちる場合は、設定ペースが速すぎる可能性があります。
メニュー2:閾値インターバル
閾値インターバルは、登りで粘る力を高めたいトレイルランナーにおすすめです。
VO2max向上インターバルよりも少し低い強度で、長めの時間走ります。レース中に「きついけれど維持できる」強度を保つ練習になります。
目的
このメニューの目的は、閾値付近で走る力を高めることです。
トレイルレースでは、長い登りを一定の負荷で進む場面があります。閾値インターバルを取り入れることで、登りでのペース維持力や疲労耐性を鍛えやすくなります。
強度の目安
最大心拍数の約82〜87%を目安にします。
VO2max向上インターバルほどきつくはありません。乳酸で脚が重くなるような強度ではなく、呼吸は弾むけれどコントロールできる強度を意識します。
メニュー例
ウォームアップ:20分
15分ゆっくり走り、その後1分やや強め、1分ゆっくりを2回ほど行います。最後に2分ゆっくり走ってからインターバルに入ります。
インターバル:8分 × 3〜6本
8分間、登りまたは起伏のある道を一定の強度で走ります。リカバリーは2分、またはスタート地点までゆっくり下る時間を使います。
初めての場合は3本から。慣れているランナーは最大6本を目安にします。
クールダウン:10〜15分
最後は10〜15分、楽なペースで走って終了します。
実施場所
長い登り、または登り下りを含む周回コースがおすすめです。
同じ坂を登って下る形でも構いません。トレイルレースでは、下ったあとに再び登る場面が多いため、下りを挟んで次の登りに入る練習にもなります。
ポイント
最後にスプリントしないことが大切です。
このメニューは、ゴール前の全力走ではなく、一定の負荷を保つ練習です。後半まで同じペースで走れるように、最初からコントロールして入りましょう。
メニュー3:下りインターバル
下りインターバルは、トレイルの下りに自信をつけたいランナーにおすすめです。
このメニューでは、心拍数を上げることよりも、下りの技術、集中力、リズムを高めることを重視します。
目的
目的は、下りの走り方を上達させることです。
下りでは、スピードだけでなく、足の置き方、視線、バランス、ブレーキのかけ方が重要になります。短い下りを繰り返すことで、路面を読む力や安定した接地を身につけやすくなります。
強度の目安
心拍数よりも、集中して安全に走れるスピードを優先します。
転倒リスクが高いテクニカルな下りでは、無理にタイムを狙わないようにしましょう。慣れないうちは、走りやすい斜面で行うのがおすすめです。
メニュー例
ウォームアップ:10〜15分
平坦または緩やかな道で身体を温めます。
インターバル:下り最大2分 × 6〜7本
まずゴール地点を決め、そこからゆっくり歩いてスタート地点まで登ります。
1本目は余裕のあるペースで下ります。2本目以降は、フォームを崩さない範囲で少しずつスムーズに走ることを意識します。毎回タイムを確認しながら、無理のない範囲でリズムを上げていきます。
クールダウン:5〜10分
最後に5〜10分、ゆっくり走って終了します。
実施場所
レースを予定している場合は、レースに近い路面を選ぶと実践的です。
岩場、ぬかるみ、急斜面、根の多い道など、レースで出てくる地形に近い場所で練習できると効果的です。ただし、安全に走れる範囲で行いましょう。
ポイント
短く集中して行うことが大切です。
下りの練習は、集中力が切れると転倒や捻挫につながりやすくなります。疲れてきたら本数を減らし、無理に続けないようにしましょう。
Suuntoウォッチでインターバルトレーニングを管理する
インターバルトレーニングでは、時間、心拍数、リカバリー、本数を確認しながら走ることが重要です。
Suuntoウォッチを使えば、トレーニング中に心拍数やペース、ラップ、時間を手元で確認できます。Suuntoアプリで作成したワークアウトメニューをウォッチに同期しておけば、走っている最中に次のステップを確認しやすくなります。
心拍ゾーンで強度を確認する
VO2max向上インターバルでは高い心拍ゾーン、閾値インターバルではやや高い心拍ゾーンを目安にします。
感覚だけでなく心拍数を確認することで、強度が高すぎる、または低すぎることに気づきやすくなります。
ラップや距離でペースの落ち方を見る
同じ4分間でも、1本目と最後の本数で進んだ距離が大きく違う場合は、最初のペースが速すぎた可能性があります。
アクティビティ後にSuuntoアプリでラップや心拍数を振り返ることで、次回の設定を調整しやすくなります。
トレーニング後は回復も確認する
高強度トレーニングの後は、回復を確認することも大切です。
睡眠、HRV、トレーニング負荷、疲労感を見ながら、次のポイント練習までの間隔を調整しましょう。
▶︎関連記事:HRVとは?心拍変動を理解してトレーニングの回復を最適化する方法
どのくらいの頻度で行うべき?
インターバルトレーニングは、毎日行う練習ではありません。
週に1回程度から始め、慣れてきても高強度のポイント練習は週1〜2回を目安にすると続けやすくなります。トレイルランでは、ロング走、イージーラン、筋力トレーニング、休養とのバランスも大切です。
初心者は1メニューだけで十分
トレイルランを始めたばかりの方は、いきなり3種類すべてを行う必要はありません。
まずは閾値インターバルや短めの坂道インターバルから始め、身体の反応を見ながら少しずつ取り入れましょう。
レース前は目的に合わせて選ぶ
登りが多いレースならVO2max向上インターバルや閾値インターバル、テクニカルな下りが多いレースなら下りインターバルを取り入れるなど、目標レースに合わせて選ぶと実践的です。
Suuntoウォッチでトレイルランの練習をもっと計画的に
トレイルランニングでは、登り、下り、起伏、路面変化など、ロードとは違う負荷に対応する力が必要です。
Suuntoのスポーツウォッチは、心拍数、GPS、ルートナビゲーション、クライムガイダンス、トレーニング負荷、リカバリー確認など、トレイルランナーの練習とレースをサポートする機能を備えています。インターバルトレーニングを計画的に取り入れたい方は、SuuntoアプリとSuuntoウォッチを活用して、自分の走りを確認してみてください。
▶︎関連記事:インターバルトレーニングのやり方|ランニング向けワークアウトをSuuntoアプリで作成する方法
まとめ|登り・閾値・下りを鍛えて、トレイルランをもっと強く
トレイルランナーにとって、インターバルトレーニングは登りの走力、心肺機能、ペース維持力、下りの技術を高めるために役立ちます。
VO2max向上インターバルでは高い強度に慣れ、閾値インターバルでは登りで粘る力を鍛え、下りインターバルでは安全に速く下るための技術を磨きます。
大切なのは、疲れている日に無理をしないこと、最初から飛ばしすぎないこと、目的に合わせてメニューを選ぶことです。
Suuntoウォッチで心拍数や時間、ラップ、回復状態を確認しながら、自分に合ったペースでトレイルランの練習を続けていきましょう。
▶︎Suuntoのランニングスポーツウォッチを見る


Unlock your interval training and watch your running improve
Norwegian trail and mountain runner Stian Angermund needs no introduction in trail running circles. He’s a two-time winner of the Salomon Golden Trail World Series (2018 and 2021) , holds the record of the Zegama-Aizkorri trail race and has won a number of iconic vertical k races.
Stian, 36, began competitive endurance sports in his teens and started taking on mountain races in his 20s. Now he also enjoys coaching fellow athletes to help them achieve their goals. Interval training, he says, can get fantastic results when done properly and consistently. Read on for his advice and check out his second post with three specific interval sessions.
Learn how to build your interval workouts using the Workout planner in Suunto app and follow the session in real time on your Suunto watch.
Stian lives in Bergen, Norway.
Master interval training
By Stian Angermund
What is interval training?
Interval training is when you break a training session into hard and easy intervals. For example, you run hard for four minutes, then walk for two minutes, before you run hard for another four minutes. You repeat this cycle several times. Intervals can be short, from just a few seconds or up to many minutes. The recovery time is often shorter than the hard interval time.
Intervals can be measured in time (duration: one, two or four minutes) and in length (distance: 200m, 400m or 1000m etc).
Why should you do interval training?
Interval training is a good way to improve your aerobic and anaerobic endurance. When having the short rest in between the intervals, your body is recovering, and you can do a bigger volume/greater amount of time at a hard intensity than by constant training at the same intensity.
How often should you do intervals?
There are many ways to get in good shape - we are all different. Some athletes do two intervals a day, several times a week, and some do only one interval session a week. If you haven’t run intervals before, I recommend starting with one interval session a week and then increasing to two sessions. It’s very individual when the body is ready and can handle two or more interval sessions a week.
To ensure you do a quality interval training session it’s essential you have fully recovered from any earlier training sessions. If you have sore muscles or feel tired when you are about to start your interval training, then it’s not the right time. You should skip or postpone the planned interval session.
How long should the intervals be?
The duration of the intervals will vary according to the goal of the session and the level of the athlete. The total volume of the interval session is the time of all the intervals. ● For example, 4x4 minutes with two minutes recovery in between. The total interval time here is 16 minutes. We do not include the recovery time. The total volume must not be longer than what you can manage. If you run 6x3 minutes and you see that you run slower and slower for each interval, then it might be that the total volume is too much or you have started too fast.
The different types of intervals
VO2 Max
To improve the Vo2max (the maximum amount of oxygen the athlete can utilise), the intervals are often from 2 to 6 minutes long. This type of interval is completed in the high-intensity zone. An intensity where you can feel lactate in your muscles. The number of intervals can be from four to 12. The total volume is often between 20 and 35 minutes. The recovery between the intervals is often one-third of the time of the interval.
Intervals to improve the anaerobic threshold
This interval session will be of a lower intensity than the Vo2max session. It can be difficult. to find the right intensity for this session. When you are at a level for improving your anaerobic threshold, you don’t feel any lactate in your muscles. You only know this limit when you go above and your muscles start to increase lactate.
Because threshold intervals are of a lower intensity than for improving your Vo2max, you can do a bigger volume. The intervals can be from five minutes to more than half an hour. The total volume can be from 30 minutes tol more than one hour. The recovery can be one minute to a few minutes. For this type of interval training, it is also important to have quality and to not do more than you can manage and recover from. If you run slower and slower during each interval or need to push to a higher intensity to keep up, then it's better to stop the session.
Threshold test
You can do a test to find your threshold level. Here’s how: after a solid warm up, run as fast as you can for 40 to 60 minutes. The average pulse for the test will be around your anaerobic threshold. This threshold will be different from one activity type to another. That means the anaerobic threshold is not the same when you run and when you cycle or ski. Therefore, you should do your threshold test in the same activity as you want to improve.
Use the SuuntoPlus Threshold test to find your threshold level.
Why is even pacing important when running intervals?
In order to get as many benefits as possible from the interval session, it is important to pace the interval right. You can use a pulse belt to help you pace the interval correctly. If you run on a treadmill or do the intervals on the same course, then ideally all the intervals should go around the same pace. That means the pulse will be lower in the beginning and increase during the session. If you start too hard, then you will not benefit as much for the session, and the recovery might take longer.
What kind of intervals are good to start with?
If you can run without stopping for 20 minutes, then you can start running intervals with a volume from 10 to 16 minutes. It can be 5x2min or 4x4min. If you can’t run this long, you can start with a run and walk session - one minute on/off until you can do this for 30 min. Then you can run two minutes and walk a minute. Then, three minutes running and one walking. Continue like this until you can run 20 minutes. After this you can start with the intervals described above.
What kind of intervals will help trail runners?
All the intervals mentioned earlier can be good for trail runners. If you run trail races with some elevation gain, It is a good idea to run the intervals up, or up and downhill. It is often hard to start on a new uphill after running a downhill, which is the case in trail races.
A way to train trail intervals is to run intervals uphill then jog easy down to where you started the interval as recovery before running another uphill interval. This can be hard for the legs, but it will prepare you for a trail race. The recovery period will be longer for uphill/downhill sessions than for flat or road intervals.
How to build an interval session?
Intervals can be done in many ways.
● Equal: 5 x 5 minutes, 4x4 minutes, 2x2 minutes● Pyramid: 3-5-7-7-5-3 minutes. ● Countdown: 8-7-6-5-4-3-2-1 minutes
There are many ways to run intervals. Let your imagination help you. Mentally it can be good to do some variation of your intervals, rather than run them the same way every time. You can change their duration, pace and terrain.
To get coaching from Stian visit: https://stianangermund.com


Suuntoでできるフィットネステスト|VO2max・閾値・FTPを確認してトレーニングに活かす方法
ランニングやサイクリングを続けていると、「今の自分の体力はどれくらいか」「トレーニング強度は合っているか」「以前より成長しているか」を知りたくなることがあります。
距離やペースだけでも練習の記録はできますが、効率よくトレーニングを続けるには、自分の現在の体力やトレーニングゾーンを把握することが大切です。
SuuntoPlusスポーツアプリには、ランニングの閾値テスト、クーパーテスト、サイクリングのFTPテスト、デカップリング、20mビープテストなど、体力や強度設定の確認に役立つ機能があります。
この記事では、SuuntoPlusスポーツアプリでできる主なフィットネステストと、テスト結果をトレーニングに活かす方法を紹介します。
目次
SuuntoPlusスポーツアプリとは
なぜフィットネステストがトレーニングに役立つのか
トレーニングゾーンを正しく設定する重要性
SuuntoPlusでできる主なフィットネステスト
1. ランナー向け閾値テスト
2. クーパーテスト
3. サイクリスト向けFTPテスト
4. デカップリングで有酸素能力を確認する
5. 20mビープテスト
テスト結果をトレーニングにどう活かすか
テスト前に確認したいこと
SuuntoPlusスポーツアプリの使い方
ZoneSenseやHRVと組み合わせて強度と回復を見る
まとめ|SuuntoPlusのフィットネステストで、自分の現在地を確認しよう
SuuntoPlusスポーツアプリとは
SuuntoPlusは、対応するSuuntoウォッチで使える追加機能です。
スポーツモードに合わせてSuuntoPlusスポーツアプリを選ぶことで、通常のトレーニング記録に加えて、特定の目的に合わせたデータやガイドを確認できます。
たとえば、トレーニング中の強度確認、ペース管理、フィットネステスト、ナビゲーション補助など、目的に応じた機能を追加できます。
フィットネステスト系のSuuntoPlusスポーツアプリを使うと、ランニングやサイクリングの現在の体力、閾値、VO2maxの目安、FTP、有酸素能力の変化などを確認しやすくなります。
なぜフィットネステストがトレーニングに役立つのか
フィットネステストは、自分の現在地を知るための方法です。
ランニングやサイクリングでは、「きつい」「楽に感じる」といった感覚も大切ですが、感覚だけではトレーニング強度がずれてしまうことがあります。
本来は軽めに行うべき練習が強くなりすぎたり、追い込むべき練習で十分な強度に届かなかったりすると、トレーニング効果を得にくくなることがあります。
フィットネステストを行うことで、次のようなことを確認しやすくなります。
現在の体力レベル
VO2maxの目安
閾値ペースや閾値心拍数
サイクリングのFTP
有酸素能力の安定性
トレーニングゾーンの見直し
定期的な進歩の確認
定期的に同じ条件でテストを行うと、トレーニングの成果や体力の変化を振り返りやすくなります。
トレーニングゾーンを正しく設定する重要性
ランニングやサイクリングでは、目的によって適切な強度が変わります。
長い有酸素トレーニング、テンポ走、閾値走、インターバル、レースペース走では、それぞれ狙う強度が異なります。トレーニングゾーンが自分の実力と合っていないと、練習の目的がずれてしまうことがあります。
たとえば、心拍ゾーンやペースゾーンが低く設定されすぎていると、余裕を持って行うべき練習が思ったより高強度になってしまうことがあります。反対に、ゾーンが高く設定されすぎていると、インターバルや閾値走で必要な刺激が足りないこともあります。
フィットネステストの結果は、心拍ゾーン、ペースゾーン、パワーゾーンを見直すための参考になります。
▶︎関連記事:心拍ゾーンとは?Suuntoウォッチでトレーニング強度を管理する方法
SuuntoPlusでできる主なフィットネステスト
SuuntoPlusスポーツアプリには、体力やトレーニング強度の確認に役立つテストがあります。
この記事では、代表的な5つを紹介します。
テスト
主な目的
おすすめの人
ランナー向け閾値テスト
閾値ペース・閾値心拍数の確認
ランニング強度を見直したい人
クーパーテスト
VO2maxの目安確認
現在の走力を測りたい人
FTPテスト
サイクリングのパワーゾーン確認
パワーメーターを使うサイクリスト
デカップリング
有酸素能力の安定性確認
ロング走・ロングライドを行う人
20mビープテスト
総合的なフィットネス確認
チームスポーツや持久力を測りたい人
すべてのテストを行う必要はありません。自分の競技、目的、トレーニング内容に合わせて選ぶことが大切です。
1. ランナー向け閾値テスト
ランナー向け閾値テストは、ランニングの強度設定を見直したい人に役立つテストです。
閾値とは、簡単に言えば「きついけれど、ある程度維持できる強度」の目安です。閾値ペースや閾値心拍数を知ることで、テンポ走、閾値走、インターバルトレーニングの強度を設定しやすくなります。
SuuntoPlusの閾値テストでは、ウォームアップの後、一定時間しっかり走ることで、閾値ペースや閾値心拍数の目安を確認できます。
こんな人におすすめ
テンポ走や閾値走の強度を知りたい人
心拍ゾーンやペースゾーンを見直したい人
マラソンや10kmレースに向けて練習している人
感覚だけでなく数値を参考に練習したい人
行うときのポイント
閾値テストは負荷が高いテストです。疲労が強い日や睡眠不足の日は避け、体調の良い日に行いましょう。
できるだけ平坦で走りやすいコースやトラックを選ぶと、安定したペースで実施しやすくなります。
2. クーパーテスト
クーパーテストは、12分間でどれだけ走れるかを測るシンプルな体力テストです。
ランニングの走力やVO2maxの目安を確認する方法として知られており、定期的に行うことで、自分の体力の変化を比較しやすくなります。
SuuntoPlusのクーパーテストを使うと、ウォームアップ後に12分間のテストを行い、走行距離やVO2maxの推定値を確認できます。
こんな人におすすめ
現在の走力をシンプルに測りたい人
VO2maxの目安を確認したい人
定期的に体力の変化を見たい人
5kmや10kmの走力を高めたい人
行うときのポイント
12分間は短く見えますが、かなり負荷の高いテストです。
最初から全力で入りすぎると後半に大きく失速しやすくなります。前半はやや余裕を持ち、後半にかけて粘る意識で行いましょう。
安全に走れる平坦な場所で行うことも大切です。
3. サイクリスト向けFTPテスト
FTPテストは、サイクリングでパワーゾーンを設定したい人に役立つテストです。
FTPは、一定時間維持できるパワーの目安として使われます。FTPを知ることで、 endurance ride、テンポ走、インターバル、レース強度などをパワーで管理しやすくなります。
SuuntoPlusのFTPテストでは、一定時間できるだけ安定した高いパワーで走り、その結果をもとにFTPの目安を確認します。
こんな人におすすめ
パワーメーターを使っているサイクリスト
サイクリングのパワーゾーンを見直したい人
ロードバイクやトライアスロンの練習をしている人
感覚ではなくパワーで強度を管理したい人
行うときのポイント
FTPテストは集中力と体力を使うテストです。交通量の少ない安全なコース、または屋内トレーナーで行うと実施しやすくなります。
パワーを大きく上下させず、できるだけ一定に保つことが大切です。
4. デカップリングで有酸素能力を確認する
デカップリングは、長めのランニングやサイクリング中に、心拍数とペースまたはパワーの関係がどれくらい変化するかを見る指標です。
長時間の運動では、同じペースやパワーを保っていても、時間が経つにつれて心拍数が上がっていくことがあります。このように、心拍数とペース・パワーの関係がずれていく状態をデカップリングと呼びます。
デカップリングが大きい場合、暑さ、疲労、水分不足、補給不足、有酸素能力の不足などが影響している可能性があります。反対に、長時間でも心拍数とペース・パワーの関係が安定している場合、有酸素能力が安定している目安になります。
こんな人におすすめ
ロング走やロングライドを行う人
マラソン、ウルトラ、トレイルランに取り組む人
有酸素能力の土台を確認したい人
長時間でも安定して動き続けたい人
行うときのポイント
デカップリングは、全力で行うテストではありません。一定の強度で長めに走る、または乗ることで、有酸素能力の安定性を確認します。
気温、湿度、補給、睡眠、疲労の影響を受けるため、1回の結果だけで判断せず、同じような条件で定期的に見るのがおすすめです。
5. 20mビープテスト
20mビープテストは、20m間隔の2本のラインを往復し、音に合わせて走るフィットネステストです。
ビープ音の間隔は少しずつ短くなり、徐々に必要なスピードが上がっていきます。チームスポーツや学校の体力テストでも知られており、持久力やスピード持久力の目安を確認できます。
SuuntoPlusの20mビープテストを使うと、テストの進行に合わせてウォッチで確認しながら実施できます。
こんな人におすすめ
総合的なフィットネスを確認したい人
チームスポーツや球技を行う人
スピード持久力を測りたい人
ランニング以外の体力指標も知りたい人
行うときのポイント
20mの距離を正確に測り、安全に往復できるスペースを確保しましょう。
急な方向転換を繰り返すため、ウォームアップを十分に行い、滑りにくい路面で実施することが大切です。
テスト結果をトレーニングにどう活かすか
フィットネステストは、実施して終わりではありません。
大切なのは、結果を日々のトレーニングに活かすことです。
トレーニングゾーンを見直す
閾値テストやFTPテストの結果は、心拍ゾーン、ペースゾーン、パワーゾーンの見直しに役立ちます。
ゾーンが自分の現在の体力に合っていると、軽めの練習、高強度の練習、レースペースの練習を分けやすくなります。
練習メニューの強度を決める
クーパーテストや閾値テストの結果を参考にすると、インターバル、テンポ走、閾値走などの強度を決めやすくなります。
閾値やVO2maxの目安がわかると、「今日はどれくらいのペースで走るべきか」「どの心拍数を目安にするか」を考えやすくなります。
▶︎関連記事:インターバルトレーニングのやり方|ランニング向けワークアウトをSuuntoアプリで作成する方法
定期的に進歩を確認する
同じテストを数週間から数か月ごとに行うことで、トレーニングの成果を比較しやすくなります。
ただし、テスト結果は体調、睡眠、気温、コース、風、疲労の影響を受けます。できるだけ同じ条件で行い、1回の結果だけで判断しないことが大切です。
日々のトレーニング負荷や長期的な進歩を確認したい方は、Suuntoアプリでの進歩管理もあわせて活用すると、トレーニングの流れを把握しやすくなります。
▶︎関連記事:ランニングのトレーニング負荷を管理する方法|Suuntoアプリとウォッチで疲労・進歩をチェック
テスト前に確認したいこと
フィットネステストは、通常のジョギングや軽いトレーニングよりも負荷が高くなります。
正確な結果を得るためにも、安全に実施するためにも、テスト前の準備が大切です。
実施前のチェックポイント
体調が良い日に行う
睡眠不足や強い疲労がある日は避ける
痛みや違和感がある場合は行わない
十分にウォームアップする
安全に走れる、または乗れる場所を選ぶ
気温や路面状況を確認する
テスト後はクールダウンを行う
特に閾値テスト、クーパーテスト、FTPテストは強度が高いため、無理に行う必要はありません。
疲労が残っている日や睡眠不足の日には、テストを延期することも大切です。
回復状態の確認方法は、こちらの記事でも紹介しています。
▶︎関連記事:トレーニング後の回復を確認する4つの方法|HRV・睡眠・負荷・感覚をSuuntoでチェック
SuuntoPlusスポーツアプリの使い方
SuuntoPlusスポーツアプリは、Suuntoアプリからウォッチに追加して使用します。
利用できるスポーツアプリは、ウォッチのモデルやソフトウェアの状態によって異なる場合があります。使用する前に、SuuntoウォッチとSuuntoアプリを最新の状態にしておきましょう。
基本的な流れは以下です。
Suuntoアプリでウォッチを同期する
SuuntoPlus Storeから使いたいスポーツアプリを追加する
ウォッチ側で対応するスポーツモードを選ぶ
運動開始前にSuuntoPlusスポーツアプリを選択する
テストの案内に沿って実施する
結果をウォッチとSuuntoアプリで確認する
SuuntoPlus Storeでは、スポーツアプリ、ガイド、パートナーサービスなどを追加できます。自分のトレーニング目的に合わせて、必要な機能を選びましょう。
ZoneSenseやHRVと組み合わせて強度と回復を見る
フィットネステストは、自分の体力やゾーン設定を確認するための目安になります。
一方で、日々のトレーニングでは、その日の体調や疲労、ストレス、睡眠によって、同じ強度でも身体の反応が変わることがあります。
体力テストでゾーン設定の目安を確認したうえで、トレーニング中の強度や回復状態をあわせて見ることで、より実践的にコンディションを管理しやすくなります。
HRVについて詳しく知りたい方は、こちらの記事も参考にしてください。
▶︎関連記事:HRVとは?Suuntoウォッチで回復状態をチェックする方法
Suunto ZoneSenseについて詳しく知りたい方は、こちらをご覧ください。
▶︎関連記事:Suunto ZoneSense
まとめ|SuuntoPlusのフィットネステストで、自分の現在地を確認しよう
SuuntoPlusスポーツアプリには、ランニングやサイクリングの体力テストに役立つ機能があります。
閾値テストは、ランニングの強度設定に。
クーパーテストは、VO2maxや現在の走力の目安に。
FTPテストは、サイクリングのパワーゾーン設定に。
デカップリングは、有酸素能力の安定性確認に。
20mビープテストは、総合的なフィットネス確認に役立ちます。
フィットネステストの結果を活用すると、心拍ゾーン、ペースゾーン、パワーゾーンを見直しやすくなり、日々のトレーニング強度も調整しやすくなります。
ただし、テストは負荷が高いものもあります。体調が良い日に行い、睡眠や回復状態も確認しながら、無理のない範囲で取り入れましょう。
自分の現在地を知ることで、トレーニングはもっと計画的になります。SuuntoPlusスポーツアプリを活用して、日々の練習をより効果的に進めてみてください。
▶︎Suuntoのフィットネス・トレーニング向けスポーツウォッチを見る


