


SUUNTOブログ

Red Bull X-ALPS just got tougher
Austrian adventurer, pilot and athlete Paul Gauschlbauer can’t believe come June 20 he’ll be competing in Red Bull X-Alps for the sixth time, and again chasing the Eagle across the Alps. “It means I’ve experienced more than 50 percent of the race’s history, which seems crazy somehow,” he says. “I have really lived and developed along with that race.”
© Nico Holzmeyer
Making a tough race tougher
The 37-year-old Suunto athlete landed in third place in the last three editions of the hike and paragliding race that starts in Salzburg and has, until now, ended on the Mediterranean Sea in Monaco. He is continuing to chase the Eagle, aka Chrigel Maurer, the generational paragliding talent that has won every race since 2009, and seems unassailable in his dominance.
But perhaps the 10th edition will challenge him in new ways. The race organizers – always looking for fresh ways to make the race tougher – have implemented what Paul says is the biggest change in race history; instead of making their way from alpine peaks to the Mediterranean Sea, the 33 competitors will travel a full circle starting in Salzburg, to Mont Blanc and then ending back in the waters of Zell am See, Austria.
“I think it’s tougher to make it to the goal because it’s longer,” Paul says. “We are always staying up in the high mountains. I always had the feeling in previous races that once we made it to Mont Blanc we’d basically already made it to Monaco, because the last stage was usually really fast, no more than a day from Mont Blanc down to the sea. Now we are arriving at Mont Blanc and we have to do the same thing one more time. It’s going to be really challenging.”
© wisthaler.com
The longest Red Bull X-Alps ever
At 1,238 km, it’s the longest route in the race’s history, 100km further than 2019. “It’s a new chapter for the Red Bull X-Alps,” says race director Christoph Weber. “The race committee wanted to make the tenth edition of the race one to remember so we decided to break away from the past and design a completely new route; a route where athletes will be geographically closer together. The days when lead athletes enjoyed good conditions at the front while those further back suffered bad weather is less likely as they’ll all be experiencing the same weather. That will add an interesting dynamic to race.”
One watch for every kilometer
Suunto and Red Bull X-Alps have a long history of working together to help athletes push their limits. To celebrate the 10th and longest edition of the race, we are launching 1238 Suunto 9 Baro Titanium Red Bull X-Alps Limited Edition watches – one for each kilometre of the race. This rare watch has a titanium bezel with Red Bull X-Alps Limited Edition text on both sides and red ink-fill on top. Each one is numbered with a corresponding kilometre of the race. The Special Edition watch has a blue textile quick-release strap in two lengths with a Red Bull X-Alps and Suunto logo. An additional dual color silicone strap is included in the box. Snap one up here!
COVID-19 challenge
Paul and his support person are currently training hard to prepare for the race. The COVID-19 pandemic has made preparation more challenging – Paul and his whole family came down with virus and all fortunately recovered. “I've had a hard time preparing because there was really no assurance that we were really going to race at all, he says. “Now I hope it won’t affect the race anymore.”
© Nico Holtzmeyer
Follow the incredible action live
With Red Bull X-Alps you can count on every single day involving rocky ascents, dizzying flights and crucial, strategic decisions – a challenge for both body and mind. With a more demanding route than ever before, Red Bull X-Alps 2021 will be full of drama, adventure, and high-alpine action. The winner will need to be smart, strong, a master of both planning and reactivity – and have a little bit of luck.
Tune in to the race along with millions of fans via its Live Tracking! Find an athlete from your country and support them from afar!
Lead images: © Nico Holzmeyer


トレーニング負荷とは?フィットネス・疲労・フォームで見る負荷管理の基本
トレーニングで成長するには、身体に適切な負荷をかけることが必要です。
ランニング、サイクリング、トレイルランニング、トライアスロンなどの持久系スポーツでは、1回ごとの練習だけでなく、数週間から数か月単位で負荷を積み上げていくことが大切です。
ただし、負荷を増やせば増やすほど良いわけではありません。負荷が少なすぎるとフィットネスは高まりにくく、反対に負荷が急に増えすぎると疲労が蓄積し、パフォーマンス低下やケガのリスクにつながることがあります。トレーニング負荷を理解するには、距離や時間だけでなく、どれくらいの強度で行ったか、疲労がどれくらい残っているかを見ることが大切です。
この記事では、フィットネス、疲労、フォームという3つの考え方をもとに、トレーニング負荷の基本を解説します。
目次
トレーニング負荷とは?
負荷を増やす3つの方法
TSSとは?トレーニング負荷を数値化する考え方
フィットネス・疲労・フォームとは
フィットネス:長期的なトレーニング負荷
疲労:短期的なトレーニング負荷
フォーム:フィットネスと疲労のバランス
フィットネス・疲労・フォームの関係
フォームの4つの状態
4つのトレーニング負荷パターン
1. オーバーロード:強化期間で負荷が急増するパターン
2. レース前の調整:疲労を抜いてフォームを上げるパターン
3. 体調不良や中断:休むことで疲労とフィットネスが下がるパターン
4. 通常パターン:活動的だがフィットネスが伸びていない状態
TrainingPeaksとの関係
Suuntoアプリでの確認方法を知りたい方へ
まとめ|トレーニング負荷を理解すると、負荷と回復のバランスを考えやすくなる
トレーニング負荷とは?
トレーニング負荷とは、運動によって身体にかかった負担を表す考え方です。
同じ10kmのランニングでも、ゆっくり走った10kmと、インターバルを含む10kmでは身体への負担が違います。同じ60分の運動でも、軽い有酸素走と、坂道トレーニングや高強度ライドでは疲労の残り方が変わります。
つまり、トレーニング負荷を見るときは、単純な距離や時間だけでは不十分です。
トレーニング負荷に関係する要素
運動時間
運動強度
心拍数
ペース
パワー
距離
地形や勾配
直近の疲労
過去数週間のトレーニング量
トレーニング負荷を理解できると、「今は負荷を増やしてもよい時期か」「疲労を抜くべきタイミングか」「レースに向けて順調に準備できているか」を判断しやすくなります。
負荷を増やす3つの方法
トレーニング負荷を増やす方法は、大きく分けて3つあります。
方法
内容
例
頻度を増やす
トレーニング回数を増やす
週3回から週4回にする
時間を増やす
1回あたりの運動時間を長くする
60分走を90分走にする
強度を上げる
より高い強度で行う
インターバルや坂道走を入れる
この3つを同時に大きく増やすと、疲労が急に高まりやすくなります。
たとえば、走る回数を増やしながら、ロング走も増やし、さらにインターバルも追加すると、身体が適応する前に疲労が蓄積してしまうことがあります。
負荷を増やすときは、頻度、時間、強度のうち、まずはどれか一つを少しずつ変えることが大切です。
TSSとは?トレーニング負荷を数値化する考え方
トレーニング負荷を数値化する考え方のひとつに、TSS(Training Stress Score) があります。
TSSは、トレーニングの強度と時間をもとに算出される負荷スコアです。短くても高強度のトレーニングはTSSが高くなりやすく、長時間でも低強度であれば、TSSの上がり方は比較的ゆるやかになります。
TSSは、1回ごとの運動負荷だけでなく、長期的な負荷の積み上げや短期的な疲労を理解するための土台になります。
TSSで理解しやすくなること
1回のトレーニングの負荷
数日間の疲労の蓄積
数週間単位の負荷の積み上げ
レース前に疲労が抜けているか
負荷が急に増えすぎていないか
TSSは専門的な指標ですが、考え方はシンプルです。
長く、強く動くほど、身体への負荷は大きくなる。その負荷を数値として見やすくしたものです。
フィットネス・疲労・フォームとは
TSSをもとにトレーニング負荷を理解するときに使われる代表的な考え方が、フィットネス、疲労、フォーム です。
日本語表記
指標
意味
フィットネス
CTL
長期的なトレーニング負荷
疲労
ATL
短期的なトレーニング負荷
フォーム
TSB
フィットネスと疲労のバランス
ここでいうフォームは、走り方のフォームではありません。
長期的な負荷と短期的な疲労のバランスから見た、現在のコンディションを表します。
この3つを理解すると、トレーニング負荷のグラフを見たときに、「フィットネスは積み上がっているか」「疲労が高すぎないか」「今はレースや高強度練習に向いている状態か」を読み取りやすくなります。
フィットネス:長期的なトレーニング負荷
フィットネスは、CTL(Chronic Training Load)とも呼ばれる、長期的なトレーニング負荷です。
一般的には、過去42日間のTSSの加重平均をもとに計算されます。継続的にトレーニングを積み上げることで、フィットネスは少しずつ高まります。
フィットネスは、「最近どれくらい継続的に練習できているか」を見る指標と考えるとわかりやすいです。
フィットネスが上がりやすい状態
定期的にトレーニングを続けている
週ごとのトレーニング量が安定している
負荷を少しずつ増やしている
ロング走や高強度練習を計画的に入れている
休養と練習のリズムが作れている
ただし、フィットネスは短期間で一気に高めるものではありません。急に負荷を増やすと、フィットネス以上に疲労が大きくなりやすいため、数週間から数か月かけて積み上げることが大切です。
疲労:短期的なトレーニング負荷
疲労は、ATL(Acute Training Load)とも呼ばれる、短期的なトレーニング負荷です。
一般的には、過去7日間のTSSの加重平均をもとに計算されます。強度の高い練習や長時間のトレーニングを行うと、疲労はフィットネスよりも早く上がります。
疲労が高いこと自体は、必ずしも悪いことではありません。身体にトレーニング刺激が入っている状態でもあります。
ただし、疲労が高い状態が長く続くと、回復が追いつきにくくなり、パフォーマンス低下やケガのリスクにつながることがあります。
疲労が高まりやすい場面
ロング走を行った
インターバルトレーニングを行った
坂道トレーニングを行った
長時間のトレイルランニングを行った
高強度のライドを行った
連日トレーニングを行った
フィットネスを高めるには、ある程度の疲労を伴う負荷が必要です。一方で、疲労が抜ける時間も必要です。負荷と回復はセットで考えましょう。
フォーム:フィットネスと疲労のバランス
フォームは、TSB(Training Stress Balance)とも呼ばれ、フィットネスと疲労のバランスから見たコンディションを表します。
ここでいうフォームは、走り方のフォームではありません。
現在の身体が、トレーニングを積み上げている状態なのか、疲労が抜けている状態なのか、あるいは疲労が高すぎる状態なのかを考えるための指標です。
フォームの見方
フォームが低い状態は、疲労が高く、トレーニング負荷がかかっている状態です。
トレーニングを積み上げる時期には、フォームが低めになることがあります。
一方で、フォームが高い状態は、疲労が抜けている状態です。 レース前の調整期には、フォームが高くなることがあります。
ただし、フォームが高ければ常に良い、低ければ常に悪いというものではありません。目的に応じて見方が変わります。
フィットネス・疲労・フォームの関係
フィットネス、疲労、フォームは、それぞれ別々の指標ではなく、関係しながら変化します。
トレーニング負荷を増やすと、まず疲労が上がります。負荷を継続して積み上げることで、フィットネスも少しずつ上がっていきます。
一方で、疲労が高くなりすぎると、フォームは下がります。疲労が抜けるとフォームは上がります。
代表的な変化
状態
フィットネス
疲労
フォーム
負荷を積み上げている時期
上がる
上がる
下がりやすい
回復期
維持または少し低下
下がる
上がりやすい
レース前の調整期
維持
下がる
上がりやすい
長期間休んだ時期
下がる
下がる
一時的に上がることがある
トレーニングの目的は、常にフォームを高く保つことではありません。
目標に向けてフィットネスを積み上げる時期と、レースや重要な練習に向けて疲労を抜く時期を分けて考えることが大切です。
フォームの4つの状態
フォームは、フィットネスと疲労のバランスから、現在の状態を読み解くために使われます。
代表的には、次の4つの状態として考えることができます。
状態
意味
フィットネス低下
負荷が少なく、体力の積み上げが落ちている状態
維持
現在のフィットネスを保っている状態
生産的なトレーニング
適度な負荷で成長につながりやすい状態
負荷が高すぎる
疲労が大きく、回復が追いつきにくい状態
フィットネス低下
フィットネス低下は、長期的な負荷に対して、現在のトレーニング負荷が少ない状態です。
レース前の調整期や休養期で一時的にこの状態になることはあります。ただし、目標に向けてトレーニングしている時期に長く続く場合は、練習量や頻度が足りていない可能性があります。
こんなときに見られやすい
シーズンオフ
体調不良やケガによる休養
忙しくて練習量が減っている
レース前に意図的に負荷を落としている
運動習慣が一時的に止まっている
維持
維持は、現在のトレーニング負荷が、これまで積み上げてきた負荷とおおむね釣り合っている状態です。
健康維持や運動習慣の継続が目的であれば、維持の状態も十分に意味があります。忙しい時期やレース後、シーズンオフには、フィットネスを大きく落とさずに保つことが目的になることもあります。
ただし、レースで記録を伸ばしたい、走力を高めたい、より長い距離に挑戦したい場合は、維持だけでは成長が止まりやすくなります。
維持が向いている時期
レース後の回復期
忙しい時期
シーズンオフ
ケガ明けの再開期
運動習慣を保ちたい時期
生産的なトレーニング
生産的なトレーニングは、フィットネスを高めるために適度な負荷がかかっている状態です。
疲労はあるものの、回復できる範囲でトレーニングが積み上がっている状態と考えるとわかりやすいです。
生産的な状態の目安
練習後に疲労はあるが、数日で回復できる
週ごとに少しずつ負荷を積み上げている
高強度練習と軽い練習のバランスが取れている
フィットネスが少しずつ上がっている
目標に向けて計画的に進められている
目標に向けてトレーニングを積み上げる時期には、この状態を意識すると良いでしょう。
負荷が高すぎる
負荷が高すぎる状態は、短期的な疲労が長期的なフィットネスに対して大きくなりすぎている状態です。
強化期間や合宿などで一時的にこの状態になることはありますが、長く続くと、体調不良やケガのリスクが高くなります。
注意したいサイン
いつものペースがきつく感じる
疲労感が抜けにくい
睡眠の質が落ちている
心拍数の反応が普段と違う
脚が重い
気分が乗らない
小さな痛みや違和感が続く
負荷が高すぎる状態が続く場合は、軽めのトレーニングや休養を入れ、身体が回復する時間を作ることが大切です。
4つのトレーニング負荷パターン
フィットネス、疲労、フォームの関係を理解すると、トレーニング負荷の変化を読み取りやすくなります。
ここでは、よくある4つのパターンを紹介します。
1. オーバーロード:強化期間で負荷が急増するパターン
合宿や強化期間では、短期間でトレーニング負荷が大きく増えることがあります。
この場合、フィットネスは上がりますが、疲労も大きく上がるため、フォームは低下します。
原文の例では、2週間のトレーニングキャンプによって、フィットネスが66から93へ上昇しています。一方で、フォームは-79まで低下しています。
これは、身体に大きな刺激が入っている状態です。適切に回復できれば、フィットネス向上につながります。ただし、フォームが大きく下がりすぎると、体調不良やケガのリスクも高くなります。
このパターンで大切なこと
強化期間の後に回復期間を入れる
高負荷の日を連続させすぎない
睡眠と食事を優先する
違和感がある場合は負荷を下げる
フォームが極端に下がった状態を長く続けない
2. レース前の調整:疲労を抜いてフォームを上げるパターン
レースに向けて順調に準備できている場合、長期的なフィットネスは少しずつ高まっていきます。
レースが近づくと、トレーニング量を少し落とし、疲労を抜いていきます。疲労が下がることで、フォームは上がりやすくなります。
このパターンでは、レース当日に向けて身体がフレッシュな状態に近づいていきます。
レース前に意識したいこと
直前まで負荷を上げ続けない
練習量を少しずつ落とす
強度を完全にゼロにしない
睡眠を確保する
新しい練習や装備を試しすぎない
レース前は、フィットネスを維持しながら疲労を抜くバランスが大切です。
3. 体調不良や中断:休むことで疲労とフィットネスが下がるパターン
体調不良、ケガ、仕事の忙しさなどでトレーニングを中断すると、まず疲労が下がります。
疲労は短期的な負荷を表すため、トレーニングを休むと比較的早く下がります。一方で、フィットネスも少しずつ低下していきます。
原文の例では、1週間トレーニングが止まり、その後は軽めに再開しています。中断前のフィットネスに近づくまで、約3週間かかる例が紹介されています。
再開時に大切なこと
休んだ分を一気に取り戻そうとしない
短時間・低強度から始める
以前のペースと比べすぎない
数値より体感を優先する
疲労が急に上がりすぎないようにする
休養や中断でフィットネスが下がるのは自然なことです。焦って負荷を戻すよりも、継続できる状態に戻すことを優先しましょう。
4. 通常パターン:活動的だがフィットネスが伸びていない状態
活動的な人によく見られるのが、一定のトレーニング負荷を維持しているパターンです。
長期的な負荷はある程度の水準にありますが、大きく上がってはいない状態です。健康維持や運動習慣の継続が目的であれば、問題のない状態です。
ただし、レースで記録を伸ばしたい、走力を高めたい、より長い距離に挑戦したい場合は、現在の負荷に新しい刺激を加える必要があります。
変化をつける方法
週1回だけ少し長く走る
坂道を取り入れる
短いインターバルを入れる
テンポ走を行う
トレーニング頻度を少し増やす
軽い週と負荷を上げる週を作る
同じ負荷を続けることは、維持には役立ちます。さらにフィットネスを高めたい場合は、身体が適応できる範囲で少しずつ負荷を増やすことが大切です。
TrainingPeaksとの関係
TSS、CTL、ATL、TSBは、TrainingPeaksでも使われるトレーニング負荷指標です。
TrainingPeaksでは、Performance Management Chartを使って、長期的なフィットネス、短期的な疲労、フォームの変化をより詳しく確認できます。
Suuntoで記録したアクティビティは、TrainingPeaksと連携して活用することもできます。日々のトレーニング記録をSuuntoで行い、長期的な計画や詳細な分析をTrainingPeaksで行うことで、レースに向けた負荷管理をより計画的に行いやすくなります。
本格的にマラソン、トレイルランニング、サイクリング、トライアスロンに取り組む人にとって、SuuntoとTrainingPeaksの連携は有効な選択肢になります。
Suuntoアプリでの確認方法を知りたい方へ
この記事では、トレーニング負荷を理解するための考え方として、TSS、フィットネス、疲労、フォームを紹介しました。
Suuntoアプリで日々のトレーニング負荷や進歩を確認する方法を知りたい方は、こちらの記事をご覧ください。
▶︎関連記事:ランニングのトレーニング負荷を管理する方法|Suuntoアプリとウォッチで疲労・進歩をチェック
トレーニング負荷を見るときは、自分の心拍ゾーンや閾値設定も重要です。SuuntoPlusスポーツアプリを使ったフィットネステストについては、こちらの記事で紹介しています。
▶︎関連記事:SuuntoPlusでできるフィットネステスト|VO2max・閾値・FTPを確認してトレーニングに活かす方法
まとめ|トレーニング負荷を理解すると、負荷と回復のバランスを考えやすくなる
トレーニング負荷とは、運動によって身体にかかった負担を表す考え方です。
距離や時間だけでなく、運動強度や疲労の変化を見ることで、トレーニングをより計画的に進めやすくなります。
フィットネス、疲労、フォームは、トレーニング負荷を理解するための重要な考え方です。
フィットネスは、長期的なトレーニング負荷
疲労は、短期的なトレーニング負荷
フォームは、フィットネスと疲労のバランス
ここでいうフォームは、走り方のフォームではなく、現在のコンディションを表します。
フィットネスを高めるには、生産的なトレーニングを積み重ねることが必要です。一方で、負荷が高すぎる状態が続くと、疲労が抜けにくくなり、パフォーマンス低下やケガのリスクにつながることがあります。
TSS、CTL、ATL、TSBの考え方を理解すると、トレーニング負荷のグラフやデータをより読み解きやすくなります。
Suuntoで記録したデータを参考にしながら、自分の身体の状態に合わせて、無理なくトレーニング負荷を積み上げていきましょう。
▶︎Suuntoのランニング・フィットネスウォッチを見る


SuuntoアプリのTSSとは?種類・見方・トレーニング負荷への活用方法
同じ1時間のトレーニングでも、ゆっくり走った日と、インターバルを行った日では身体への負荷が異なります。距離や時間だけでは比べにくい負荷を、運動時間と相対的な強度から数値化する指標がTSSです。
Suuntoアプリでは、ランニング、サイクリング、スイミングなどのトレーニング負荷をTSSで確認できます。ただし、画面に表示されるTSS(r)、TSS(hr)、TSS(p)などは計算に使われたデータが異なります。正しく比較するには、その違いと個人設定の影響を知ることが重要です。
この記事では、TSSの意味、Suuntoアプリに表示されるTSSの種類、数値の読み方、負荷管理へ活用する方法を解説します。
目次
TSSとは?
TSSの数値はどう読む?
Suuntoアプリに表示されるTSSの種類
計算方法はどのように選ばれる?
正しく比較するための設定
SuuntoアプリでTSSを活用する方法
TSSが体感とずれる主な理由
ATL・CTL・TSBとの関係
現行Suuntoウォッチで負荷を記録する
よくある質問
まとめ
TSSは疲労や回復を直接測定した数値ではありません。運動データと個人設定から推定されるトレーニング負荷です。体調、痛み、睡眠、筋肉痛、主観的な疲労感も合わせて判断してください。
TSSとは?
TSSは「Training Stress Score」の略で、トレーニングの時間と、自分の基準に対する相対的な強度を組み合わせて負荷を数値化する指標です。
同じ距離や同じ時間でも、低強度の運動と高強度の運動ではTSSが変わります。一方、強度が低くても長時間続ければ、短時間の高強度トレーニングと同じ程度のTSSになることがあります。
そのためTSSは、次のような比較に役立ちます。
時間と強度が違うランニング同士を比較する
ラン、バイク、スイムなど異なる種目の負荷を共通の目安で見る
1日または1週間に積み上げた負荷を確認する
急激なトレーニング量の増加に気づく
TSSの数値はどう読む?
パワーを基準とするTSSでは、個人の閾値強度で1時間運動した場合が100 TSSに相当する考え方が基準になります。ただし、すべての100 TSSが同じ運動内容や同じ疲労を意味するわけではありません。
たとえば、高強度のタイムトライアルで得た100 TSSと、数時間の低強度ライドで積み上げた100 TSSでは、心肺、筋肉、関節、補給への負担が異なります。数値が同じでも、回復に必要な時間や身体の反応は同じとは限りません。
また、TSSは他の人と競うためのスコアではありません。体力、閾値設定、利用データが人によって異なるため、自分の過去のトレーニングと継続的に比較します。
Suuntoアプリに表示されるTSSの種類
Suuntoアプリでは、TSSの後ろに計算基準を示す文字が表示されます。これを見ると、どのデータをもとに負荷が推定されたかを確認できます。
表示
主な計算基準
使われやすい場面
主な注意点
TSS(r)
ランニングペース
ロードランニングなど
坂道や路面条件による負荷差を捉えにくい場合がある
TSS(hr)
心拍数
ランニング、トレイル、持久系スポーツなど
心拍反応の遅れ、暑さ、脱水、疲労の影響を受ける
TSS(p)
パワー
サイクリング、ランニングパワーなど
正しい閾値パワーと安定したパワーデータが必要
TSS(s)
スイミングペース
プールスイミングなど
泳法、休息、プール設定、計測精度の影響を受ける
TSS(met)
運動種目と時間に基づくMET
心拍・ペース・パワーを利用できない記録
個人の実際の強度を反映しにくい概算値
TSS-
手動で編集した値
ユーザーがTSSを修正した記録
自動計算値との比較条件をそろえる
TSS(hr)を詳しく知りたい場合は「hrTSSとは?心拍数でトレーニング負荷を測る方法」をご覧ください。本記事ではTSS全体とSuuntoアプリでの使い分けを扱い、hrTSS記事では心拍ベース計算の特徴と限界を詳しく解説しています。
計算方法はどのように選ばれる?
Suuntoアプリは、アクティビティの種類と利用できるデータに応じてTSSの計算方法を選びます。ランニングではペース、サイクリングではパワー、心拍データを利用できる種目では心拍数などが計算に使われる場合があります。
どの方式が常に最も正確というわけではありません。一定ペースのロードランニングではペースを利用しやすい一方、急な上り下りがあるトレイルでは、速度だけでは努力を表しにくくなります。心拍数は身体の反応を捉えますが、短いインターバルでは強度変化への反応が遅れます。
心拍数、ペース、パワーを利用できない場合はTSS(met)が使われることがあります。これは運動種目と時間をもとにした概算なので、個人の実際の強度を細かく比較する用途には限界があります。
正しく比較するための設定
閾値と強度ゾーンを自分に合わせる
TSSは、実際の運動強度を個人の閾値に対して評価します。閾値心拍数、閾値ペース、FTPなどが実力と合っていないと、同じトレーニングでもTSSが高すぎたり低すぎたりする可能性があります。
Suuntoの5ゾーンモデルでは、ゾーン4の上限が無酸素性閾値の基準になります。推定値から始めた場合も、体力の変化やフィールドテストの結果に合わせて定期的に見直しましょう。
設定方法は「心拍ゾーンの計算・設定方法|Suuntoウォッチで強度管理を始める基本」で解説しています。
安定した心拍データを記録する
手首心拍を利用する場合は、ウォッチを手首の骨から少し上へ、運動中にずれない程度に装着します。寒さ、装着の緩さ、腕の動きなどによって心拍データが不安定になる場合があります。
高強度インターバルや手首で安定した計測が難しいスポーツでは、対応する胸部心拍ベルトの使用も検討してください。
屋外ではGPS取得を待つ
ペースを使うランニングでは、距離と速度の記録が重要です。運動開始前にGPSの取得を確認し、同じ条件のワークアウトを比較しやすくします。
SuuntoアプリでTSSを活用する方法
1回のワークアウトを確認する
ウォッチを同期し、Suuntoアプリで記録したアクティビティを開きます。表示されたTSSと計算方式を確認し、時間、心拍数、ペース、パワー、主観的なきつさを合わせて見ます。
「TSSが高いから良い練習」と判断するのではなく、予定した目的に対して適切だったかを確認します。回復ランのTSSが想定より高い場合は、ペース、心拍数、暑さ、疲労を見直します。
同じ種類のトレーニングを比較する
同じコースのイージーラン、同じ時間のテンポ走、同じインターバルメニューなど、条件の近い記録を比較します。計算方式が違うTSSをそのまま比べるより、同じスポーツ、同じ方式、似た環境での推移を見るほうが判断しやすくなります。
1週間の合計と急な変化を見る
単発のスコアだけでなく、数日から1週間の積み上がりを確認します。普段よりTSSが大幅に増えた週は、高強度セッションや長時間運動が重なっていないか、回復日を確保できているかを振り返ります。
SUUNTO Japan公式:Suuntoアプリのトレーニング負荷指標の読み取り方(日本語字幕あり)
TSSが体感とずれる主な理由
原因
起こりうること
確認方法
閾値設定が合っていない
TSSが継続的に高すぎる・低すぎる
心拍ゾーン、閾値ペース、FTPを見直す
心拍データが不安定
TSS(hr)が実際の体感とずれる
装着位置、センサー、心拍グラフを確認する
暑さ・脱水・睡眠不足
同じペースでも心拍と負荷が高くなる
気象、補給、睡眠、体感を記録する
短い高強度運動
心拍反応が追いつかず負荷を捉えにくい
ペース、パワー、ラップ、体感も見る
筋力・下り・技術的な路面
心拍が低くても筋肉や関節への負担が大きい
筋肉痛、標高差、主観的負荷を加える
TSS(met)による概算
個人の実際の強度を十分に反映しない
利用可能なら心拍、ペース、パワーを記録する
ATL・CTL・TSBとの関係
各トレーニングのTSSが積み重なると、短期・長期の負荷を確認する指標へつながります。
ATL:直近のトレーニング負荷。現在の疲労を考える手がかり
CTL:長期的なトレーニングの積み上げ。継続的な負荷の傾向
TSB:長期負荷と短期負荷のバランス。現在のフレッシュさを考える手がかり
CTLが上がれば常に良い、TSBがプラスなら必ずレースに最適、という単純なものではありません。記録期間、トレーニング計画、個人の反応によって意味が変わります。
ATL・CTL・TSBを使った判断は「ランニングのトレーニング負荷を管理する方法|Suuntoアプリとウォッチで疲労・進歩をチェック」で詳しく解説しています。
現行Suuntoウォッチで負荷を記録する
日々のランニングを軽量なウォッチで記録したい人にはSuunto Run、ランニングから複数のスポーツまで取り組む人にはコンパクトなSuunto Race Sが選択肢です。
大きなAMOLEDディスプレイでトレーニングデータを確認したい人にはSuunto Race 2、長時間のトレイルランニングやアウトドアアクティビティまで記録したい人にはSuunto Vertical 2も候補になります。
利用できるトレーニング指標や画面は、モデル、スポーツモード、センサー、ソフトウェアバージョンによって異なる場合があります。製品ページ、ユーザーガイド、Suuntoアプリで最新情報を確認してください。
よくある質問
TSSが高いほど効果の高いトレーニングですか?
必ずしもそうではありません。TSSは負荷の大きさを示す目安であり、トレーニングの質や目的への適合を保証するものではありません。低強度の日、休養、高強度の日を計画に合わせて組み合わせます。
TSS(r)とTSS(hr)は直接比較できますか?
共通の負荷指標として参考にはできますが、計算に使うデータと弱点が異なります。継続的な変化を見る場合は、できるだけ同じスポーツ、同じ計算方式、似た条件の記録を比較してください。
同じコースなのにTSSが違うのはなぜですか?
ペース、心拍数、運動時間だけでなく、暑さ、風、疲労、脱水、センサー精度、閾値設定などが影響します。TSSと一緒に心拍グラフ、ペース、気象条件、体感を確認しましょう。
TSS(met)は使えない数値ですか?
運動記録を大まかに負荷へ反映する用途には使えます。ただし、個人の実際の強度を直接測った値ではないため、細かな比較では心拍、ペース、パワーを使ったTSSより概算的です。
TSSだけで休養日を決めてもよいですか?
TSSだけでは判断しません。ATL、CTL、TSB、睡眠、安静時心拍数、HRV、筋肉痛、主観的疲労を組み合わせます。痛みや体調不良がある場合は数値にかかわらず休養し、必要に応じて専門家へ相談してください。
まとめ|TSSの種類と計算条件を確認して活用しよう
TSSは、運動時間と個人の基準に対する強度から、トレーニング負荷を数値化する指標です。Suuntoアプリでは、ランニングペース、心拍数、パワー、スイミングペース、METなど、利用できるデータに応じたTSSが表示されます。
数値を見るときは、TSSの後ろにある記号、閾値設定、センサーの記録状態を確認します。単発の高低だけで判断せず、同じ条件のトレーニングや週間の推移を比較し、体調や主観的な疲労感と組み合わせましょう。
トレーニング負荷を継続して記録する
SuuntoウォッチとSuuntoアプリで、1回の負荷と長期的な積み上がりを振り返りましょう。
Suuntoスポーツウォッチを見る

Two friends pursue history on the Eiger
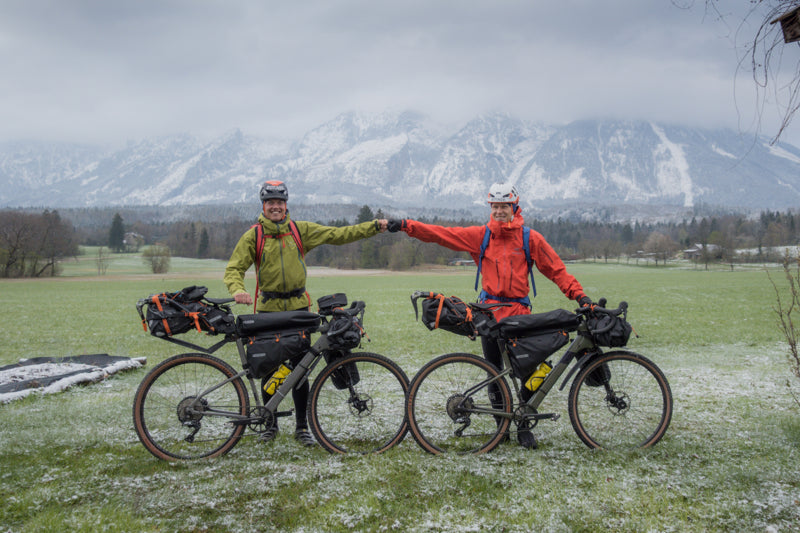
Childhood buddies Philipp Reiter and Martin Schidlowski set off bikepacking from Berchtesgaden in south Germany yesteday following the same historic journey undertaken 85 years ago by German climbers and friends Toni Kurz and Andi Hinterstoisser.
In 1936, early in the Nazi period, Kurz and Hinterstoisser deserted from the German military, and under the cover of darkness began cycling from Berchtesgaden to the base of Eiger in Switzerland, some 600 km away. Their goal? To become the first climbing team to solve the last unsolved climbing problem in the Alps – the sheer, unforgiving North Face of the Eiger (3967 m). However, their climb ended in tragedy, with both climbers, and two Austrian climbers all dying on the wall. The tragic story was captured in the 2008 film, North Face.
“What is cool for me is we will get a little glimpse of an idea of how tough it was and what challenges Kurz and Hinterstoisserand had to face,” Philipp says. “It’s cool to discover how it really was for them.”
The intimidating North Face of Eiger. © Wikimedia Commons User: Terra3 / CC BY-SA 3.0
Philipp and Martin, both Berchtesgaden locals, are undertaking the same journey, with the aim of summitting Eiger via the North Face, to experience firsthand what their compatriots went through. It will take them three days to cycle 600 km, with 6000 m of vertical gain, to reach Grindelwald Valley and the base of the face where they will attempt the 1600 m vertical climb.
A snow dump made the first day a tough ride. @ Nicolas Holtzmeyer
Philipp, a photographer, alpinist and history enthusiast, and Martin, a climber and mountain guide, have been friends since childhood, and having been going on adventures together since 2006. Each year they try to share one adventure that combines endurance and mountaineering.
“Martin is totally not into biking,” Philipp says. “I’m more experienced with biking, and he’s expert in climbing. We make a good team. He’s afraid of the long bike ride, and I’m afraid of the challenging climb. This will be my biggest alpine project. It’s 1600 m straight up!”
The two friends will track their journey with Suunto watches and provide live updates via Suunto Instagram. @ Nicolas Holtzmeyer
This isn’t the first history focused adventure Philipp has initiated. In 2020, he and some friends did a relay run of the 850 km front line where Austrian and Italian troops battled during the First World War. In 2019, Philipp and his friends did the same on the 1400 km border that once divided Germany.
“Back in 1936 it was the Germans against the Austrians, and the Austrians against the Italians,” Philipp continues. “Climbing teams from each country wanted to become the first to scale the North Face. It created a super big hype, like the equivalant of a Superbowl TV broadcast.”
Philipp and Martin won’t have to cope with any competition or a medic circus, but a Bavarian television crew will follow them to document the historic journey. You can follow them on Suunto Instagram!


Anton Krupicka - Human powered, doorstep to doorstep
Once a pure runner, who won ultra races across the US, an injury in 2011 transformed Anton Krupicka into a passionate multisport athlete who thrives on human powered adventure.
“There is something special and empowering about doing everything yourself – not relying on a motor vehicle – and as a multi-sport athlete, I love combining sports into one big outing,” Anton says. “For instance, riding my bike to climb at the local crag, or riding my bike on a tour to link up a series of mountains on foot, or even riding my bike from my doorstep to climb and ski a local mountain. I like the logistical challenge and the need to refine my systems to be as functional and simple as possible.”
Anton’s passion for mixed sport adventure hasn’t diminished his love of racing, however. “Pushing your hardest is such a unique life experience, and I find that I’m only able to do that in a race environment,” he says. “Competition, at its essence, is everyone working together towards a common goal to bring out the best in each other. It’s a beautiful, painful, connecting experience. When it goes well, there’s euphoria. When it doesn’t go well, there is an unparalleled opportunity for learning and growth. I think racing is so valuable, no matter where you finish in the results. As such, I hope to do it my whole life.”
Anton, now 37, began racing early in life. Originally hailing from Nebraska, he became a runner at 11, and 18 months later ran his first marathon. The thrill of pushing his limits led from one challenge to another, and 10 years later he ran his first ultra marathon, the Leadville 100, and the experience changed his life. “It gave me a fundamental confidence I could do anything if I tried hard enough,” Anton says.
In 2011, at the height of his ultra powers, Anton broke his leg while running, putting his career on hold. But it was a blessing in disguise because it gave him the time and inspiration to explore sports he hadn’t had the opportunity to try before – climbing, cycling and skiing. “I never had the confidence to pursue these other sports when I was younger,” Anton says. “Now, for the past 10 years, I would say I have been as enthusiastic a climber as I am a runner (though not as successful, of course!), and for the last six years I’ve also devoted a lot of time to cycling and skiing, depending on if it’s summer or winter. These have grown to become as important and indispensable to me as an athlete and a human as running has been for the past 26 years.”
Now based in Boulder, Colorado, Anton is always cooking up new adventures. His favorite usually involves mixing cycling with mountaineering. He enjoys cycling from mountain to mountain and climbing them on foot. With his love of pushing hard, bikepacking races are also on the cards in the near future. “My ideal adventure probably has some element of speed included in it, I don’t think records are necessarily interesting in and of themselves. However, I do think trying your hardest puts a unique demand on you and shapes the experience in a positive way. Trying to go fast demands that you are focused and skilled and it puts me in a mindset I find very enjoyable and an enormous privilege. Trying my best – pushing towards my personal limits – is the best way for me to grow and learn new things. There has to be some chance of failure and challenge for growth to occur.”
Whatever Anton does, trail running, bikepacking, mountaineering, skiing, he keeps meticulous training logs, and has been doing so since 1995. He’s been using Suunto watches since 2015, which he says are fundamental to his athletic life. He started with a Suunto Core, switched to an Ambit3 Peak, and now uses a Suunto 9 Baro. “I use my Suunto 9 to take splits on regular training routes, check the altitude and elevation gain, track distance, and with the advanced GPS technology available now I even use it for navigation in unknown terrain. I always have my Suunto with me!”
All images by Joey Schusler

And the World Vertical Week 2021 winners are...
After a very complicated and challenging year, 2021 was perhaps one of Suunto’s most special editions of World Vertical Week. The results show how much athletes from every corner of the globe want to push themselves in the outdoors – the number of participants more than tripled to over 48,000 athletes joining the challenge in search of vertical glory this year.
The reigning champ
Austria has done it again: it’s the country with the highest average climb per activity, 421 m. The country of music and mountains has again retained the position that it’s accustomed to, number one, which it has held in four of the last five years. It only lost its crown in 2019, falling to fifth place. Austria is followed by Slovenia (2nd, 401 m), Italy (3rd, 378 m), Switzerland (4th, 348 m), and France (5th, 292 m). These nations have regularly featured in the World Vertical Week top 10. Special mention goes to Hong Kong athletes, with their 254 m average, taking eighth place.
Austria 421 m
Slovenia 401 m
Italy 378 m
Switzerland 348 m
France 292 m
Slovakia 280 m
Spain 275 m
Hong Kong 254 m
Norway 239 m
Canada 233 m
Spain, France and Italy always consistent
Add, add, add. Based on many diverse efforts, Spanish athletes made Spain the nation with the most climbed meters overall. Spain has snatched back the title, which landed in French hands last year. Italy comes in as third again. Suunto has been providing total data by country for three years, and these three countries have had a place on the podium each time.
Spain
France
Italy
Austria
Germany
Don't say vertical climb, say skimo
Once again, ski touring looms large as the sport with the most vertical meters clocked: up to 960 m on average per activity. And its companions also repeated on the podium: mountaineering (628 m) and trail running (434 m). The average accumulated climb in each sport increases year after year, but these three disciplines remain top dogs.
Ski touring 960 m
Mountaineering 628 m
Mountain biking 378 m
Trekking and hiking 241 m
Cycling 198 m
Nordic skiing 173 m
Running 92 m
10,000 m... in one week!
Each year, Suunto World Vertical Week generates unique stories of athletes who go above and beyond, surprising and inspiring the entire community. This time, the efforts of nine athletes stands out. Faced with an invitation to tally vertical meters, they managed to accumulate more than 10,000 meters in one week. That’s brutal!
In addition, 89 were able to tally 10,000 feet – or 3,500 meters – during a single activity! 1,000 meters of total ascent during an activity was broken 4,240 times during the week. Respect!
Top nations by sport
Italy is multiskilled
The transalpine country is ranked in third place for collecting the most average and overall vertical climb meters, and in addition it leads the mountain biking ranking and is among the top three countries in three more categories: ski touring, mountaineering and cycling. Italy is present in six of the seven classifications by discipline. Bravo!
Ski touring (avg. ascent by country)
Over 1,000 meters on average? Why not? The first four countries in the ranking, Germany, Italy, Switzerland and Austria, are all above the 1000 meter mark this year. The ranking offers surprises and changes compared to 2020, perhaps due to the constraints and limitations arising from the pandemic. Germany deserves special mention; last year it didn't make the top 5 and in 2021 it is on top! Spain, on the other hand, was first in 2020, but has disappeared from the 2021 top 10.
Germany 1076 m
Italy 1050 m
Switzerland 1043.3 m
Austria 1042.9 m
United States 957 m
France 940 m
Slovakia 927 m
Slovenia 926 m
Poland 876 m
Japan 844 m
Trail running (avg. ascent by country)
For years, Japan and Hong Kong have reflected the passion trail running inspires in Asia: they captured the top positions here once again, accompanied this time by Slovenia.
Japan 839 m
Hong Kong 628 m
Slovenia 626 m
Italy 594 m
Norway 502 m
Hungary 486 m
Portugal 485 m
Spain 476 m
Switzerland 472 m
Greece 464 m
Mountaineering / avg. ascent by country
Switzerland returns to the top five and comes out on top, showing that it is passionate about seeing the world from way up high. It is accompanied by Italy, France, Germany and Austria... forming a classification dominated by Central Europe, the territory of the Alps and high mountains.
Switzerland 1019 m
Italy 993 m
France 856 m
Germany 755 m
Austria 688 m
Mountain biking (avg. ascent by country)
Italy is synonymous with variety, but according to data from the Suunto World Vertical Week it tallied the most vertical meters of all on two wheels. There are few changes from 2020, with the main one being that Slovenia has entered the top 5.
Italy 547 m
Spain 475 m
Austria 473 m
Slovenia 471 m
Switzerland 440 m
Trekking and hiking (avg. ascent by country)
Thai athletes racked up the most vertical meters in trail running last year. This time, it would seem they have chosen to continue, only at a different pace.
Thailand 567 m
Japan 503 m
Slovenia 411 m
Italy 399 m
Slovakia 396 m
Cycling (avg. ascent by country)
It seems like climbing mountain passes by road bike in Portugal is close to becoming a tradition. The country won top position once again, and Colombia returns to the ranking after last year’s absence.
Portugal 432 m
Colombia 383 m
Italy 382 m
Spain 340 m
Greece 271 m
Running (avg. ascent by country)
Traditionally this is one of the closest categories, with just a few meters of difference separating countries. This time Slovenia, which regained the top position that it had back in 2018, has pulled away a little.
Slovenia 196 m
Norway 164 m
Switzerland 150 m
Hungary 143 m
France 129 m
Thank you to everyone for participating in Suunto World Vertical Week 2021. We’ll be back with another edition of Vertical Week!
READ ALSO
Three inspiring World Vertical Week moments


