


SUUNTOブログ


登山やトレイルで天気を確認する方法|Suuntoウォッチで気圧・日没・ストームアラームを活用
登山やトレイルランニングでは、天気の変化が行動計画に大きく影響します。
出発時は晴れていても、山では急に雲が広がったり、風が強くなったり、雨に変わったりすることがあります。特に標高の高い場所、稜線、長時間のハイクでは、天気や気圧の変化を早めに把握することが大切です。
SuuntoのGPSウォッチには、アウトドアで天気の変化を確認するための機能があります。気圧傾向、ストームアラーム、日の出・日の入り、気温、高度、天気予報などを活用することで、山での判断をサポートできます。この記事では、登山やトレイルで天気を確認するために役立つSuuntoウォッチの機能と、実際の使い方を紹介します。
登山やトレイルで天気確認が重要な理由
山の天気は、平地よりも変わりやすいことがあります。
登り始めは晴れていても、標高が上がるにつれて気温が下がったり、風が強くなったり、ガスが出たりすることがあります。雨や雷、強風、日没の早さは、登山やトレイルランニングの安全に直結します。
山の天気は変わりやすい
登山やトレイルランでは、天気予報だけでなく、行動中の変化にも注意が必要です。
気圧が下がってきた。
風が強くなってきた。
雲が厚くなってきた。
気温が思ったより低い。
こうした変化に早めに気づくことで、休憩場所を変えたり、行動時間を短くしたり、引き返す判断をしやすくなります。
日没・気温・風も行動判断に影響する
山では、日没時間も大切な情報です。
特に秋冬や標高の高いエリアでは、日が落ちると一気に気温が下がることがあります。ヘッドライトを持っていても、暗くなってからの行動はリスクが高くなります。
天気、気圧、気温、高度、日の入り時間をあわせて確認しておくことで、無理のない行動計画を立てやすくなります。
Suuntoウォッチで確認できる天気・環境情報
Suuntoウォッチでは、モデルやソフトウェアの対応状況に応じて、アウトドアで役立つ天気・環境情報を確認できます。
対応するSuuntoウォッチでは、ウィジェットから現在の高度、気圧、気圧傾向、気温などを確認できます。山での行動中に気圧や高度の変化を手元で見られるため、天候変化やペース配分の判断に役立ちます。
気圧傾向
気圧傾向は、天気の変化を知るための参考になります。
一般的に、気圧が大きく下がると天候が崩れるサインになることがあります。登山中に気圧の変化を確認できると、雨や風の変化に早めに気づきやすくなります。
ストームアラーム
ストームアラームは、急な気圧低下を知らせる機能です。
Suunto RaceやSuunto Verticalでは、ストームアラームを有効にしている場合、3時間で気圧が4hPa以上低下するとアラームとストームシンボルで通知される仕様です。
日の出・日の入り
の出・日の入りの時刻を確認できると、登山やハイキングの行動時間を管理しやすくなります。
Suunto Verticalでは、日の出・日の入りアラームとストームアラームを設定でき、日の出・日の入り時刻とアラームにはGPS取得が必要とされています。
気温
気温の確認は、ウェアや防寒対策の判断に役立ちます。
ただし、腕に着けているウォッチで気温を測る場合、体温の影響を受けることがあります。正確に外気温を確認したい場合は、ウォッチを腕から外してしばらく置くなど、測定環境に注意しましょう。
高度・高度計
高度は、現在地の標高や登下降の目安として役立ちます。
登山では、地図上の標高やルートの高度差と照らし合わせることで、現在どのあたりまで登ってきたか、残りの登りがどれくらいあるかを把握しやすくなります。
天気予報
対応モデルでは、ウォッチ上で現在の天気や予報情報を確認できます。
対応するSuuntoウォッチでは、天気ウィジェットから現在の気温、風速・風向、天気の状態などを確認できます。さらに詳細な天気情報も手元で確認できるため、登山やトレイルランニング中の状況判断に役立ちます。
気圧傾向とストームアラームで天気の変化に備える
登山やトレイルランでは、天気予報だけでなく、行動中の気圧変化も確認しておくと安心です。
気圧が安定しているのか、下がり続けているのか、急に変化しているのかを見ることで、天候変化のサインに気づきやすくなります。
気圧が下がると天気が崩れるサインになることがある
気圧が下がると、雨や風など天気の変化につながることがあります。
もちろん、気圧だけで天気を完全に判断できるわけではありません。地形、季節、風向き、前線、標高など、さまざまな要因が関係します。
それでも、登山中に「気圧が下がり続けている」とわかれば、空の変化や風の強さにもより注意を向けやすくなります。
ストームアラームとは
ストームアラームは、急な気圧低下を検知したときに通知する機能です。
Suunto Race 2、Suunto Vertical 2をはじめ、対応するSuuntoウォッチでは、ストームアラームを有効にしておくことで、急な気圧低下を検知した際にアラームとストームシンボルで通知します。3時間で4hPa以上の気圧低下があった場合に通知されるため、登山やトレイルランニング中に天候変化のサインへ早めに気づきやすくなります。
急な天候悪化の可能性に早めに気づけるため、登山、ハイキング、キャンプ、トレイルランニングなどのアウトドアで役立ちます。
アラームが鳴ったときに考えたいこと
ストームアラームが鳴った場合は、まず周囲の状況を確認しましょう。
空が暗くなっていないか。
風が強くなっていないか。
遠くで雷鳴が聞こえないか。
稜線や開けた場所にいないか。
安全に下山・撤退できるルートがあるか。
アラームは「必ず嵐が来る」という断定ではありませんが、行動を見直すきっかけになります。特に雷や強風のリスクがある場合は、早めに安全な場所へ移動する判断が大切です。
日の出・日の入りを確認して行動時間を管理する
登山では、日没までに安全な場所へ戻ることが基本です。
特に初めて歩くルート、標高差の大きいルート、天気が不安定な日、秋冬の登山では、日の入り時間を早めに確認しておくことが重要です。
日没前に下山・撤退判断をしやすくする
Suuntoウォッチで日の入り時間を確認できると、行動中に「あとどれくらい明るい時間が残っているか」を把握しやすくなります。
予定よりもペースが遅い。
休憩に時間がかかっている。
天気が崩れてきた。
ルート上にまだ大きな登りが残っている。
こうした状況では、日没時間を見ながら早めに判断することが大切です。
朝駆け登山や写真撮影にも役立つ
日の出・日の入り情報は、安全管理だけでなく、楽しみ方にも役立ちます。
朝日を見に行く登山、夕景を狙う写真撮影、キャンプ場での行動計画などでは、日の出・日の入り時間を手元で確認できると便利です。
特に写真撮影では、光の向きや時間帯が仕上がりに大きく影響します。日の出前後や日没前後の時間を把握しておくことで、撮影ポイントへの到着時間や撤収タイミングを考えやすくなります。
登山やアウトドアでの写真撮影にSuuntoウォッチを活用する方法は、こちらの記事でも紹介しています。
▶︎関連記事:Suuntoウォッチがアウトドア写真撮影に役立つ理由
ストームアラームと日の出・日の入りアラームの設定方法
ストームアラームや日の出・日の入りアラームは、対応するSuuntoウォッチの設定メニューからオン/オフできます。
ウォッチフェイス画面で中央ボタンを長押しして設定メニューを開き、システム通知 > アラート から ストーム や 日の出・日の入り に関するアラートを設定できます。
ストームアラームをオンにすると、気圧の急な低下を検知した際にウォッチ上で通知されます。日の出・日の入りアラームを設定しておくと、行動開始や下山、撮影、キャンプでの準備時間を考えやすくなります。
*モデルによってメニュー名や表示位置が異なる場合があります。使用しているウォッチの設定画面、またはユーザーガイドもあわせて確認してください。
気温と高度を確認して装備やペースを調整する
山では、標高が上がるにつれて気温が下がりやすくなります。
天気予報では暖かく見えても、稜線や風の強い場所では体感温度が大きく下がることがあります。ウォッチで気温や高度を確認することで、ウェアの調整やペース配分を考えやすくなります。
ウォッチで気温を測るときの注意点
ウォッチを腕に着けたまま気温を見ると、体温の影響を受ける場合があります。
外気温をより正確に知りたい場合は、ウォッチを腕から外してしばらく外気に触れさせると、参考にしやすくなります。気温表示は、行動中の体感や天気予報とあわせて判断するのがおすすめです。
高度変化から負荷を把握する
登山やトレイルランでは、距離だけでなく高度差も負荷に大きく影響します。
同じ5kmでも、平坦な道と標高差の大きいルートでは疲労感が異なります。高度を確認しながら進むことで、今どのくらい登っているのか、残りの登りをどう進むかを考えやすくなります。
ルート上の登り下りを詳しく把握したい方は、クライムガイダンスの記事も参考にしてください。
▶︎関連記事:登山・トレイルランのルートナビゲーション|Suuntoクライムガイダンスの便利な使い方
天気予報とウォッチの情報を組み合わせて使う
Suuntoウォッチの天気・環境情報は、アウトドアでの判断をサポートするものです。
ただし、登山やトレイルランでは、出発前の天気予報、雨雲レーダー、登山天気サービス、現地の情報とあわせて確認することが大切です。
出発前は天気予報・雨雲レーダーを確認する
出発前には、目的地周辺の天気予報を確認しましょう。
見るポイントは、天気だけではありません。
降水確率
風速
気温
雷の可能性
雨雲の動き
日の出・日の入り
標高による気温差
山では、ふもとの天気と山頂付近の天気が違うことがあります。長時間の行動や標高の高いエリアでは、余裕を持った計画が必要です。
行動中はウォッチで変化を見る
行動中は、ウォッチで気圧傾向、気温、高度、日の入り時間などを確認します。
たとえば、出発前の予報では晴れでも、行動中に気圧が下がり続けている場合は、空の変化や風に注意する。予定より遅れている場合は、日の入り時間を見ながらルート短縮や撤退を考える。
このように、出発前の予報と行動中の変化を組み合わせることで、より安全に判断しやすくなります。
Suuntoウォッチが役立つアウトドアシーン
Suuntoウォッチの天気・環境情報は、登山だけでなく、さまざまなアウトドアで役立ちます。
登山・ハイキング
登山やハイキングでは、気圧、気温、高度、日の入り時間の確認が行動判断に役立ちます。
天気が崩れそうなとき、予定より時間がかかっているとき、稜線に出る前など、ウォッチで情報を確認することで、次の判断をしやすくなります。
登山用GPSウォッチの選び方を知りたい方は、以下の記事も参考にしてください。
▶︎関連記事:登山におすすめのGPSスマートウォッチとは?地図・バッテリー・選び方を解説
トレイルランニング
トレイルランニングでは、天候の変化がペースや安全に影響します。
長い登り、稜線、山間部のルートでは、雨や風、気温低下に備えることが大切です。気圧傾向や日の入り時間を確認できると、レースやロングランの行動計画にも役立ちます。
キャンプ・縦走
キャンプや縦走では、夜間の気温や天気の変化も重要です。
テントを張る場所、行動を終える時間、翌朝の出発時間を考えるときに、天気や日の出・日の入り情報が役立ちます。ストームアラームや気圧傾向を確認できると、天候悪化への備えもしやすくなります。
釣り・写真撮影
釣りや写真撮影では、日の出・日の入り、気圧、天気の変化が大切な要素になります。
朝夕の光を狙う撮影や、長時間屋外にいるアクティビティでは、手元で環境情報を確認できると便利です。
天気確認に役立つSuuntoウォッチを選ぶポイント
登山やアウトドアで使うウォッチを選ぶときは、天気情報だけでなく、ナビゲーション、バッテリー、使いたいアクティビティに合っているかも確認しましょう。
Suuntoには、オフラインマップやルートナビゲーションに対応したGPSスポーツウォッチだけでなく、気圧計・高度計・コンパスを備えたアウトドアウォッチもあります。登山やトレイルランニングでルート確認まで行いたいのか、気圧や高度、方角をシンプルに確認したいのかによって、選ぶモデルが変わります。
気圧計・高度計・コンパス
山で使うなら、気圧計、高度計、コンパスは確認しておきたい機能です。
気圧は天候変化のサインを知るために、高度は現在地や登下降の把握に、コンパスは方向確認に役立ちます。
Suunto Coreは、気圧計、高度計、コンパスを備えたアウトドアウォッチです。GPSやオフラインマップは搭載していませんが、天気や気圧、高度、方角をシンプルに確認したい方におすすめです。
▶︎Suunto Coreを見る
オフラインマップ・ルートナビゲーション
登山やトレイルでは、天気だけでなく現在地やルート確認も重要です。
Suunto Vertical / Vertical 2など、オフラインマップやルートナビゲーションに対応したモデルなら、スマートフォンを頻繁に取り出さなくても手元でルートを確認しやすくなります。
Suunto Vertical / Vertical 2が登山に向いている理由は、こちらの記事で詳しく紹介しています。
▶︎関連記事:Suunto Vertical / Vertical 2が登山用GPSスマートウォッチに向いている理由
バッテリー持ち
長時間の登山や縦走では、バッテリー持ちも重要です。
GPS記録、地図確認、ナビゲーション、天気情報の確認を行う場合、バッテリーに余裕があると安心です。日帰り登山だけでなく、長時間のハイクや山小屋泊を想定するなら、バッテリー性能もチェックしましょう。
Suuntoウォッチで天気を確認する前に準備しておきたいこと
アウトドアでウォッチを使う前に、基本的な準備をしておくと安心です。
ウォッチとSuuntoアプリを最新にする
出発前に、ウォッチとSuuntoアプリを最新バージョンに更新しておきましょう。
天気ウィジェットやナビゲーション機能、マップ機能は、ソフトウェアアップデートによって改善されることがあります。山に入る前に同期や設定を済ませておくと、現地で慌てにくくなります。
GPS取得と位置情報を確認する
日の出・日の入り時刻や位置に応じた情報を使う場合は、GPS取得が必要になることがあります。
登山口や開けた場所でGPSを取得し、ルートやマップ、アクティビティ記録の準備ができているか確認しましょう。
予備の安全対策も忘れない
ウォッチは便利なサポートツールですが、天気判断をウォッチだけに頼るのは避けましょう。
登山地図、スマートフォン、モバイルバッテリー、レインウェア、防寒具、ヘッドライト、水分、非常食など、基本装備もあわせて準備することが大切です。
Suuntoのアウトドアウォッチで、天気とルートを手元で確認しよう
登山やトレイルランでは、天気の変化、現在地、ルート、標高差、日没時間をまとめて確認できると、行動中の判断がしやすくなります。
Suuntoのスポーツウォッチは、アウトドアでのルートナビゲーションやアクティビティ記録に対応したモデルを展開しています。天気や気圧、標高、ルート確認を活用したい方は、自分のスタイルに合うモデルをチェックしてみてください。
▶︎Suuntoのアウトドア向けスポーツウォッチを見る
まとめ|天気の変化を早めに知ることが、安全なアウトドアにつながる
登山やトレイルランニングでは、天気の変化を早めに把握することが大切です。
Suuntoウォッチを使えば、気圧傾向、ストームアラーム、日の出・日の入り、気温、高度、天気予報などを手元で確認できます。出発前の天気予報と、行動中のウォッチ情報を組み合わせることで、山での判断をサポートできます。
天気が変わりやすい山では、「まだ大丈夫」ではなく、「早めに気づいて、早めに判断する」ことが安心につながります。
登山、トレイルラン、キャンプ、縦走をより安全に楽しむために、Suuntoウォッチの天気・環境情報を活用してみてください。
▶︎Suuntoの登山・ハイキング向けGPSスポーツウォッチを見る


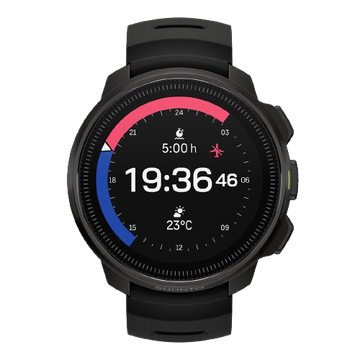
Get key info at a glance with the new Outdoor watch face
The new Outdoor watch face for the Suunto 9 Baro, 9, 5 and 3 watches allows users to track conditions and daylight hours with just a quick glance. No need to press buttons or scroll – the essential info is presented on the screen.
Suunto UX designer Jeanette Lau supported the development and says the motivation behind the watch face was to support users with their adventure planning. “We wanted to inspire and equip users for their outdoor adventures,” she says. “We conducted some research and we learned many of our users felt as if there wasn’t enough time in the day and wanted to know what the conditions were before embarking on their adventure.”
Click to learn about 8 tools to track the weather with Suunto
For all of the above watches, the Outdoor watch face features a sun gauge that displays the number of night and daylight hours before sunrise and sunset. Tap the screen once, and the watch face displays the number of hours until sunset or sunrise, plus the battery life remaining, or the moon phase, which is helpful because on a full moon night you know you’ll have extra light to stay out a little longer.
“Most of the time we feel as if there isn’t enough time in the day,” Jeanette says. “But with this watch face, I can see exactly how much time I have for a run before the sun sets without having to do the math myself.”
On the Suunto 9 Baro
On Suunto 9 Baro watches – which have a barometer – the Outdoor watch face also displays an air pressure gauge along with current altitude. With two taps on the screen, a more detailed screen appears, displaying the barometric trend and, once they are 2000 m or higher, the oxygen percentage.
On the Suunto 9, Suunto 5 and Suunto 3
Rather than extra barometric info, on the Suunto 9, 5, and 3 watches, the Outdoor watch face includes a steps gauge that quickly tells users where they’re at with their daily step goal and how many calories they have burned.
To get the outdoor watch face on your Suunto 9 Baro, Suunto 9, Suunto 5 or Suunto 3, make sure you have the latest software version on your watch and then enter the watch face selection in your watch settings and choose the newly loaded face.
Read more articles
8 tools for tracking the weather with Suunto

Know your species of cloud
One of the fun activities to do in the outdoors is identifying different species of flora and fauna. It’s about more than knowing names; the process of identification brings us closer to the world around us and tells us what’s going in that habitat.
The same can be said for knowing the different species of cloud. Being able to recognise the different types of clouds and what they’re doing tells us what’s happening with the weather, and when our risk is increasing or decreasing. This is an especially important skill for those who spend a lot of time in the mountains.
We talked to Sarvesh Garimella, the chief scientist and COO at MyRadar, a Suunto partner, about the different varieties of clouds and what we should look out for when we’re planning to head into the great outdoors. A keen hiker since his field research days at university, Sarvesh has a Phd on ice clouds in the atmosphere. Who better to ask then? Here are Savesh’s 10 tips.
Click to find out more about MyRadar’s detailed local weather forecasts!
Download MyRadar Wear OS app here.
Respect the mountain
At a really high level, clouds are one type of information your surroundings are giving you. We can also look at recent weather and trail reports about an area. And one of the most important recommendations that has been echoed to me again and again is to know your limits and respect the mountain. There could be hazards you are prepared for and others you aren't prepared for. No climb or trip is worth your life. Be smart and live to climb another day.
The trend is your friend
In forecasting we like to say this phrase a lot: "the trend is your friend." If you’re just looking at what the barometer is saying in one moment that’s less informative than observing what the trend is. Or if you’re looking at a model of rain output, the model that came out an hour ago might not show as much output as the model that came out just now does. If you look at the next model an hour later it might be showing more rain. Each successive model is showing more and more rain or whatever phenomena. Whether it be simple observation of the environment or more sophisticated analysis of weather models, the trend is your friend. Just because you have a snapshot of what’s going on now that doesn’t mean you have a complete idea of what it could turn into, especially in a complex environment.
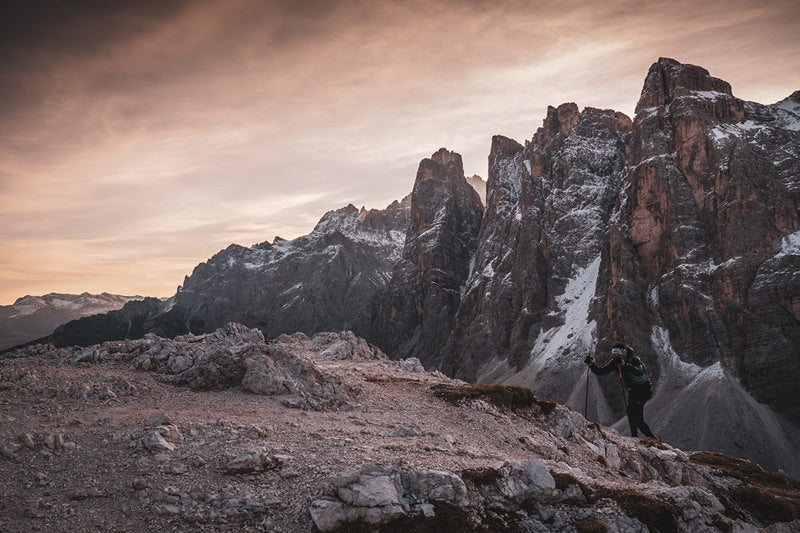
Sarvesh regularly hikes in the Pacific Northwest.
Know your cloud
The World Meteorological Organisation (WMO) has an International Cloud Atlas that consists of 10 genus of clouds within which there are many species of cloud. Within the species of clouds there are lots of different varieties. The WMO website has flow charts and guidance to help you identify what specific types of clouds you are looking at.
The big three
For most people I say there are only three types of clouds to think about. Those are the cirrus clouds, which are the wispy ice clouds that tend to be higher in the atmosphere. Most of the clouds you see that are puffy and popcorn-like are cumulus clouds, and those tend to be scattered and independent. Then you have stratus clouds, the decks of extensive, and low to medium altitude clouds. These are the low clouds that stretch out as far as you see that produce gentle spitting rain. There is a qualifier for various types of clouds: whenever you hear the word nimbus it refers to rain. Cumulonimbus clouds, for example, can turn into a thunder head. So the big three are: cirrus, cumulus, and stratus clouds.
1. Cirrus clouds
2. Cumulus clouds
3. Stratus cloud
Watch the low clouds
In addition to those three main types of clouds you can also classify clouds by their altitude. Low, medium and high clouds. It’s good to identify what could be happening in the low cloud decks versus the middle or high cloud decks. If you see there are a few wispy cirrus clouds in the morning, and then you see a few more in the afternoon, that could suggest there might be more moisture entering into the region, but it might not pose an immediate risk. But if your low cloud decks seem sketchy and visibility is poor you might like to wait another hour or two for the sun to come up to see if it burns off the fog. I’ve been on climbs where we’ve definitely had risk issues with the low or medium cloud deck, especially on Mt Rainier.
Not all clouds are bad
When I see a stratus deck that is low and consistent, with spitting rain, that’s a good sign for me because it means it’s not the nicest from a hiking standpoint, which means there is going to be less people out on the trail. Just because you see rain it doesn’t mean you are going to have a bad time.
Beware of lenticular clouds
Here's one particular example especially relevant for mountain climbing; a lenticular cloud. These are the lens shaped clouds that sit on top of mountains. They tend to form when you have moist air moving across the landscape, which gets kicked upwards by the mountain itself. They are pretty to look at, but what you have to keep in mind, especially on the leeward side of the mountain, is it means you get lots of vortex shedding from wind coming over the mountain. Pilots know to stay away from lenticular clouds because the turbulence there can be really bad. Wind risk can be more significant than any other type of hazard depending on the mountain you are on. If you see a lenticular cloud it suggests that there might be windier conditions as you get closer to the summit.
Watch for vertical extent
The thinner, wispy clouds higher up are less of an issue to look out for than low clouds. The stratus decks can produce steady, low intensity rain, but from a hazard standpoint they aren’t particularly dangerous. If you have instability in the atmosphere or the chance for developing thunderstorms, that is the sort of hazard you want to look out for. If you notice the cloud cover is significantly higher than it was first thing in the morning or the vertical extent of the clouds is increasing then its ability to start producing rain also increases.
Be aware of cooling
If you feel the air getting cool and if you can see the pressure is dropping this might be because a weather cell is moving towards your area. The up and down draughts and the rain and the cooling effects of the rain can change the weather pretty dramatically. That can be a sign of quickly changing weather. This is one of the reasons why My Radar has the precipitation nowcasts; they warn you when it sees a cell on a radar that you might not necessarily be able to pay attention to. Remember, the trend is your friend.
Read trail reports
The trail reports put out by the fire service, the AllTrails App and such are definitely important as well. Many of the hazards are only present if the trail is in a certain condition. If you have lots of wind that might be okay if you have lots of traction. But if you have ice on the ground and also gusting winds that’s another issue.
Add MyRadar Wear OS app on your Suunto 7 to get detailed local weather forecasts on your wrist.
Lead image: ©Philipp Reiter
Other images by Marc Thunis on Unsplash

Boost your hill training with SuuntoPlus Climb
Hill repeats are an essential part of an outdoor athlete’s workout repertoire. To make the hard work pay off, pacing is key. The new Climb SuuntoPlus™ feature does just that: it gives you real-time insights on your effort and motivates you to keep going.
The same goes for longer hikes, too: once you learn what kind of ascent speeds are sustainable for you, you can use this feature to pace your way up accordingly.
To use SuuntoPlus™ features on the Suunto 9 or Suunto 5, activate them before starting an activity: Select your preferred activity type and – before hitting start – go down to the options menu and select your preferred SuuntoPlus feature, like Climb. The SuuntoPlus feature you chose, will be added and available as an extra screen during the session.
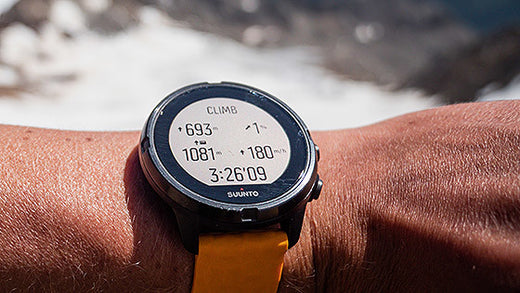
© Philipp Reiter
Top left: Ascent and climb counter
After you have activated SuuntoPlus Climb your watch will automatically detect the uphills and also create laps of them. The first climb is triggered after ascending for 10 meters.
During the climb you will see the ascent you have covered during that particular uphill on the top left on your screen. Once the climb ends, the ascent number will switch to the total number of climbs you have covered. When the next climb starts, you will again start to see the vertical meters for that individual climb.
Top right: Grade %
On the top right you have the grade of your uphill in percentages. The same goes for the downhill, too. The arrow shows the direction of the hill. The grade is based on your progress during your recent efforts.
Bottom left for running: Normalized Graded Pace
During trail running and running your running speed is shown as Normalized graded pace (NGP). Normalized graded pace is the adjusted pace, that reflects the changes in grade and intensity that contribute to the physiological cost of running on varied terrain.
Bottom left: Total vertical meters
For activity types other than running this view shows the total vertical meters covered during the activity.
Bottom right: Vertical speed
Vertical speed is a great way to pace an effort in an uphill lap. This also helps you estimate how long the climb will take for you – if you know the total ascent. The vertical speed is shown as meters per hour.
Note: SuuntoPlus Climb works best with watches that have a barometric sensor, like Suunto 9. Products without a barometer rely on GPS based altitude. This will require longer climbs as small changes in elevation may not be identified.
Lead image: © Philipp Reiter
Read more about hill repeats
7 tips to accelerating your uphill speed
Improve your running with high intensity hill repeats

Six ways to plan a route for your next adventure
An essential part of outdoor adventure is planning. The better you are at it, the smoother, safer and more relaxed your trips.
Of course, there are many aspects to planning, from understanding the topography and distances, through to knowing your group and managing rest breaks. However, knowing your route is key. When that’s sorted everything else is more likely to flow.
Whether you want to start from scratch, use an existing route or something in between, here are six different ways to create a route for your Suunto watch to guide your next adventure.
Suunto app’s route planning capabilities are very versatile. Depending on the situation you can use the most suitable option – even on the go as all these work on your mobile.
Planning a route from scratch is just one of the many route planning options on Suunto app.
Plan a route from scratch
Just opening the map and starting to draw your own route is probably the first route planning method that comes to people’s minds. Just mark the starting point and key points along the way to draw the desired route to your destination.
Tip: To help the route planning process you can choose whether you want to follow “any road or path”, “all road types”, “all road types avoiding hills”, “paved roads” or “free drawing”. Using the most suitable option will make planning more efficient.
Plan using heatmaps
Suunto Heatmaps show the tracks frequently used by Suunto community all over the globe, based on millions of activities. Turn the heatmaps on and choose the desired activity type. Suunto heatmaps are sport specific. This allows you to differentiate between activities, for example, running and trail running. Heatmaps can be on while planning routes. This enables you to see where the popular trails are.
Tip: Suunto app also has “My Tracks”, a new feature showing where you have been during the last week, month or a year. Compare your own tracks with the general heat to spot areas and trails you haven’t yet been to.
Suunto app recommends popular routes for your location.
Use popular routes on Suunto app
When browsing Suunto app’s map view, you can swipe up a menu of route recommendations: the app automatically generates popular routes for the location you have selected. Simply select an activity type, see what others have been doing and select one you like.
Tip: If you want to see more route options, zoom out or change the location for your search and tap ‘Search here’.
Use an existing activity
Would you like to do that awesome run from last year again? Or has your friend been to an interesting trail? You can use existing activities to create routes. All you need to do is tap the three dots on top right of the activity screen and select ‘Save route’. The route then opens in Suunto app’s route planner so you can name the route and sync it to your Suunto watch.
Tip: If you want to find your old activities more easily,, add a trail name, location etc in the description field. You can then search for them in your Diary on Suunto app and create routes for navigation.
You can sync routes to Suunto app from Suunto compatible route services, like Wikiloc, and get access to their planning tools and route libraries.
Sync from a partner service
Suunto app is compatible with several route planning services, like komoot, Fatmap, Wikiloc, Twonav Land, Openrunner and2bulu (in China). Connect your Suunto app account with the partner service to get routes created there to be synced with your Suunto app – and your watch. You can find thousands and thousands of routes in the partner services and also use their tools, like route libraries, desktop apps and big screen solutions. (Learn more about Suunto's partners.)
Tip: Some of our route service partners are included in Suunto Value Pack. Learn more about it here.
Import a GPX file
Have you spotted an interesting route in the media or perhaps a race organizer has offered you the race route as a GPX file? To get that route on your watch, save it in a location you can access on your phone and open it using Suunto app. (Learn how to import a GPX file on Suunto app for iOS or Android.)
Tip: You can also share or save your own routes as GPX files using Suunto app: Go to the list of your routes and click the sharing button. Then select whether you want to share the route or save the GPX file.

4 ways to navigate like a pro with a Suunto 7
We’ve all been there: you head out for a run, and it feels really good and turns into an exploratory run and before you know it you either have no idea where you are or you need to find a shortcut back because you’re running late.
No need to fumble with your phone, the Suunto 7 has your back. Read on for its four ways to find your way. All these navigation aids can be utilized during any activity type with GPS.
Suunto 7 has detailed terrain maps available for offline use.
Breadcrumbs
Like the breadcrumbs left by Hansel and Gretel, the Suunto 7 always draws the path you have travelled on a terrain map. This feature allows you to follow your tracks back to your starting point. And you don’t need to slavishly follow the exact same route back; if you like you can take a shortcut and merge back with the breadcrumb route later.
Terrain maps
To aid with this on-the-go navigation the Suunto 7 also shows you detailed terrain maps that are automatically downloaded to your watch for offline use. Suunto 7 downloads and updates local offline maps with heatmaps automatically when your watch is charging and connected to Wifi.
The downloaded map area is based on your last known location and varies from 35 km × 35 km to 50 km × 50 km (from 22 mi × 22 mi to 31 mi × 31 mi), depending on where you are located. You can also create custom offline maps for your travels and adventures away from home.
Learn more about offline maps
The more a route glows on a Heatmap, the more popular it is.
Heatmaps
Another option is to use activity-specific Heatmaps on your Suunto 7. Heatmaps are simply maps showing the most popular routes of the Suunto community. That’s really useful when you are deciding on route options or exploring a new area.
Learn how to change map style during exercise.
Create routes on Suunto app and select which ones you want to use on your Suunto 7.
Preplanned routes
Suunto 7 offers offline route navigation with detailed outdoor maps. The routes can be synced to your Suunto 7 via Bluetooth from Suunto app. You can create a route from scratch or use an existing route. Simply select which routes you want to have available on your watch on Suunto app and sync. When your Suunto 7 is charging and connected to Wifi, an offline outdoor map is downloaded for each route to your watch automatically.
You can either start navigating with a preplanned route at the beginning of a workout or later during the activity. The selected route is visible in the map view of your Suunto 7. Zoom in and out with the top and bottom buttons, or tap to see an overview of the route and get notifications if you go off path.
Learn more about Route navigation with Suunto 7
READ MORELearn six ways to create routes for your Suunto


