Activity monitoring
Suunto Traverse
measures your daily steps and estimates calories burned during the
day based on your personal settings.
Your approximate daily step count is available as a default view
in the time display. Press
VIEW
to change to the step counter view. The step count is updated
every 60 seconds.

Daily step count and calories burned are displayed under
DISPLAYS
»
Steps
. The values are reset daily at midnight.

NOTE:
Activity monitoring is based on your movement as measured by
sensors in the watch. The values provided by activity monitoring
are estimations and not intended for medical diagnostics of any
kind.
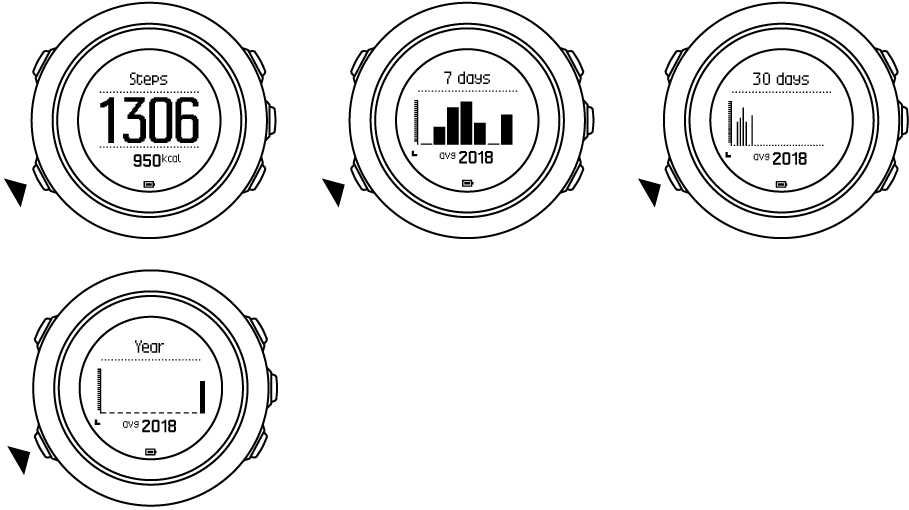
Step history
Suunto Traverse
provides a complete history of your step count. The step display
shows your daily steps, as well as an overview of weekly, monthly
and yearly trends. You can show/hide the step display from the
start menu under
DISPLAYS
»
Steps
. When activated, you can view your step history by pressing
NEXT
to scroll through active displays.
 While in the steps display, you can press
VIEW
to see your 7-day, 30-day and yearly trends.
While in the steps display, you can press
VIEW
to see your 7-day, 30-day and yearly trends.
Alti-Baro
Suunto Traverse
continuously measures absolute air pressure using the built-in
pressure sensor. Based on this measurement and reference values,
it calculates altitude or sea level air pressure.
Three profiles are available:
Automatic
,
Altimeter
and
Barometer
. For information on setting profiles, see
Matching profile to activity.
To view alti-baro information, press
NEXT
while in the time display or activate the alti-baro display from
the display menu.

You can change to different views by pressing
VIEW
.
In altimeter profile, you can see:
- altitude + temperature
- altitude + sunrise/sunset
- altitude + reference point
- 12h altitude graph + altitude
In barometer profile, you get the corresponding views:
- barometric pressure + temperature
- barometric pressure + sunrise/sunset
- barometric pressure + reference point
- 24h barometric pressure graph + barometric pressure
Sunrise and sunset time views are available when GPS has been
activated. If GPS is not active, sunrise and sunset times are
based on the last recorded GPS data.
You can show/hide the alti-baro display under the start menu.
To hide the alti-baro display:
-
While in the time display, press
START
.
-
Scroll to
DISPLAYS
with
LIGHT
and press
NEXT
.
-
Scroll to
End Alti-Baro
and press
NEXT
.
-
Keep
NEXT
pressed to exit.
Repeat the procedure and select
Alti-Baro
to show the display again.
NOTE:
If you are wearing your
Suunto Traverse
on your wrist, you will need to take it off in order to get an
accurate temperature reading because your body temperature will
affect the initial reading.
Getting correct readings
If your outdoor activity requires accurate sea level air pressure
or altitude, you need to calibrate your
Suunto Traverse
by entering either your current altitude or the current sea level
air pressure.
TIP:
Absolute air pressure and known altitude reference = sea level
air pressure. Absolute air pressure and known sea level air
pressure = altitude.
The altitude of your location can be found from most topographic
maps or Google Earth. A sea level air pressure reference for your
location can be found using the websites of national weather
services.

CAUTION:
Keep the area around the sensor free of dirt and sand. Never
insert any objects into the sensor openings.
If
FusedAlti
is activated, the altitude reading is corrected automatically
using
FusedAlti
together with altitude and sea level pressure calibration. For
more information, see
FusedAlti.
Changes in local weather conditions affect altitude readings. If
local weather changes often, it is advisable to reset the current
altitude reference value frequently, preferably before starting
your journey when the reference values are available. As long as
the local weather stays stable, you do not need to set reference
values.
To set the sea level pressure and altitude reference values:
-
Keep
NEXT
pressed to enter the options menu.
-
Scroll to
ALTI-BARO
with
LIGHT
and enter with
NEXT
.
-
Press
NEXT
to enter
Reference
.
The following setting options are available:
-
FusedAlti: GPS is switched on and the watch starts calculating
altitude based on FusedAlti.
-
Altitude
: Set your altitude manually.
-
Sea level pressure
: Set the sea level pressure reference value manually.
-
Set the reference value using
START
and
LIGHT
. Accept the setting with
NEXT
.
TIP:
When not recording an activity, press
START
in the alti-baro display to get directly to the
ALTI-BARO
menu.
Use example: Setting the altitude reference value
You’re on the second day of your two-day hike. You realize that
you forgot to switch from the barometer profile to the altimeter
profile when you started in the morning.You know that the current
altitude readings of your
Suunto Traverse
are wrong.
So, you hike to the nearest location shown on your topographic map
for which an altitude reference value is provided. You correct
your
Suunto Traverse
altitude reference value accordingly and switch to the altimeter
profile. Your altitude readings are correct again.
Matching profile to activity
The altimeter profile should be selected when your outdoor
activity involves changes in altitude (such as hiking in the
mountains).
The barometer profile should be selected when your outdoor
activity does not involve changes in altitude (such as canoeing).
To get correct readings, you need to match the profile to your
activity. You can either let
Suunto Traverse
decide a suitable profile for the activity using the automatic
profile, or choose a profile yourself.
To set the alti-baro profile:
-
Keep
NEXT
pressed to enter the options menu.
-
Scroll to
ALTI-BARO
with
LIGHT
and enter with
NEXT
.
-
Scroll to
Profile
with
START
and enter with
NEXT
.
-
Change the profile with
START
or
LIGHT
and confirm your selection with
NEXT
.
-
Keep
NEXT
pressed to exit.
Incorrect readings
If the altimeter profile is on for an extended period of time with
the device in a fixed location while the local weather changes,
the device will give incorrect altitude readings.
If you use the altimeter profile and the weather changes
frequently while you climb in altitude or go down in altitude, the
device will give you incorrect readings.
If you use the barometer profile for an extended period of time as
you climb in altitude or go down in altitude, the device assumes
that you are standing still and interprets your changes in
altitude as changes in sea level air pressure. It will therefore
give you incorrect sea level air pressure readings.
Using altimeter profile
The altimeter profile calculates altitude based on reference
values. The reference value can either be sea level air pressure
or altitude. When the altimeter profile is activated, the
altimeter icon is shown at the top of the alti-baro display.

Using barometer profile
The barometer profile shows the current sea level air pressure.
This is based on the reference values and the constantly measured
absolute air pressure.
When the barometer profile is activated, the barometer icon is
shown on the display.

Using automatic profile
The automatic profile switches between the altimeter and barometer
profiles according to your movement.
It is not possible to measure weather and altitude changes at the
same time, as both cause a change in the surrounding air pressure.
Suunto Traverse
senses vertical movement and switches to measuring altitude, when
needed. When altitude is shown, it is updated with a maximum delay
of 10 seconds.
If you are at a constant altitude (less than 5 meters of vertical
movement within 12 minutes),
Suunto Traverse
interprets all pressure changes as weather changes. The
measurement interval is 10 seconds. The altitude reading remains
steady and if the weather changes, you will see changes in the sea
level air pressure reading.
If you are moving in altitude (more than 5 meters of vertical
movement within 3 minutes),
Suunto Traverse
interprets all pressure changes as movements in altitude.
Depending on which profile is active, you can access the altimeter
or barometer in the alti-baro display with
VIEW
.
NOTE:
When you are using the automatic profile, barometer or altimeter
icons are not shown on the alto-baro display.
Autopause
Autopause pauses the recording of your activity when your speed
is less than 2 km/h (1.2 mph). When your speed increases to more
than 3 km/h (1.9 mph), the recording continues automatically.
You can turn autopause on/off for each sport mode in Movescount
under the advanced settings for the sport mode.
Backlight
Pressing
LIGHT
activates the backlight.
By default, the backlight turns on for a few seconds and turns
off automatically.
There are four backlight modes:
-
Normal
: The backlight turns on for a few seconds when you press
LIGHT
and when the alarm clock sounds. This is the default setting.
-
Off
: The backlight is not switched on by pressing a button or
when the alarm clock sounds.
-
Night
: The backlight turns on for a few seconds when you press any
button and when the alarm clock sounds.
-
Toggle
: The backlight turns on when you press
LIGHT
and stays on until you press
LIGHT
again.
You can change the general backlight setting in the watch
settings under
GENERAL
»
Tones/display
»
Backlight
.
You can adjust the backlight brightness (in percent), either in
the watch settings under
Tones/display
»
Backlight
.
TIP:
When the
BACK LAP
and
START
buttons are locked, you can still activate the backlight by
pressing
LIGHT
.
Flashlight
In addition to normal backlight modes, Traverse has one
additional mode where the backlight is automatically set to
maximum brightness and can be used as a flashlight. To activate
the flashlight, keep
LIGHT
pressed.

The flashlight stays on for about four minutes. You can turn it
off at any time by pressing
LIGHT
or
BACK LAP
.
Keeping
BACK LAP
pressed locks and unlocks buttons.

You can change the button lock behavior in the watch settings
under
GENERAL
»
Tones/display
»
Button lock
.
Your
Suunto Traverse
has two button lock options:
-
Actions only
: Start and options menus are locked.
-
All buttons
: All buttons are locked. Backlight can be activated in
Night
mode.
TIP:
Select the
Actions only
button lock setting to avoid accidentally starting or stopping
your log. When the
BACK LAP
and
START
buttons are locked, you can still change displays by pressing
NEXT
and views by pressing
VIEW
.
Compass
Suunto Traverse
has a digital compass that allows you to orient yourself in
relation to magnetic north. The tilt-compensated compass gives
you accurate readings even if the compass is not horizontally
level.
You can show/hide the compass display from the start menu
under
DISPLAYS
»
Compass
.
The default compass display includes the following
information:
- middle row: compass heading in degrees
-
bottom row: press
VIEW
to see current time, cardinal direction or empty (no value)

You can change the compass display information from the
options menu under
General
»
Formats
»
Compass unit
. Select which is the primary value in the center of the
compass display: degrees, Mils or cardinals.
The compass switches to power saving mode after one minute.
Reactivate it with
START
.
Calibrating compass
If you have not used the compass before, you must first
calibrate it. Turn and tilt the watch in multiple directions
until the watch beeps, indicating calibration is complete.

If the calibration is successful, the text
Calibration successful
is displayed. If the calibration does not succeed, the text
Calibration failed
is displayed. To retry the calibration, press
START
.
If you have already calibrated the compass and want to
re-calibrate it, you can manually start the calibration
process.
To manually start compass calibration:
-
Keep
NEXT
pressed to enter the options menu.
-
Scroll to
NAVIGATION
with
START
and enter with
NEXT
.
-
Scroll to
Settings
with
LIGHT
and select with
NEXT
.
-
Scroll to
Compass
with
LIGHT
and select with
NEXT
.
-
Press
NEXT
to select
Calibration
.
Setting declination
To ensure correct compass readings, set an accurate
declination value.
Paper maps point to true north. Compasses, however, point to
magnetic north – a region above the Earth where the Earth’s
magnetic fields pull. Because magnetic North and true North
are not at the same location, you must set the declination on
your compass. The angle in between magnetic and true north is
your declination.
The declination value appears on most maps. The location of
magnetic north changes yearly, so the most accurate and
up-to-date declination value can be obtained from the internet
(for example
www.magnetic-declination.com
).
Orienteering maps, however, are drawn in relation to magnetic
north. This means that when you are using orienteering maps
you need to turn the declination correction off by setting the
declination value to 0 degrees.
To set the declination value:
-
Keep
NEXT
pressed to enter the options menu.
-
Scroll to
NAVIGATION
with
START
and enter with
NEXT
.
-
Scroll to
Settings
with
LIGHT
and select with
NEXT
.
-
Scroll to
Compass
with
LIGHT
and select with
NEXT
.
-
Scroll to
Declination
with
LIGHT
and select with
NEXT
.
-
Turn the declination off by selecting
--
, or select
W
(west) or
E
(east). Set the declination value with
START
or
LIGHT
.

-
Press
NEXT
to accept the setting.
TIP:
You can also access the navigation menu and compass settings
by pressing
START
while navigating.
Setting bearing lock
You can mark the direction to your target in relation to North
with the bearing lock feature.
To lock a bearing:
-
With the compass active, hold the watch in front of you and
turn yourself towards your target.
-
Press
BACK LAP
to lock the current degree displayed on the watch as your
bearing.
-
An empty triangle indicates the locked bearing in relation
to the North indicator (solid triangle).
-
Press
BACK LAP
to clear the bearing lock.

NOTE:
When using the compass while recording an activity, the
BACK LAP
button only locks and clears the bearing. Exit the compass
view to make a lap with
BACK LAP
.
Countdown timer
You can set the countdown timer to count down from a preset
time to zero. You can show/hide it from the start menu under
DISPLAYS
»
Countdown
.
When activated, the countdown timer can be accessed by
pressing
NEXT
until see the display.

The default countdown time is five minutes. You can adjust
this time by pressing
VIEW
.
TIP:
You can pause/continue the countdown by pressing
START
.
NOTE:
Countdown timer is not available while activity recording
is ongoing.
Displays
Your
Suunto Traverse
comes with several different features, such as compass
(see
Compass) and stopwatch (see
Stopwatch). These are handled as displays that can be
viewed by pressing
NEXT
. Some of them are permanent, others you can show or hide
as you like.
To show/hide displays:
-
Press
START
to enter the start menu.
-
Scroll to
DISPLAYS
by pressing
LIGHT
and press
NEXT
.
-
In the list of display, toggle any feature on/off by
scrolling to it with
START
or
LIGHT
and pressing
NEXT
. Keep
NEXT
pressed to exit the displays menu if needed.
Your sport modes (see
Sport modes) also have multiple displays that you can
customize to view different information while recording an
activity.
Adjusting display contrast
Increase or decrease the display contrast of your
Suunto Traverse
in the watch settings.
To adjust the display contrast:
-
Keep
NEXT
pressed to enter the options menu.
-
Press
NEXT
to enter the
GENERAL
settings.
-
Press
NEXT
to enter
Tones/display
.
-
Scroll to
Display contrast
with
LIGHT
and enter with
NEXT
.
-
Increase the contrast with
START
, or decrease it with
LIGHT
.
-
Keep
NEXT
pressed to exit.
Inverting display color
Change the display between dark and light through the
settings in the watch.
To invert the display in the watch settings:
-
Keep
NEXT
pressed to enter the options menu.
-
Press
NEXT
to enter the
GENERAL
settings.
-
Press
NEXT
to enter
Tones/display
.
-
Scroll to
Invert display
with
START
and invert with
NEXT
.
FusedAlti
FusedAlti
TM
provides an altitude reading that is a combination of GPS
and barometric altitude. It minimizes the effect of
temporary and offset errors in the final altitude reading.
NOTE:
By default, altitude is measured with FusedAlti during
recordings that use GPS and during navigation. When GPS
is switched off, altitude is measured with the
barometric sensor.
If you do not want to use FusedAlti in altitude
measurement, set your reference value with altitude or sea
level pressure.
You can search for a new reference value with FusedAlti by
activating it in the options menu under
ALTI-BARO
»
Reference
»
FusedAlti.
In good conditions it takes 4-12 minutes for FusedAlti to
find a reference value. During that time,
Suunto Traverse
shows barometric altitude with '~' before the reading to
indicate that the altitude may not be correct.
Find back
Suunto Traverse
automatically saves the starting point of your recording
if you are using GPS. With Find back,
Suunto Traverse
can guide you directly back to your starting point (or to
the location where the GPS fix was established).
To find back:
-
Keep
NEXT
pressed to access the options menu.
-
Press
NEXT
to select
NAVIGATION
.
-
Scroll to
Find back
with
START
and select with
NEXT
.
The navigation guidance is shown as one of the views in
the breadcrumb display.
Icons

The following icons are displayed in
Suunto Traverse
:

|
alarm |

|
altimeter |

|
barometer |

|
battery |

|
Bluetooth |

|
button lock |

|
button press indicators |

|
current display |

|
down/decrease |

|
flashlight |

|
GPS signal strength |

|
heart rate |

|
highest point |

|
incoming call |

|
lowest point |

|
message/notification |

|
missed call |

|
next/confirm |

|
pairing |

|
settings |

|
sport mode |

|
storm |

|
sunrise |

|
sunset |

|
up/increase |
POI icons
The following POI icons are available in
Suunto Traverse
:

|
begin |

|
building/home |

|
camp/camping |

|
car/parking |

|
cave |

|
crossroad |

|
emergency |

|
end |

|
food/restaurant/cafe |

|
forest |

|
geocache |

|
info |

|
lodging/hostel/hotel |

|
meadow |

|
mountain/hill/valley/cliff |

|
road/trail |

|
rock |

|
sight |

|
water/waterfall/river/lake/coast |

|
waypoint |
Logbook
The logbook stores the logs of your recorded activities.
The maximum number of logs and the maximum duration of a
single log depends on how much information is recorded in
each activity. GPS accuracy (see GPS accuracy and power
saving), for example, directly impact the number and
duration of logs that can be stored.
You can view the log summary of your activity right after
you have stopped recording or through the
Logbook
under the start menu.
The information shown in the log summary is dynamic: it
changes depending on factors such as sport mode and
whether or not you used an heart rate belt or GPS. By
default, all logs include at minimum the following
information:
- sport mode name
- time
- date
- duration
- laps
If the log includes GPS data, the logbook entry includes a
view of the full route track as well as the altitude
profile of the track.
TIP:
You can see many more details of your recorded
activities in Suunto app.
To view log summary after stopping a recording:
-
Keep
START
pressed to stop and save the recording.
-
Press
NEXT
to view the log summary.
You can also view the summaries of all your recorded
sessions(logs) in the logbook. In the logbook recorded
sessions are listed according to date and time.
To view summary log in the logbook:
-
Press
START
to enter the start menu.
-
Scroll to
Logbook
with
LIGHT
and enter with
NEXT
.
-
Scroll the logs with
START
or
LIGHT
and select a log with
NEXT
.
-
Browse the summary views of the log with
NEXT
.
Memory left indicator
If more than 50 % of the logbook has not been synchronized
with Suunto app,
Suunto Traverse
displays a reminder when you enter the logbook.

The reminder is not displayed once the unsynced memory is
full and
Suunto Traverse
begins overwriting old logs.
Movescount
Movescount allows you to customize your watch to best meet
your needs.
Start by installing SuuntoLink:
-
Go to
www.suunto.com/suuntolink
.
-
Download, install and open the latest version of
SuuntoLink.
-
Follow the instructions to create your Movescount
account.
-
Go to
www.movescount.com
and log in.
NOTE:
The first time your
Suunto Traverse
is connected to Movescount, the watch settings are
transferred from the watch to your Movescount account.
The next time you connect your
Suunto Traverse
to your Movescount account, changes in settings and
sport modes you make in Movescount and in the watch are
automatically synchronized.
Navigating with GPS
Suunto Traverse
uses the Global Positioning System (GPS) to determine
your current position. GPS incorporates a set of
satellites that orbit the Earth at an altitude of 20,000
km at the speed of 4 km/s.
The built-in GPS receiver in
Suunto Traverse
is optimized for wrist use and receives data from a very
wide angle.
Getting GPS signal
Suunto Traverse
activates GPS automatically when you select a sport mode
with the GPS functionality, determine your location, or
start navigating.

NOTE:
When you activate GPS for the first time, or have not
used it for a long time, it might take longer than
usual to get a GPS fix. Subsequent GPS starts will
take less time.
TIP:
To minimize GPS initiation time, hold the watch steady
facing up and make sure you are in an open area with a
clear view of the sky.
TIP:
Regularly synchronize your
Suunto Traverse
with Suunto app to get the latest satellite orbit data
(GPS optimization). This reduces the time needed to
get the GPS fix and improves track accuracy.
Troubleshooting: No GPS signal
-
For an optimal signal, point the GPS part of the watch
upwards. The best signal can be received in an open
area with a clear view of the sky.
-
The GPS receiver usually works well inside tents and
other thin covers. However, objects, buildings, dense
vegetation or cloudy weather can reduce the GPS signal
reception quality.
-
GPS signal does not penetrate any solid constructions
or water. Therefore do not try to activate GPS inside
buildings, caves or under water.
GPS grids and position formats
Grids are lines on a map that define the coordinate
system used on the map.
Position format is the way the GPS receiver's position
is displayed on the watch. All the formats relate to the
same location, they only express it in a different way.
You can change the position format in the watch settings
in the options menu under
GENERAL
»
Formats
»
Position format
.
You can select the format from the following grids:
-
latitude/longitude is the most commonly used grid and
has three different formats:
-
WGS84 Hd.d°
-
WGS84 Hd°m.m'
-
WGS84 Hd°m's.s
-
UTM
(Universal Transverse Mercator) gives a
two-dimensional horizontal position presentation.
-
MGRS
(Military Grid Reference System) is an extension of
UTM and consists of a grid zone designator,
100,000-meter square identifier and a numerical
location.
Suunto Traverse
also supports the following local grids:
-
British (BNG)
-
Finnish (ETRS-TM35FIN)
-
Finnish (KKJ)
-
Irish (IG)
-
Swedish (RT90)
-
Swiss (CH1903)
-
UTM NAD27 Alaska
-
UTM NAD27 Conus
-
UTM NAD83
-
NZTM2000
(New Zealand)
NOTE:
Some grids cannot be used in the areas north of 84°N
and south of 80°S, or outside the countries that they
are intended for.
GPS accuracy and power saving
When customizing sport modes, you can define the GPS fix
interval using the GPS accuracy setting in Suunto
Movescount. The shorter the interval, the better the
accuracy during recording.
By increasing the interval and lowering the accuracy,
you can extend the battery life.
The GPS accuracy options are:
-
Best
: ~ 1 sec fix interval, highest power consumption
-
Good
: ~ 5 sec fix interval, moderate power consumption
-
OK
: ~ 60 sec fix interval, lowest power consumption
-
Off
: no GPS fix
You can adjust the predefined GPS accuracy of the sport
mode if needed
only
during a recording and while navigating. For instance,
if you notice you are low on battery, you could adjust
the setting to extend battery life.
Adjust GPS accuracy in the start menu under
NAVIGATION
»
Settings
»
GPS accuracy
.
GPS and GLONASS
Suunto Traverse
uses a Global Navigation Satellite System (GNSS) to
determine your location. The GNSS can use signals from
both GPS and GLONASS satellites.
By default your watch searches for GPS signals only. In
some situations and locations already the world, using
GLONASS signals can improve location accuracy. However,
keep in mind that using GLONASS consumes more battery
than using GPS only.
You can activate or deactivate GLONASS at any time, even
while recording an activity.
The activate or deactivate GLONASS:
-
Keep
NEXT
pressed to enter the options menu.
-
Scroll to
NAVIGATION
with
START
and enter with
NEXT
.
-
Scroll to
Settings
with
LIGHT
and select with
NEXT
.
-
Scroll to
GNSS
with
START
and select with
NEXT
.
-
Choose
GPS & GLONASS
to activate GLONASS. If already active, choose
GPS
to deactivate GLONASS.
-
Keep
NEXT
pressed to exit.
NOTE:
GLONASS is only used if GPS accuracy is set to best.
(See
GPS accuracy and power saving).
Notifications
If you have paired your
Suunto Traverse
with Suunto app (see
Suunto app), you can get call, message and push
notifications on the watch.

To get notifications on your watch:
-
Keep
NEXT
pressed to enter the options menu.
-
Press
LIGHT
to scroll to
CONNECTIVITY
and press
NEXT
.
-
Press
LIGHT
to scroll to
Notifications
.
-
Toggle on/off with
LIGHT
.
-
Exit by keeping
NEXT
pressed.
With notifications on, your
Suunto Traverse
gives an alert (see
Tones and vibration) and displays a notification icon
in the bottom row of the time display with each new
event.
To view notifications on your watch:
-
Press
START
to enter the start menu.
-
Scroll to
NOTIFICATIONS
with
START
and press
NEXT
.
-
Scroll through the notifications with
START
or
LIGHT
.
Up to 10 notifications can be listed. Notifications
remain in your watch until you clear them from your
mobile device. However, notifications older than one
day are hidden from view in the watch.
Recording activities
Use sport modes (see
Sport modes) to record activities and view various
information during your outing.
Out of the box,
Suunto Traverse
has has one sport mode, Hiking. Start a recording by
pressing
START
and then press
NEXT
to enter
RECORD
.
So long as there is only one sport mode in the watch,
the recording starts immediately. If you add other
sport modes, you need to select the sport mode you
want to use and then press
NEXT
to start the recording.
TIP:
You can also quickly start the recording by keeping
START
pressed.
Pairing heart rate sensor
Pairing procedures may vary depending on the heart
rate (HR) sensor type. Please refer to the user
guide for the device you are pairing with your
Suunto Traverse
before continuing.
To pair a heart rate sensor:
- Activate heart rate sensor.
-
Keep
NEXT
pressed to enter the options menu.
-
Scroll to
CONNECTIVITY
with
LIGHT
and select with
NEXT
.
-
Press
NEXT
again to enter
Pair
.
-
Scroll to
HR belt
with
LIGHT
and press
NEXT
.
-
Hold your
Suunto Traverse
close to the device you are pairing and wait for
Suunto Traverse
to notify that pairing was successful.
Points of interest
Suunto Traverse
includes GPS navigation which allows you to navigate
to a pre-defined destination stored as a point of
interest (POI).
NOTE:
You can also start navigating to a POI when you
are recording an activity (see
Recording activities).
To navigate to a POI:
-
Press
START
to enter the start menu.
-
Scroll to
NAVIGATION
with
START
and press
NEXT
.
-
Scroll to
POIs (Points of interest)
using
LIGHT
and press
NEXT
.
-
Scroll to the POI you wish to navigate to with
START
or
LIGHT
and select with
NEXT
.
-
Press
NEXT
again to select
Navigate
. If you are using the compass for the first time,
you need to calibrate it (see
Calibrating compass). After activating the
compass, the watch starts searching for a GPS
signal. All navigating is recorded. If your watch
has more than one sport mode, you are prompted to
select one.
- Start navigating to the POI.
The watch displays the breadcrumb display, showing
your position and the position of the POI.
By pressing
VIEW
you can access additional guidance:
-
distance and direction to POI in straight line
-
distance to POI and estimated time en route based
on your current speed,
-
difference between your current altitude and the
POI altitude

When stationary or moving slowly (<4 km/h), the
watch shows you the direction to the POI (or
waypoint if navigating a route) based on the compass
bearing.
While moving (>4 km/h), the watch shows you the
direction to the POI (or waypoint if navigating a
route) based on GPS.
The direction to your target, or bearing, is shown
with the empty triangle. Your direction of travel,
or heading, is indicated by the solid lines at the
top of the display. Aligning these two ensures you
are moving in the correct direction.

Checking your location
Suunto Traverse
allows you to check the coordinates of your current
location using GPS.
To check your location:
-
Press
START
to enter the start menu.
-
Scroll to
NAVIGATION
with
START
and press
NEXT
.
-
Scroll to
Location
with
LIGHT
and press
NEXT
.
-
Press
NEXT
to select
Current
.
-
The watch starts searching for a GPS signal and
displays
GPS found
after acquiring the signal. After that your
current coordinates are shown on the display.
TIP:
You can also check your location while you are
recording an activity by keeping
NEXT
pressed to access
NAVIGATION
in the options menu or by pressing
START
while in the breadcrumb display.
Adding a POI
Suunto Traverse
allows you to save your current location or define a
location as a POI.
You can store up to 250 POIs in the watch.
When adding a POI, select a POI type (icon) and POI
name from a predefined list.
To save a POI:
-
Press
START
to enter the start menu.
-
Scroll to
NAVIGATION
with
START
and press
NEXT
.
-
Scroll to
Location
with
LIGHT
and press
NEXT
.
-
Select
Current
or select
Define
to manually change longitude and latitude values.
-
Press
START
to save the location.
-
Select a suitable name for the location. Scroll
through the name options with
START
or
LIGHT
. Select a name with
NEXT
.
-
Press
START
to save the POI.
TIP:
You can quickly save your current location as a
POI by keeping
VIEW
pressed. This can be done from any display.
Deleting a POI
You can delete a POI directly in the watch.
To delete a POI:
-
Press
START
to enter the start menu.
-
Scroll to
NAVIGATION
with
START
and press
NEXT
.
-
Scroll to
POIs (Points of interest)
with
LIGHT
and press
NEXT
.
-
Scroll to the POI you wish to delete with
START
or
LIGHT
and select with
NEXT
.
-
Scroll to
Delete
with
START
and press
NEXT
.
-
Press
START
to confirm.
Routes
You can create a route in Movescount, or import a
route created with another service.
To add a route:
-
Go to
www.movescount.com
and log in.
-
Sync your
Suunto Traverse
with Movescount using Suuntolink and the supplied
USB cable.
Routes could also be deleted through Movescount.
Navigating a route
You can navigate a route you have transferred to
your
Suunto Traverse
from Movescount (see 3.20 Routes) or from a log in
your logbook with GPS data. You get a preview of the
route based on the route list or logbook selection.
If you are using the compass for the first time, you
need to calibrate it (see
Calibrating compass). After activating the compass,
the watch will begin searching for a GPS signal.
After the watch acquires a GPS signal, you can begin
to navigate a route.
To navigate a route:
-
Press
START
to enter the start menu.
-
Scroll to
NAVIGATION
with
START
and press
NEXT
.
-
Scroll to
Routes
or
NAVIGATION
and press
NEXT
to enter .
-
Scroll to the route you want to navigate with
START
or
LIGHT
and press
NEXT
.
-
Press
NEXT
to select
Navigate
. All navigating is recorded. If you watch has
more than one sport mode, you are prompted to
select one.
-
Select
Forwards
or
Backwards
to chose the direction you want to navigate (from
the first waypoint or the last).

-
Start navigating. The watch informs you when you
are approaching the beginning of the route.

-
The watch informs you when you have arrived at
your destination.
TIP:
You can also start navigating while recording an
activity (see
Recording activities).
During navigation
During navigation, press
VIEW
to scroll the following views:
- full track view showing the whole route
-
zoomed-in track view of the route: by default, the
zoomed-in view is scaled to a 100 m (0.1 mi)
scale; the scale is larger if you are far away
from the route
Track view
The full track view shows you the following
information:
-
(1) arrow indicating your location and pointing to
the direction of your heading.
- (2) the beginning and end of the route
- (3) The closest POI is shown as an icon.
- (4) scale of the track view

NOTE:
In the full track view the north is always up.
Map orientation
You can change the map orientation in the options
menu under
NAVIGATION
»
Settings
»
Map
»
Orientation
.
-
Heading up
: Displays the zoomed-in map with the heading
pointing up.
-
North up
: Displays the zoomed-in map with the north
pointing up.
Ascent profile view
The ascent profile view shows you the following
information:
- Remaining ascent
- Real-time altitude profile graph
- Remaining descent

If you veer too far off the route track, the profile
graph is not updated. Instead, the text
Off route
is shown below the graph. You need to return to the
track to get accurate ascent calculations.
To access the service menu, keep
BACK LAP
and
START
pressed simultaneously until the watch enters the
service menu.

The service menu includes the following items:
-
Info
:
-
Air pressure
: shows the current absolute air pressure and
temperature.
-
Version
: shows the current software and hardware
version.
-
BLE
: shows the current Bluetooth Smart version.
-
Display
:
-
LCD test
: allows you to test that the LCD works
properly.
-
ACTION
:
-
Power off
: allows you to put the watch into deep sleep.
-
GPS reset
: allows you to reset GPS.
NOTE:
Power off
is a low power state. Follow the normal startup
procedure to wake up the device. All settings
except time and date are maintained. Just confirm
them through the startup wizard.
NOTE:
The watch switches to power saving mode when it is
static for 10 minutes. The watch re-activates when
moved.
NOTE:
Service menu content is subject to change without
notice during updates.
Resetting GPS
In case the GPS unit cannot find a signal, you can
reset GPS data in the service menu.
To reset GPS:
-
In the service menu, scroll to
ACTION
with
LIGHT
and enter with
NEXT
.
-
Press
LIGHT
to scroll to
GPS reset
and enter with
NEXT
.
-
Press
START
to confirm GPS reset, or press
LIGHT
to cancel.
NOTE:
Resetting GPS resets GPS data and compass
calibration values. Saved logs are not removed.
Sport modes
Sport modes are your way to customize how
activities are recorded. Different information is
shown on the displays while recording depending on
the sport mode.
Suunto Traverse
comes with a predefined sport mode for hiking.
In Suunto Movescount you can create custom sport
modes, edit the predefined sport mode, delete
sport modes, or simply hide them so that they are
not shown in your
RECORD
menu (see
Recording activities).
A custom sport mode can contain up to four
displays. You can choose which data appears on
each display from a comprehensive list of options.
You can transfer up to five sport modes created in
Movescount to your
Suunto Traverse
.
Stopwatch
The stopwatch is a display that can be turned on
or off from the start menu.
To activate the stopwatch:
-
Press
START
to enter the start menu.
-
Scroll to
DISPLAYS
with
LIGHT
and press
NEXT
.
-
Scroll to
Stopwatch
with
LIGHT
and press
NEXT
.
When activated, the timer can be accessed by
pressing
NEXT
until the timer appears.

NOTE:
The stopwatch is not visible while recording an
activity.
To use the stopwatch:
-
In the activated stopwatch display, press
START
to start measuring time.
-
Press
BACK LAP
to make a lap, or press
START
to pause the stopwatch. To view the lap times,
press
BACK LAP
when the stopwatch is paused.
-
Press
START
to continue.
-
To reset the time, keep
START
pressed when the stopwatch is paused.
While the stopwatch is running, you can:
-
press
VIEW
to switch between the time and lap time shown on
the bottom row of the display.
-
switch to Time display with
NEXT
.
-
enter the options menu by keeping
NEXT
pressed.
If you no longer want to see the stopwatch
display, deactivate the stopwatch.
To hide the stopwatch:
-
Press
START
to enter the start menu.
-
Scroll to
DISPLAYS
with
LIGHT
and press
NEXT
.
-
Scroll to
End stopwatch
with
LIGHT
and press
NEXT
.
Suunto app
With the Suunto app, you can further enrich your
Suunto Traverse
experience by analyzing and sharing your
trainings, connecting to partners and much more.
Pair with the mobile app to get notifications on
your
Suunto Traverse
.
To pair your watch with Suunto app:
-
Download and install Suunto app on your
compatible mobile device from the App Store,
Google Play in addition to several popular app
stores in China.
-
Start Suunto app and turn on Bluetooth if it is
not on already.
-
On your watch, keep
Next
pressed to enter the options menu.
-
Scroll to
PAIR
with
Light Lock
and select with
Next
-
Press
Next
to select
MobileApp
.
-
Return to the app and tap the watch icon in the
upper left corner of the screen. When the name
of the watch appears, tap PAIR.
-
Enter the passkey shown on your watch display
into the paring request field on your mobile
device and tap PAIR to finalize the connection.
NOTE:
Some features require an internet connection
over Wi-Fi or mobile network. Carrier data
connection fees may apply.
Syncing with mobile app
If you have paired your
Suunto Traverse
with Suunto app, all your new training sessions
are automatically synced when the Bluetooth
connection is active and in working range. The
Bluetooth icon on your
Suunto Traverse
flashes when data is being synced.
If your mobile device has an active data
connection and Bluetooth is on, logs are synced
with Suunto app when automatic syncing is on. If
there is no data connection, syncing is delayed
until a connection is available.
This default setting can be changed from the
options menu if you have paired your watch with
the mobile app.
To turn off automatic syncing:
-
Keep
NEXT
pressed to enter the options menu.
-
Scroll to
CONNECTIVITY
with
LIGHT
and select with
NEXT
.
-
Press
NEXT
again to enter the
MobileApp sync
setting.
-
Toggle off with
LIGHT
and keep
NEXT
pressed to exit.
When automatic syncing is off, you cannot get or
view notifications on your watch.
Suunto Apps
Suunto Apps allow you to further customize your
Suunto Traverse
. Visit Suunto App Zone under Community in
Movescount.com to find Apps, such as various
timers and counters, available for your use. If
you cannot find what you need, create your own App
with Suunto App Designer. You can create Apps, for
example, for calculating your estimated marathon
result, or the slope grade of your skiing route.
NOTE:
Suunto Apps in Movescount refers to apps you can
use in your watch. Not to be confused with
Suunto app which is a mobile app used for
analyzing and sharing your trainings, connecting
to partners and much more.
To add Suunto Apps to your
Suunto Traverse
:
-
Go to the
App zone
section in Movescount community to browse
existing Suunto Apps. To create your own App,
select
App Designer
.
-
Add Suunto App to a sport mode. Connect your
Suunto Traverse
to your Movescount account to synchronize Suunto
App to the watch. The added Suunto App will show
the result of its calculation while you
exercise.
NOTE:
You can add up to five Suunto Apps to each sport
mode.
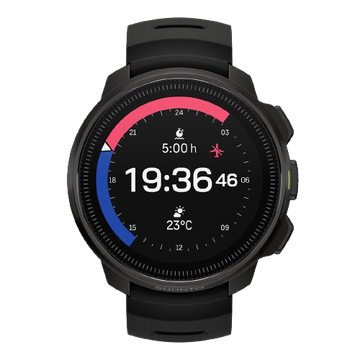
Time
The time display on your
Suunto Traverse
shows the following information:
- top row: date
- middle row: time
-
bottom row: change with
VIEW
to show additional information such as
sunrise/sunset, altitude and battery level.
In the options menu under
GENERAL
»
Time/date
, you can set the following:
- Dual time
- Alarm
- Time and date
Alarm clock
You can use your
Suunto Traverse
as an alarm clock. Turn the alarm on/off and set
the alarm time in the options menu under
GENERAL
»
Time/date
»
Alarm
.
When the alarm is switched on, the alarm symbol
is shown on most of the displays.
When the alarm sounds, you can:
-
Snooze by pressing
LIGHT
. The alarm stops and restarts every five
minutes until you stop it. You can snooze up
to 12 times for a total of one hour.
-
Stop by pressing
START
. The alarm stops and restarts the same time
the following day, unless you switch the alarm
off in the options menu.

NOTE:
When snoozing, the alarm icon blinks in the
time display.
Time syncing
Your
Suunto Traverse
time can be updated through your mobile phone,
computer (Suuntolink) or GPS time.
When you connect your watch to the computer with
the USB cable, Suuntolink by default updates
your watch time and date according to the
computer clock.
GPS time
GPS time corrects the offset between your
Suunto Traverse
and the GPS time. GPS time checks and corrects
the time whenever a GPS fix is found (for
example when recording an activity, or saving a
POI).
GPS time is on by default. You can turn it off
in the options menu under
GENERAL
»
Time/date
»
Time & date
.
Daylight Saving Time
Suunto Traverse
supports Daylight Saving Time (DST) time
adjustments if GPS time is on
You can adjust the Daylight Saving Time setting
in the options menu under
GENERAL
»
Time/date
»
Time & date
.
There are three settings available:
-
Automatic
– automatic DST adjustment based on GPS
location
-
Winter time
– always winter time (no DST)
-
Summer time
– always summer time
Tones and vibration
Tones and vibration alerts are used for
notifications, alarms and other key events. Both
can be adjusted separately in the options menu
under
GENERAL
»
Tones/display
»
Tones
or
Vibration
.
For each alert type, you can select from the
following options:
-
All on
: all events trigger tones/vibration
-
All off
: no events trigger tones/vibration
-
Buttons off
: all events other than pushing buttons
trigger tones/vibration
Track back
With
Suunto Traverse
you can retrace your route any time during a
recording with the help of the breadcrumb
display.
You can also navigate a track from the logbook
with recorded activities that include GPS data.
Follow the same procedure as in
Navigating a route. Scroll to
Logbook
instead of
Routes
, and select a log to start navigating.
Weather indicators
In addition to the barometer graph (see
Using barometer profile),
Suunto Traverse
has two weather indicators: weather trend and
storm alarm.
The weather trend indicator is displayed as a
view in the time display, providing you a quick
way to check weather changes.

The weather trend indicator is comprised of two
lines forming an arrow. Each line represents a
3-hour period. A change in barometric pressure
greater than 2 hPa (0.59 inHg) over three hours
triggers a change the direction of the arrow.
For example:

|
pressure dropping heavily over the last
six hours
|

|
pressure was steady, but rising heavily
over the last three hours
|

|
pressure was rising heavily, but dropping
heavily over the last three hours
|
Storm alarm
A significant drop in barometric pressure
typically means a storm is coming and you should
take cover. When the storm alarm is active,
Suunto Traverse
sounds an alarm and flashes a storm symbol when
the pressure drops 4 hPa (0.12 inHg) or more
during a 3-hour period.
The storm alarm is off by default. You can turn
it on in the options menu under
GENERAL
»
Alerts
»
Storm alarm
.
NOTE:
The storm alarm does not work if you have
altimeter profile activated.
When a storm alarm sounds, pressing any button
ends the alarm. If no button is pressed, the
alarm repeats once after five minutes. The storm
symbol remains on the display until the weather
conditions stabilize (pressure drop slows down).
A special lap (called 'storm alarm') is
generated when a storm alarm occurs while
recording an activity.